
Animate a melting object in Carrara
by karamela
A tutorial for creating melting object in Carrara, a Mac 3D visualization software, with Morph Targets.
What's the best way to animate a melting object?
Creating editable, non-destructive animation methods for organic object is critical to reducing time and headaches. Carrara (a 3D graphics program for Mac) provides an excellent tool with its Morph Target controls. To maximize the organic process of a melting ice cube, you'll create individual Morph Targets that can then be controlled with sliders, blended together and even edited non-destructively. Edits made to Morph Targets are automatically applied across the entire animation. This technique can be very usefull in many motion graphic or animations projects.
01 Prepare the base object
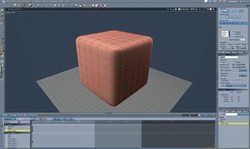
In a new scene, select Insert > Plane. Hold [U] and drag from the Centre of the plane to increase its size. Click Vertex Object in the top toolbar, then click in the centre of the plane to enter the object. From the preset primitives in the toolbar, select a Cube and insert by clicking in the centre of the plane. Reduce the Cube's subdivisions to 6 by pressing [-] twice. Click [Return] to finish. Press [Ctrl/Cmd] + [A] to select all. Select Model > Smooth Edges and accept the default settings. Under the Properties Tray's Model tab, set Subdivision to Smooth and both Modeling Level and Rendering Level to 2.
 Preparing Ice Cube |
02 Create the first Morph Target
Under the Morph tab, click Create to designate the whole object as a candidate for morphing. Type Ice Cube into the Current Area field. With Ice Cube highlighted in the Morph Area List, click the menu item to the right. Choose Create Target; in the New Target Name dialog, type Full Water. In the Full Water parameter that appears click Edit. Flatten and expand the cube, then lower it to the floor so it's a flat shape on the floor. Remodel the shape to create gentle undulations around the perimeter, resembling a puddle. Click Valid to accept the morph.
 Model a Full Water |
03 Create additional targets
Repeat step 2 twice to create two additional Morph Targets: name them Partial Melt and Lumps. Model the former to look like it's started melting and the latter so that it looks like a very slightly melted cube. Once you're done, click Finish Editing in the top toolbar and select the Vertex Object ice cube. In the Properties panel > General tab, choose the Ice Cube Morph Area List item. When highlighted, the newly created Morph Targets appear with active slider controls underneath. Adjust and keyframe the melt over time.
 Model partial melt |
04 All done
That's it, you have just created your melting Ice Cube object and animated it with Carrara and Morph Targets tool sets.
 Finished |
You might also like
DSLR camera for filmmakingWhen it is all said and done DSLR's are a great, cost effective way for amate...
Maxwell Render 2Next limit's latest release introduces many new features, as well as welcome ...

 Film Clapperboardon 04/25/2013
 Mountain bike suspension forkson 04/14/2013
 DSLR camera for filmmakingon 03/03/2013
 Differences between freeride and downhill bikeon 11/01/2011
Comments