How to Clean a Computer Keyboard

by JoHarrington

All kinds of things fall in the cracks between your sweat coated keys. So how do you safely clean your PC's keyboard?

It was a natural progression. After writing about the best ways to clean your computer's innards, screen and software, then the keyboard had to be next.

Look down now at your own key pad. It's disgusting when you really pay attention to it. The keys are covered in grime, all of the sweat from your fingers over time mixing with dust. Worst case scenario, something got spilled onto it.

Pick your keyboard up and turn it upside down. Give it a shake.

PC Keyboards Naturally Trap Bits Between the Keys

Image: The gunk after a keyboard shaking.
Jo Harrington

Always a bit scary that one, as the desk becomes coated in dried crumbs, finger-nails, ash, shreds of tobacco, hair and whatever else slipped inside.

I think it's time we learned all of the ways that a keyboard can be cleaned, if only to prolong its life. 

There are several ways to do it, some more thorough than others.  I'll endeavor to present them all for your choice.  Scroll to the end for one that's adventurous, thorough and free.

What's Inside Your Keyboard?

A rubber membrane protects the electronics underneath. This traps 90% of the dust and grime getting inside.
Image:  Under the lid of a keyboard.
Image: Under the lid of a keyboard.
Jo Harrington

Before you start cleaning your computer's keyboard, it's better to know what you're actually dealing with here.

Keyboards are a little like a layer cake.  The top and bottom are hard plastic.  This is what you can see and what ends up covered in grime. The base of this collects the bigger foreign objects, like hair and crumbs.

Beneath the keys is a second layer, made of silicon or rubber, accessible only when each key is depressed. Bits of fine dust can trickle through, but you are unlikely to find large pieces down here.  To be there, they've literally had to go through the mill.  This dust is ground by the motion of the keys.

This rubber mat is protecting the important part of your keyboard's make up.  Underneath it are three electrical panels, each carrying your typed commands into your computer's software.  You do not want this section to come into contact with liquids.

Finally there's a hard plastic base, in which screws hold the whole thing together.

Cleaning Method One: Prevention!

The best way to keep your keyboard clean and tidy is to not let anything fall in there in the first place.

A silicone (or plastic) keyboard skin adds yet another layer. This time it's above your keys, meaning that nothing can fall down between the cracks.

You type with it still in place, only removing it when the skin becomes dirty.

Then it's a quick shake into the rubbish bin or, if it's really filthy, take it to a sink and give it a good clean with soap and water.

Once it's completely dry, replace it on the keyboard and you're good to go again!

Buy a Keyboard Skin!

Universal PC Computer Desktop Keyboard Skin Protector Cover

keep Dirt, Food particles, Dust, Hairs / Dandruff, Sweat, Ketchup,similar liquids, Sand, Spills, Finger oils, Key wear out; Easy to install, simply place over the keyboard and m...

View on Amazon

Universal Silicone Keyboard Protector Skin for Laptops Notebooks 15" 15.6" 16" 16.4" 17" 17.1" 17...

Laptop Keyboard skin protector cover. Ultra thin and highly transparent - doesn't affect typing. Made of durable flexible non-slip polyurethane - provides ultra comfortable feel...

View on Amazon

Cleaning Method Two: The Brush!

For only lightly soiled keyboards, this one is the best option.
Image:  Cleaning a keyboard with a brush.
Image: Cleaning a keyboard with a brush.
Jo Harrington

Don't you love Wizzley articles that have you pause mid-sentence, to take a photograph of yourself brushing the keyboard that you are currently using?

For keyboards that merely have a few dust bunnies trapped between the keys, then you don't need to go any further than a brush.

There are bespoke brushes that do this (I'm using one in the picture), but you can get exactly the same effect using an old (and dry!) toothbrush or any hard bristle dusting brush.  You could even use the pastry brush that you bought for cleaning out the inside of your computer.

You press the bristles between the keys and sweep towards the edges of your keyboard. The bits trapped inside come loose and end up scattered all over your desk.

It's quick and efficient, as far as it goes, but this isn't deep cleaning. Neither is it making your keyboard any more sanitary.  You've probably got more germs crawling over the plastic keys under your fingertips, than you have in the toilet bowl.  Did you think of that before you helped yourself to another biscuit while typing?

Treat Yourself to a Keyboard and Computer Brush

Buy one of these to have something handy to knock out dust bunnies as they arrive.

Warning! For all of the methods that follow, please ensure that your keyboard is unplugged.  This is for your own safety, as electric shocks often hurt.  Thank you!

Cleaning Method Three: The Wipes and Swabs!

This is the way to go for blasting the germs and combating the caked and clinging grime.

Some dust is just not leaving your keyboard with a sweep of a brush.  This is when you need to apply some sort of cleaner. 

There are so many things that you can use, though it's best to remember that you will be touching this with your finger-tips later.  Anything that irritates skin is out immediately.

A quick survey of my friends has thrown up rubbing alcohol (but not containing ethyl, as that can remove the letters from your keys), soapy water, denture cleaner, mild disinfectant sprays and actual keyboard cleaner. 

Just use your common sense.  What would you clean a plastic cup with, if a child was going to drink from it later?  Anything stronger than that, you don't want to use.

Image: Wiping a keyboard with a paper towel.
Jo Harrington.

Yes, I have swopped keyboards.  I'm using the first one to type this!

Apply a small amount of cleaner to a paper towel or cloth.  Don't spray it directly onto the keyboard, as that may drip down.  Ensure that your napkin isn't dripping, but just moist.  Use that to wipe over the keys and bigger sections of your keyboard. 

Obviously, if you have keyboard wipes, don't bother with any of this.  Just use the wipes.

Image:  Using a cotton wool swab to clean a PC keyboard.
Image: Using a cotton wool swab to clean a PC keyboard.
Jo Harrington.

None of this is going to help with the grime caked to the sides of your keys.  That's when you moisten a cotton wool swab and get to work there.

All of this will sanitize your keyboard, but it's not really getting at the amassed dirt underneath your keys, nor that on the rubber membrane.  It's also reasonably labor intensive.

Some Products Formulated for Cleaning Keyboard Keys

Cyber Clean 25055 Home & Office Pop-up Cup - 5.11 oz. (145g)

Cyber Clean Home & Office Pop-up Cup is a patented high tech cleaning compound. It is non-toxic and biodegradable. This amazing Swiss formula is a cleaning compound designed to ...

View on Amazon

3M Keyboard cleaner kit, White (674)

The 3M Keyboard cleaner kit has a scrubbing tool designed to remove dirt from keys and fits into hard-to-reach places on keyboards, fax machines, etc. It also has a cleaning sol...

View on Amazon

Fellowes CRC 22020 Deluxe Laptop Cleaning Kit

The FellowesDeluxe Laptop Cleaning Kit keeps your laptop and surrounding area sparkling clean. Includes 25ml cleaning spray to remove dust and dirt, a gentle micro fiber cloth t...

View on Amazon

Cleaning Method Four: Popping The Keys!

You might not realise how easy it is to simply take the keys off. Then you have access to the gunk underneath!
Image: Taking the keys off a computer keyboard.
Jo Harrington

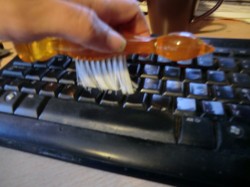
Let me give you a moment to finish recoiling in horror at what lurks behind the keys in that photograph.  Then another for the realization to sink in that your keyboard probably looks the same.

It is very easy to remove the keys from a computer's keyboard.  I'm using a screwdriver in the picture, but that is overkill.  All you need is a slight bit of leverage. A dinner knife would cover it.  On some laptop key pads, your finger-nail will do it.

Just find a corner, slide your knife or nail underneath and lever it up. The whole key should just pop right out.  If not, then try another corner.  Be gentle, as the mechanism holding them in place is plastic.  Too much pressure and you'll have it snapping.

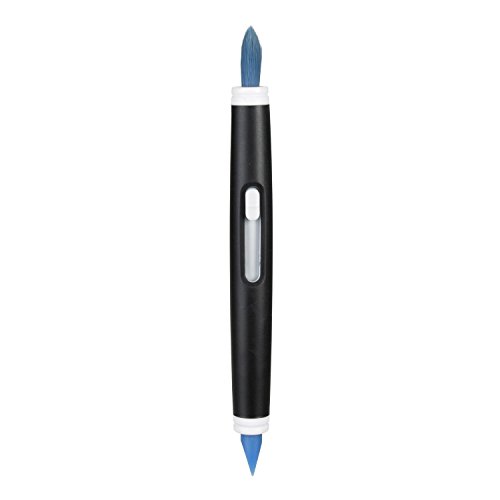
Once they're out, then shake away the gunk; or use your brush or vacuum cleaner on it.  By all means use wipes or cleaners, but be aware that each gap there is exposing the rubber membrane. Try not to get that wet.

You can clean your keys in a sink with some soapy water.  They're only plastic.  But ensure that they're bone dry (perhaps leave them airing for a day to make absolutely certain) before slotting them back into place.

Oops!  You don't know where to put them back!  The wise people take a photograph of their keyboard before removing a thing.  But there's a standard lay-out. The image below should point to the most common keys.

Cleaning Method Five: Into the Dishwasher or Sink!

You think I'm joking, don't you? I did say that the final method would be more adventurous!

Look again at what a keyboard is.  All the parts getting dirty are above the electronics. Once you remove that section, all you are left with is plastic, metal and rubber.

Since when did you need anything too specialized to clean those?

But first we need to remove the electronics.  Time for me to grab keyboard number three (on account of the last one sitting there with no keys in it).

Turn it over and you will find the screws holding the casing together.  Mine requires a Philips head screwdriver to remove them.  There were eight different screws.  Take care not to lose any of them!

Once you've unscrewed the back, then the whole thing should just come apart.  If not, look for any plastic catches, or simply grab a leg and pull. 

Now that it's in two pieces, gently lift the rubber membrane and shake it out into the bin.  Then dump the mat itself into the washing up bowl.

Image:  Keyboard's rubber membrane in the washing up bowl.
Image: Keyboard's rubber membrane in the washing up bowl.
Jo Harrington.

All that confronts you now cannot be safely cleaned; but nor should it need to be.  This section has been protected by all that sat above it.

Look for any screws holding the electrical panels to the bottom part of the casing.  There should only be two or three important ones, as you can take this out all in one piece.

Image: Taking the electronic part out of a keyboard.
Jo Harrington
Image: Taking the electrical panel away from a keyboard.
Jo Harrington

Once that part is safely stashed somewhere else, you now have the two halves of the plastic casing.

I've repeatedly heard that the most effective way of cleaning them is to place them onto the top shelf of a dishwasher.  Set it to no heat dry, as that might melt or warp it.  Off you go!  Some people also remove the keys and pop them into a mesh bag, also placed into the dishwasher, for the most thorough clean ever.

Again, wait a day to make sure that it's all bone dry, then screw it all back together again for a keyboard that is as good as new.

I've never done this for the simple reason that I don't own a dishwasher.  You can be certain that I would use this method if I did.

I have a choice between two variants.  One is to shove the casing into the shower; and the other is to put it into the washing up bowl.

Image: Keyboard in the sink.
Jo Harrington.
Image:  The parts that I didn't wash in the sink.
Image: The parts that I didn't wash in the sink.
Jo Harrington.
Image: Keyboard on the draining board.
Jo Harrington.

Happy Keyboard Cleaning!

You have had five different methods for cleaning your keyboard here.  They each have their pros and cons, with the latter two being more labor intensive and the last meaning you have no keyboard for 24 hours.

Mixing and matching should give you a method to suit your own needs.  If you have any questions, then just ask away in the comments.

Keyboard Cleaners on eBay

Now you have a clean keyboard, how about the rest?

PC monitors are expensive items. You do not want to be squirting household cleaning products all over them.
Computer housework is often forgotten, until the whole thing grinds to a chugging halt. A free, powerful piece of software helps clean out the gunk.
The grills on your PC let out the heat, but they also attract dust and dirt. Too much of that and everything will grind to a halt.
Updated: 03/09/2014, JoHarrington
 
Thank you! Would you like to post a comment now?
21

Comments

Only logged-in users are allowed to comment. Login
dan on 04/21/2016

sah duuudde

Dan Townshend on 04/21/2016

THIS GAMES GRAPHICS IS MORE SCARY THAN SOME FUCK'D SHIT I SAW WHEN I WAS BACK IN 'NAM!!

Dan Townshend on 04/21/2016

IM JOKING M8

Dan Townshend on 04/21/2016

wtf even is this 1999 bullshit. DIE

ur nan on 04/21/2016

kys

JoHarrington on 04/24/2014

Aww! Thank you. Happy keyboard cleaning!

ologsinquito on 04/23/2014

What a great article. My own keyboard is definitely due for a cleaning. I never thought of what would happen if I simply held my computer upside down and shook it. Voted up and pinned.

JoHarrington on 01/10/2013

You will notice from those photographs that the only keyboard which I didn't clean was the black one. A couple of weeks ago, my space bar started to stick, so I opened it up. Let's just say that it was WELL overdue a good clean out. I'm amazed any key still depressed!

Pinkchic18 on 01/10/2013

Oh boy, I didn't realize how dirty my keyboard was until I looked down. Funny, because you and I have the same black keyboard. Ishy.

JoHarrington on 12/15/2012

The toilet seat gets cleaned regularly! As for the keyboard, I know that I'll sit here typing, then picking up my sandwich or eating a bag of crisps.

What you don't know can't hurt you, and all that. Until I come along with pictures!


You might also like

How to Dust a Computer

The grills on your PC let out the heat, but they also attract dust and dirt. ...

How to Clean a Computer Screen

PC monitors are expensive items. You do not want to be squirting household cl...


Disclosure: This page generates income for authors based on affiliate relationships with our partners, including Amazon, Google and others.
Loading ...
Error!