Forget paying crazy high prices to have nail designs painted on when you can do it at home for a fraction of the cost. Money is tight in everyone's budget, but having your nails look fun and fancy is not something you need to skip.

How to create a Ladybug Nail Design
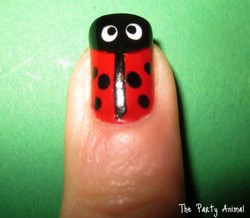
Have some fun and celebrate Spring with this adorable Ladybug Nail Design you can easily do yourself.

Creating a Ladybug Nail Design like I did in the photo above is so easy to do. Not only does it look adorable, but it screams springtime to me.
You can create the same design in just 7 EASY steps and I am going to share those with you right here.
What you will need to create your Ladybug Nail Designs
To create your Ladybug Nail design you will need the following:
- Red Nail Polish - You can really use any shade of red you like, I chose to go with a brighter shade of red I had on hand. Of course you can make your Ladybug any color you want too - it is your option. I think a Pink Ladybug would be cute too.
- Black Nail Polish - this is used for the spots and head of your Ladybug
- Black Art Deco Polish - If you do not have a thin paint brush then I recommend using one of these. It is just nail polish that comes with a thin brush that allows you to do thin lines, that is what I used.
- White Nail Polish - This is used to make your Ladybug's Eyes.
- Nail Dotting Tools - These come in very handy when you are creating your spots and eyes for your Ladybug. If you do not have one can you can always use a toothpick to make them, but they may not come out as round.
- Clear Top Coat - This will protect your nail design and also provide you with a nice shine.
- Nail Polish Remover and Q-Tips for edge clean up
Some other items you can use that may be helpful for you is instead of the Black Nail Polish and Black Art Deco Polish is to use a Black Nail Art Pen.Also if you find you do not have a steady hand to create your Ladybug's head you can use French Manicure Guide Stickers - you just place these at the tips of your nails and it is a fool proof way to get the ladybug head done with no mess ups.


7 EASY steps to create a Ladybug Nail Design
Step 1: Polish your Nails with your Red Nail Polish - usually 2 coats is best. Let dry.
Step 2: Using your Black Deco Art Polish create a line done the middle of your nail from the tip to the bottom.
Step 3: Using your Black Nail Polish create your Ladybug's head covering the tips of your nails. This may require 2 coats.
Step 4: Using your Nail Dotter and Black Nail Polish add on your Ladybug's Spots. When I use the Nail Dotter I will put a small amount of the nail polish on a disposable plate or paper and then dip the dotter into that.
Step 5: Using your Nail Dotter again this time with White Nail Polish, create your Ladybug's Eyes.
Step 6: Now with Black Nail Polish and the Nail Dotter put a black dot in each of the White Eyes. Some people opt to just leave them white, but I think they are cuter with the black.
Step 7: After your nails are dry go ahead and add on a Clear Top Coat to protect them and give them shine.
That is it !! Is that EASY or what?
So what do you think? Are there Ladybugs on your nails in the near future?
Clean up those edges !!!
Once your nails have dried be sure to clean up around the edges. You just spent some time doing a very cool nail design - do not let it look ugly with nail polish all over your fingers.
My favorite things to use to make it easy are these Nail Tees Q-Tips - they are just like Q-Tips, but they are pointed at the ends to make clean up around the nails so much easier. How many times have you done your nails and used a regular Q-Tip to clean the edges to accidentally remove half the polish on the sides in the process? Me me !!!
Oh and one more thing I love - Nail Polish Remover Pump Dispensers these are so helpful when you just need a little remover - just pump the top and there it is mess free !!


Take a look at my other Nail Art Pages for even more FUN !!


Updated: 04/10/2012, ThePartyAnimal
You might also like
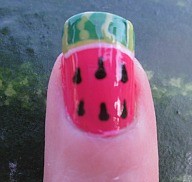
How to create a Watermelon Nail DesignCreate this SWEET Watermelon Nail Design by following my easy step by step tu...
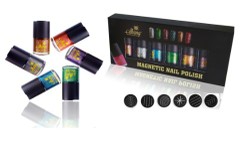
Magnetic Nail Polish - The New Rage in Nail PolishThe hot new trend in nail polish is magnetic nail polish with actual metal fl...
Disclosure: This page generates income for authors based on affiliate relationships with our partners, including Amazon, Google and others.

 How to create a Mike and Sully Nail Designon 06/20/2013
 How to create a Cupcake Nail Designon 04/26/2012
 How to create a Strawberry Nail Designon 04/10/2012
Ladybug Nail Talk right here !!
I'm running out of fingernails to try out all your adorable designs on! LOL!
What cute nails! I'll bet kids would especially love this design.
I love these designs. I remember doing this design on my little sisters nails when we were young. They're absolutely adorable on little toddlers :) Great post!
This is so awesome. You are very creative. Love your articles.