Celebrate Disney's new Monsters University Movie by creating this Easy and Simple nail design featuring Mike and Sully on your nails. It is perfect for the kids and of course adults too !!! Forget about paying high prices at the nail salon when it can be done by you right at home. So come along as I show you step by step how truly easy it is...

How to create a Mike and Sully Nail Design
Create this FUN Simple Mike and Sully Nail Design by following my easy step by step tutorial.

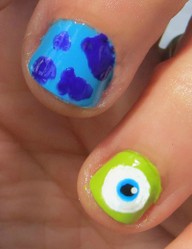
Creating this Mike and Sully Nail Design like I did in the photo above is easy to do. Having this design on your nails will definitely get you lots of compliments.
This is a great Nail Design for both the kids and adults - heck I am in my 40's (shhhh) and this is the design on my nails. Unfortunately my nails are short right now due to lots of gardening I have been doing, but that did not stop me from doing it.
You can create the same design in just 8 EASY steps and I am going to share those with you right here.
What you will need to create your Mike and Sully Nail Design
To create your Mike and Sully Nail design you will need the following:
Now these are all the nail colors I used you can use shades you have have on hand as well that are close.
- Blue Nail Polish
- I used Sally Hansen Blue me Away for the base to create the color for Sully. I think it was the perfect match to his fur. But if you have a light blue shade in your nail collection already that will work as well.
- Lime Green Nail Polish
- Purple Nail Polish
- White Nail Polish
- Turquoise Blue Nail Polish
- Black Nail Polish
- Nail Dotting Tools
- Clear Top/Base Coat
- Nail Polish Remover and Q-Tips for edge clean up
Now again all of these colors are what I used, but use what you may have on hand already. If you have Nail Polish Pens you can use those. I just prefer the Nail Dotting Tools to create my designs, but of course you also need a steady hand to use them. This design is so simple to create so just have fun!!!
Nail Polish and Supplies
Ad


8 EASY steps to create a Mike and Sully Nail Design
Step 1: Apply a Clear Top Coat to your nails - this helps then come out looking so much better.
Step 2: Polish all your nails the Sully Blue except your ring finger which will be done in the Green for Mike.
Step 3: Polish your ring fingers using the Lime Green Nail Polish color for Mike.Let them dry.
Step 4: Using your Nail Dotting Tool and some of your Purple Nail Polish create random spots on your Sully Nails. Tip: I usually take some polish and place on a paper plate and dip my nail dotting tool into that.
Step 5: Using our White Nail Polish on your Mike nails create a big white circle for his big eyeball. Let dry completely before moving on.
Step 6: Using your Turquoise Nail Polish create a smaller circle in your big white circle in Mike's Eye. Let dry completely before moving on.
Step 7: Take your Black Nail Polish and create another circle on top of the blue circle to create a pupil in Mike's Eye. Let dry completely before moving on.
Step 8: Now for a special touch using your White Nail Polish again just make a tiny white dot to create a highlight in Mike's eye like shown in the photo. Let your nails dry completely. It may take a little while for Mike's Eye to dry since there are multiple layers. Once it is dry take your Clear Top Coat and finish them off and give them shine.
That is it - You are done!!! Come on how EASY is that? For extra fun you can add some sparkle polish.
So what do you think? Do you see a Mike and Sully Design on your nails in the near future?
Clean up those edges !!!
Once your nails have dried be sure to clean up around the edges. There is nothing worse than cool looking nails and polish all over your fingers. I always get polish all over my fingers when I do a design - I know It cleans up in the end - so no worries.
To help with clean up I love using these Nail Tees Q-Tips - they are similar to Q-Tips, but hand pointed ends. This makes it so much easier to get close to the sides of your nails without removing half your design. I cannot tell you how many times I have done that using a regular Q-Tip.
Another handy item - Nail Polish Remover Pump Dispensers with a push on the pump they will dispense the remover in small amounts and in the end save you from wasting a bunch.


Take a look at my other Nail Art Pages for even more FUN !!


Updated: 06/20/2013, ThePartyAnimal
You might also like
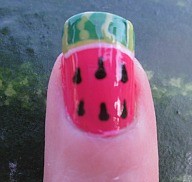
How to create a Watermelon Nail DesignCreate this SWEET Watermelon Nail Design by following my easy step by step tu...
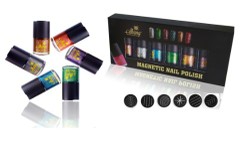
Magnetic Nail Polish - The New Rage in Nail PolishThe hot new trend in nail polish is magnetic nail polish with actual metal fl...
Disclosure: This page generates income for authors based on affiliate relationships with our partners, including Amazon, Google and others.

 How to create a Cupcake Nail Designon 04/26/2012
 How to create a Ladybug Nail Designon 03/27/2012

Mike and Sully Nail Talk right here !!
What a cute design and so appropriate this summer with the new movie out.
Very intricate work! Love the effect.
These are so fun!
That is AWESOME - how they turn out great. Enjoy the movie - I am going on Sunday and cannot wait.
OOHHHH !!! We are heading to the movie tonight.. My daughter is using this idea right now THANKS
You should do it - you will be super grandma for sure and by far the coolest in that theater - lol
Okay now those are cool. I'll bet we will see some of those this summer. I may even paint my own nails like that when I take my grandkids to see the new movie. They would get a kick out of it.
Me too!!!
They can be for any age - this design is on,y own nails and I am 40 something - lol
Very cute for the right age group.