Pom-Pom Bumble Bees
The Story Behind Our Bees
Making Pom-Pom Bees is really very easy! Most kids are fascinated by real bumble bees and when my son was a little lad, he loved to simply sit down next to our flowers and wait for the bees arrival. H
e never touched the bees; he just studied them with captivated awe.
Because of his love for these little creatures, I set out on a mission. I wanted to give him a bumble bee that he could touch and hold until his heart was content.
I have always had a large craft supply on hand for when such emergencies arose. We gathered pom poms, chenille stems, wiggly eyes and our craft glue. Together we made a pom pom bee that he could have and hold from that day forward.
The bee pictured here was his very first pom-pom bumble bee. That bee is about 18 years old and he is still one of my son's treasures. I had to sneak the little bee out of my son's bedroom while my son was sleeping to take his picture so you could see him. Fear not! The little bee is back where he belongs and my son is still asleep :)
Oh! You Want One Too!
Then Let's Get Busy. I'll Show You Step by Step How to Make Your Own Pom-Pom Bumble Bee
The Supply List
- Black Pom-Pom ~ 1"
- Yellow Pom-Pom ~ 1 1/2" or 2"
- 1 Black Chenille Stem
- 2 Wiggly Eyes ~ 5 mm
- Flower Stamen
- White Pantyhose & Floral Wire OR Silver Chenille Stem
Tools Needed
- Low Temp Glue Gun & Glue Sticks OR Craft Glue *
- Sissors
- Wire Cutters (Optional)
- Needlenose Pliers (Optional)
*If an adult is assembling this bee, a glue gun should be used and allows a faster assembly. However, glue guns can severely burn, therefore, if a child is making the bee, please use craft glue. It will take approximately 1 hr. for craft glue to completely dry between steps.
Assemble The Pom-Pom Bee
- Cut Black Chenille Stem into 4 pieces for Legs

- Cut Flower Stamen in half for the Antennae
- Glue the 2 Pom-Poms together (See assembly note below.)
For A Studier Assembly
When gluing the pom-pom together, push apart the fur and glue the center of each pom-pom to the center of the other pom-pom.
Special Note for Craft Glue Users
I use a hair claw to hold the pom-poms together until the glue drys.
Prior to the discovery of hair claws, I used clothespins, but they were often not quite large enough. |
|
![]() |
| Scunci No-slip Grip Octopus Clip, 8.5 Cm, Colors may vary Scunci |
![]() |
| Scunci No-slip Grip Chunky Jaw Clips (Pack of 5) Scunci |
Add Eyes, Legs and Antennae to Your Pom Pom Bee
- Glue on Eyes
- Using 3 of the 4 Chenille Stem pieces, fold each stem piece (leg section) in half and glue on body as shown below. Again, be sure to separate the fur and glue stem to center of pom pom. 3 leg sections need to be added to create 6 legs :)


3. Shape legs so bee will stand.


4. Glue in Antennae

Pom-Pom Bee Wings
Until Today, How I Make These Lovely Wings, Has Been a Secret
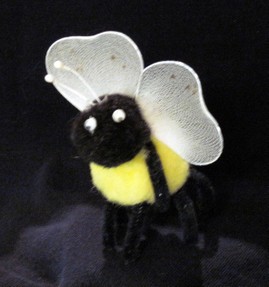
I am sharing my wing making technique here, and exclusively, on Wizzley.
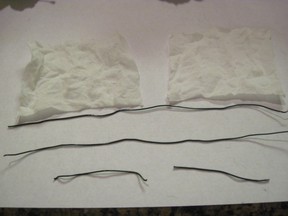
To assemble these fabulous wings, you will need to cut a small section from a pair of white pantyhose and floral wire. While I am certain there are other fabrics that would work just as well, hose are my preferred and proven material.
Note: I will also offer alternate wing ideas
Instructions for Wings
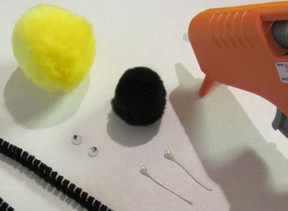
- Cut two 6 1/2" pieces of floral wire
- Cut two 2" pieces of floral wire
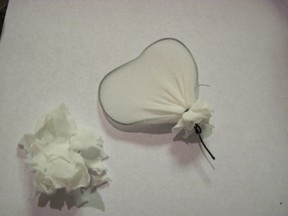
- Cut one 2 1/4" piece from one leg of the pantyhose.
- Cut open that pantyhose piece and lay flat.
- Cut pantyhose piece in half to create 2 square pieces
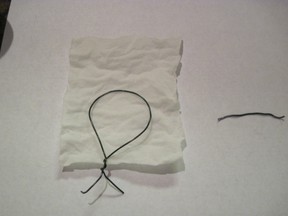
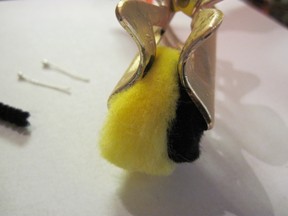
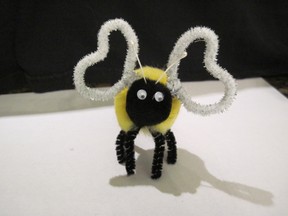
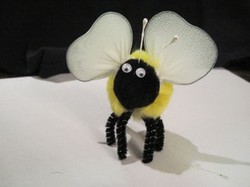
6. Shape the long wire piece as shown and twist the base tightly to hold your circle.
The circle should measure approx. 1 3/4" diameter.

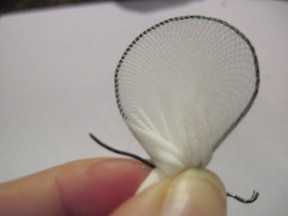
7. Fold and stretch one pantyhose piece over the wire form, catching all raw edges
between your fingers at the bottom. (See photo below)
8. Twist and tighten the short 2" piece of floral wire your previously cut around the bottom
to hold the pantyhose tightly into place with needlenose pliers. (See photos)


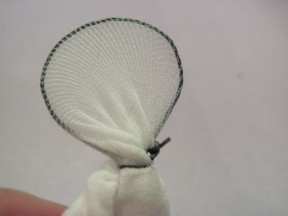
9. Trim excess hose fabric.
10. Set aside and make the second wing exactly the same way.
Finishing the Pom-Pom Bee
- Shape the wings to look like an uneven heart or earlobe.

- Put a bead of glue around the bottom pantyhose edges for added security.
- Poke the wings between the head and body of the bee, tucking in the fabric edges.
- Glue in place if desired.
Here He Is!
All Done!
![]() Pom Pom Bumble Bee Sylvestermouse |
Wing Alternatives
These are the more commonly used options
Silver Chenille Stem Wings
These stems would be shaped the same way as the floral wire instructions above.


On Stop Shopping for Supplies to Make Pom-Pom Bees
Chenille Stems, Yellow and Black Pom-Poms Are Available Separately, but I Usually Purchase the Assortments When Offered
![]() | ![]() | ![]() |
| Pom Poms 1-1/2" 15/Pkg: Yellow Darice | Pom Poms 1" 40/Pkg: Black Darice | Craft Pom Poms 300/Pkg-Assorted Colors Jo-Ann Stores |
![]() | ![]() | ![]() |
| Chenille Stems 6mm 12-Inch, 100/Pkg, ... Notions Marketing - Drop Ship | Charles Leonard Inc, Chenille Stems -... Charles Leonard Inc. Only $5.84 | Glue-On Googly Eyes 5Mm-30Mm 120/Pkg ... Fibre Craft |
![]() | ![]() | ![]() |
| Flower Stamen Assortment Wilton Products Only $3.49 | Paddle Wire 22 Gauge 110 Feet-Green Darice | Nylon Spandex Tights by Leg Avenue Leg Avenue Only $8.00 |
Bumble Bees Have Stripes and So Do The Pom-Pom Used for This Awesome Bee
![]() Pom Pom Bumble Bee Sylvestermouse |
The Tools
Having the Right Tools Always Makes Things Easier
![]() | ![]() | ![]() |
| Darice Chenille & Pom Pom Kit Striped... Darice & Catan Floral | Clauss 33403 5.75" Floral Cutter, Pouch Clauss Only $13.00 | Stanley 84-096 5-Inch Needle Nose Plier Stanley Hand Tools |
![]() | ||
| Adhesive Technologies 0440 Low Temp M... Adhesive Technologies | ||
The Bees Were Only The Beginning!
They will also be "only the beginning" of my featured Pom-Pom Insects and Animals on Wizzley.
Pom Pom Bumble Bees
![]() Pom Pom Bumble Bees Sylvestermouse |
More Crafts by Sylvestermouse
I Will Be Adding Additional Pom-Pom Animals and Insects Soon Right Here on Wizzley, but for Now You can View More Crafts by Sylvestermouse Here:
Because I understand the real desire to make original treasures, I am sharing some of my own personal ideas and instructions for making unique heirlooms.


Sylvestermouseon 05/28/2011


This Article was Published in Honor of Chef and All of the Busy Bees on Wizzley!
These are absolutely adorable! Your instructions are easy to follow too. Thanks for sharing your wisdom with us!
Now those are beyond adorable !!!
Wowza!! These are way too cute. And you are so creative! Great post :)
This is adorable love it
These are so cute. Thank you for the tutorial, I'll bookmark this. Great article!
I'm not crafty but I think even I could make this. Really cute!
So easy diy plan. Thanks.
How cute! I love this clever craft!
Oh my goodness, is this an adorable little bumblebee! And I love your idea of using the hair clippie things to hold your craft while it's drying!
Wonderful and cute! Thanks for this suggestion for a rainy day