Designing Framed Thumbnail Images With Titles

by Sheri_Oz

You can easily create memorable thumbnails that tell what your article is all about. Let me show you how I do it.

I love to play around with images and graphics on the computer. Nobody ever taught me (and maybe some will say that it is obvious - no offense taken). I do think, however, that my thumbnails are getting better and better all the time.

Let me show you how I do it, using the free photo enhancement software, paint.net. I will show you how I use free public domain images and tweak them in various ways to get the effect I am after. Sometimes I even surprise myself!

What You Will Find in This Article

I will show you examples of thumbnails I have made lately. Then, for each one, I will show you the component parts: the public domain clip art materials I have used, the way I work with the text and how I make the frames.

I had fun figuring these out and I hope you have fun taking these ideas and expanding on them according to your own personal styles.

If you want to use the same photo enhancement software as me, download it for free here.

One of the Easiest Ones of the Bunch

An Easy Thumbnail
Public Domain Image (linked to source)
Copyright Image

All I had to do here was find a font that I liked and center it horizontally on the image.

I used the "dropper" feature on paint.net (number "1" in the image below) to pick up one of the red tones from the exclamation mark so as not to add another color to this already busy image. I also played around with the size and exact placement of the text until it felt right.

Making a Single Frame

Making a Single Frame
  1. Use the dropper (on the tools window) to select one of the red tones from the exclamation mark or any other color you may choose.
  2. Make sure the color of your frame is shown as the "secondary" color because that is what the program will choose to make the frame.
  3. Click "Image" and then "Canvas Size" and make sure the image is in the middle field so that the frame will be even all around it.
  4. Make sure that there is a check mark in the box above that says "maintain aspect ratio".
  5. Click "OK".

That's all there is to it!

A Thumbnail That is A Bit More Complicated

Public Domain Images Used (linked to sources)
Blank Sticky NoteThumbThumb Tack

I first positioned the hand on the sticky note but when I copied the hand onto the sticky note, it was too large and was not at the angle required. Therefore, I pasted it onto a new layer, something that would give me the freedom to manipulate the hand without affecting the sticky note itself.

Making the hand smaller was easy. You "grab" the image in the corner (there will be a small circle there) and move one corner toward the opposite corner. You place the image about where you want it to be and play around with the size until it looks right to you.

Then, in order to rotate it, you click on the "Layers" feature in the toolbar and then click "Rotate / Zoom" as shown to the right.

This will open a new window as shown in the image below.

Pasting Hand on Sticky NOte
Layer Window
Rotating the Layer
Rotating the Layer
Screenshot by Sheri Oz

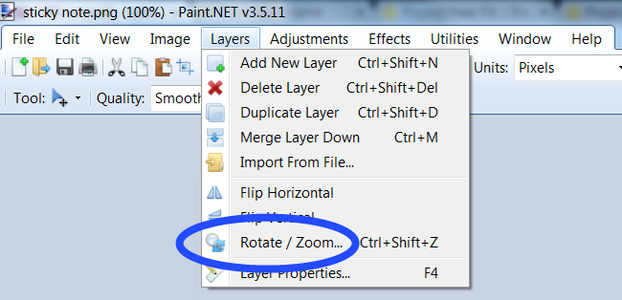
Now, with the mouse on the little bar indicated by the blue arrow above, rotate the hand. If the sticky note and the hand are on separate layers, only the hand will rotate.The first time I did this, I discovered that the lower part of the hand was too close to the edge of the image and upon rotating, some of the image disappeared. You can solve this problem by going to "Image" and clicking "Canvas Size". Increase the height only and you will have room to rotate without losing any of the image.

When the hand is parallel to the left-hand margin of the sticky note, click "OK". The layers window will close.

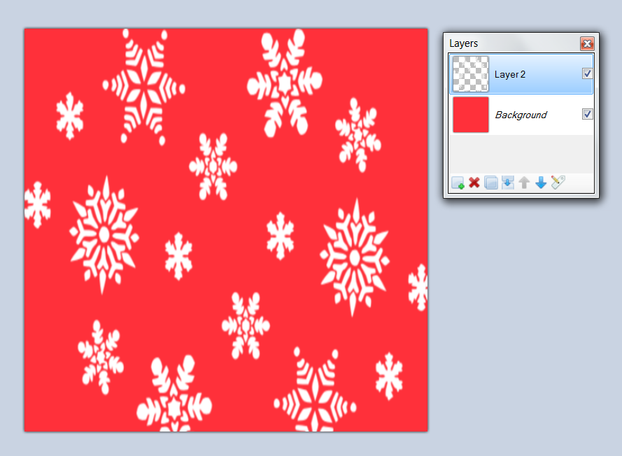
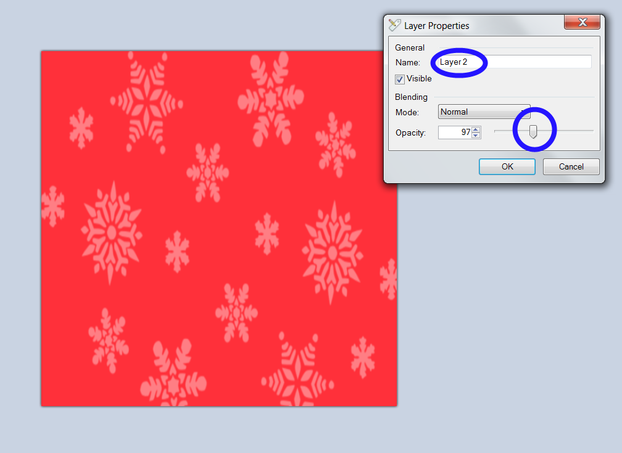
You may find that part of the edge of the sticky note is covered by the hand layer. You can correct this by opening "Layers" and then "Layer Properties". Click where it says, "Normal" to open the various options and click "Multiple". Like magic, the sticky note edge will reappear. Now you can merge the two layers into one by clicking on

Rotating the Text
Rotating the Text
Screenshot by Sheri Oz
Adding Text

Pull down the menu on the "Layers" function on the toolbar and click on "Add a new layer". The new layer will be exactly the same size as the entire image. If you select "Multiple" on "Layer Properties" you will be able to see both layers while you work on the upper layer alone. Write your text and then decide what color, font and size you would like it to be. I decided to justify my text to the right as it seemed to fit the design best that way. Play around with the text until you are satisfied. In this case, I also rotated the text layer so it lined up parallel to the sides of the sticky note. Remember, you can also move the text layer around without affecting the other layer.

When you are satisfied with the text, position, size, font and color, merge the layers as you did for the hand and sticky note layers.

A - Background Color Added
B - Adding Thin White Frame
Adding a Set of Frames

First I picked up one of the flesh colors and used it to paint the background (see Image A above). Then I added a thin white frame (see Image B above - I know, the white is barely visible). The original image was 5.12 inches wide and, after making sure the secondary color was white, I increased the canvas size to 5.2 inches.

Adjusting the secondary color to match the background (using the dropper tool), I added another frame by increasing the canvas size to 5.25 inches and then another white frame to increase the canvas to 5.45 inches (see Image C below). The final colored frame brings the canvas size to 5.58 inches (Image D below).

C - Adding Two More Frames
D - With All Frames
D - With All Frames

At this point, I just added the thumbtack to the image, making it smaller and placing it exactly where I wanted to. I added it after completing the frames because I wanted the thumbtack to overlap the inner frames and not to be overlapped by them.

The thumbnail is now complete.


FInal Thumbnail

Making Thumbnail to This Article

The thumbnail to this article is very simple to construct. First, open a new file on paint.net and, using the "Image" button on the tool bar and clicking "Resize", you get the window below. I usually set the image size for 6 inches by 6 inches square.  The rest of the steps are numbered:

Opening New File for Thumbnail Image

  1. I used the paint-can on the tool bar to paint the entire canvas a solid reddish color.
  2. I opened the public domain snowflake image (http://www.clker.com/clipart-snowflakes-7.html) onto paint.net and used "Image" and "Resize" to make it 6x6 inches. In this case, the slight distortion of the image was not a problem.
  3. Under "Edit", I clicked "Select All", then "Copy" and then I opened the red image and still under "Edit", I clicked" Paste onto New Layer". I repositioned the snowflakes to fill the red image exactly as I wanted, getting the image below left, consisting of 2 layers, the red background and the white snowflakes.


4.  I softened the snowflakes by clicking on "Layers" and "Properties". This opens a window that   lets me play with the "Opacity" of the layer (see below right image). By reducing it by about half, I now have enough of a design to be interesting, but nothing that would overwhelm the text I will add.

5.  I then added the text, selected the font, the size and the position and then added frames that looked pleasing to me as instructed above for the other thumbnail images.

Unprocessed LayersReducing Layer Opacity on Thumbnail Image
Updated: 04/17/2014, Sheri_Oz
 
Thank you! Would you like to post a comment now?
8

I hope my explanations were clear. Perhaps some of you do these same processes differently?

Only logged-in users are allowed to comment. Login
WriterArtist on 04/03/2014

Explained in easy steps. Thank you.

younghopes on 04/01/2014

Very interesting and you have explained it very easily too,

Sheri_Oz on 03/31/2014

You were my first inspiration, Pam. I read your article about removing the background from around the shell and you got this photo enhancement monster going!

dustytoes on 03/31/2014

I like to play with things like this too. I do it a lot for Zazzle products - blending and arranging images together. I am also self-taught.

Sheri_Oz on 03/31/2014

I would ask a teenage daughter if I had one. Turns out my adult daughters know less about this stuff than I do. Go figure!

ologsinquito on 03/31/2014

I'll admit I often take the easy way out with computer images. When I'm stuck, I ask my teenage daughter for help.

You might also like

Use Polyvore to Display Your Products to Advantage

You are selling your designs on Zazzle, Etsy or other online shops. Help shop...

Effective Thumbnail Images for Pinterest Success in Promoting ...

You want your articles to be liked and, more important, pinned and repinned, ...


Disclosure: This page generates income for authors based on affiliate relationships with our partners, including Amazon, Google and others.
Loading ...
Error!