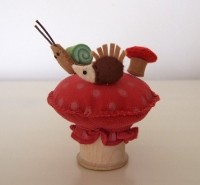
Mushroom Spool Pincushion
Full step-by-step color instructions for a super cute Mushroom Spool Pincushion which makes a magical home for your sewing pins. An easy pincushion project to sew and a cute gift.
Here's a magical home for your Straight Headed Sewing Pins with a novel fabric mushroom spool pincushion or pin keep that you can make. It's an easy project (once you know how it's put together) and is useful for re-purposing old thread spools and scraps of fabric too.
Have loads of fun making this cute mushroom or toadstool pin keep which is sure to get loads of comments from family and friends.
Magical Home for Pins
This mushroom spool pincushion is a cute make and great for crafty gifts too. It's quick and easy because the spool makes up the base of the mushroom for you which means you only have the top to sew.
The mini pins are all handmade - these aren't included in today's tutorial but I might include larger versions in a tutorial at a later date.
Image Credit: Images belong to the Author, Marie Williams Johnstone.
Formerly known as poshplushies & poshmakes on Flickr and Etsy.
|
Step 1: Mushroom Pincushion
What you need to make a Mushroom Pin Keep
- an empty thread spool to form the base of your mushroom or toadstool. Wooden ones look gorgeous but plastic ones can be covered over with a pretty paper print as shown.
- some small, pretty fabric offcuts. Red is a great choice for a mushroom top but browns would also work well.
- some plush toy stuffing. You can buy this in bags from most craft stores. I have also used plain old cotton wool but that's no good should your mushroom ever get wet.
- some sewing thread, needle and scissors
|
Step 2: Mushroom Pincushion
The first step is just to roughly cover the top of your mushroom spool. You need a rectangle of fabric which is long enough to wrap around the spool and to cover the top.
I got lucky with my fabric and found a sleeve off-cut with a pretty, gathered hem. You could sew some pretty lace to the bottom of the fabric to get a similar effect. Pull the fabric tightly around the spool and stitch it together to hold it in place.
|
Step 3: Mushroom Pincushion
Gather the material overhanging the top of the spool, pull it tight over the top and roughly sew it together. This part will be completely covered later.
Find a circle of fabric to form the base of your mushroom cap. I draw around a mug onto the material with a fabric pen. The fabric needs to be around 2 inches wider than your spool when the spool is placed in the middle. Once you've cut your circle of fabric, pop your spool in the center and draw around it.
|
Step 4: Mushroom Pincushion
Using a sharp pair of scissors, cut just inside the circle you just made in the center of your fabric. Don't cut right to the edges because you're going to push the bottom of your spool through this hole - if you make it too large, you won't get a tight or a nice neat fit.
|
Step 5: Mushroom Pincushion
Turn your spool upside down so the uncovered side is showing. Push this end through the hole in the fabric you've just cut.
Slowly pull the fabric down to meet the fabric covering at the other end of the spool. If you have a pretty gather or lace, make sure that's pulled through. You now need to sew what is going to form the base of your mushroom cap onto the fabric covering the top of the spool. This can be as rough or neat as you like.
|
Step 6: Mushroom Pincushion
This shows what your mushroom pincushion should look like now - it is upside down remember! The bottom part of your mushroom cap is now stitched onto the spool and you can turn it over so it's facing up the right way.
Cut another circle of fabric to the same size as the first. This piece is going to go on the top of your pincushion and will form the top of your mushroom or toadstool.
|
Step 7: Mushroom Pincushion
Place this circle of fabric on top of the other one and line them up. Stitch this circle onto the bottom one - but don't stitch all the way around as you need to leave a hole to push your stuffing in.
I use blanket stitch to sew the raw edges of the two pieces of fabric together but you can use whatever stitch you like. It looks like the spool is missing in the photo but it's just hidden under all the fabric!
|
Step 8: Mushroom Pincushion
Pack the stuffing tightly into the gap not yet sewn up on your mushroom cap. Push it right to the other end then sew up a bit more of the edging.
Push in some more stuffing, then sew a little more. You need more stuffing than you think to pack it all tightly. Repeat this process until the top is nice and firm, then finish off your stitching so it's all sewn up.
Finished Pincushion
Complete with Handmade Pins
Your finished mushroom spool pincushion should look similar to the one I've made when you're done. If you don't have any spools you can use, how about a piece of wood instead which will make a great base for a mushroom.
The snail, hedgehog and mini mushroom sewing pins are all handmade and sewn over the top of regular straight head pins. They're very tiny and fiddly to make but great for display. They make cute pencil toppers too.
Cute Fabric on eBay
|
Time left: 10h 35 min
Fixed price: $2.51
Buy It Now
|
|
|
Time left: 12d 3h
Fixed price: $14.14
Buy It Now
|
|
|
Time left: 20d 4h
Fixed price: $3.95
Buy It Now
|
|
|
Time left: 20d 4h
Fixed price: $3.95
Buy It Now
|
|
|
Time left: 27d 13h
Fixed price: $2.51
Buy It Now
|
Red Cotton Fabric at eBay
See ALL Pretty Red Cotton Fabric at eBay.comMore Crafty Tutorials
Disclosure: This page generates income for authors based on affiliate relationships with our partners, including Amazon, eBay, Google and others.


What do you think of the Mushroom Spool Pincushion?