Complete Origami Dress Instructions

by Marie

A complete photo tutorial with Origami Dress Instructions that you can easily follow. Make pretty paper dresses that are perfect to pop on the front of your hand crafted cards.

This is a simply gorgeous project for anyone who adores dresses and Origami Fashion Projects. These origami dresses look stunning on the front of a hand crafted card and are made from square Origami Paper.

Make some super small dresses and glue to a popsicle stick so you can use them as cake and cupcake decor, dress up paper dolls, use as gift and also hanging decorations, or attach to some string and use as pretty and unique bunting for a girl's room.

Pretty Paper Dresses

Origami Paper Dresses to Make
by Marie Williams Johnstone (Author)

Cute Origami Dresses

Now you can fill your closet with the prettiest paper dresses. These origami party dresses are so sweet and can be created from special origami paper like the ones displayed below or from slightly thicker scrapbook paper.

The origami dresses are very easy to fold when you know how and you can make this full skirted dress with a plunging V shaped neckline. Quite similar to a 50s style of rock 'n' roll dress. Ideal for sticking onto the front of handmade cards, these folded paper dresses are sure to impress anyone who appreciates fashion and style.

#1 Folding the Paper into Long Quarters

Origami Dress 1
Origami Dress 1
Origami Dress 2
Origami Dress 2
Origami Dress 3
Origami Dress 3
Origami Dress 4
Origami Dress 4

Step 1) Use a square sheet of paper which is colored on one side only and white on the other. This will make the folding easier to follow. Start with the white side of the paper facing upwards on your work-surface. Pull the right edge of the paper over to meet the left edge and fold the paper in half. Make a good crease, then unfold back to the white square.

Step 2) Now take the right edge of the paper and pull it to the middle crease line. Make a fold.

Step 3) Take the left edge of the paper and pull to the middle crease line. Make a fold.

Step 4) Unfold your paper completely back to a square and you should see that it is divided into 4 evenly spaced rectangular sections. This time place the paper with the colored side facing upwards on your work-surface and the crease lines or folds running horizontally from side to side. 

#2 Making the Origami Dress Pleat

Origami Dress 5
Origami Dress 5
Origami Dress 6
Origami Dress 6
Origami Dress 7
Origami Dress 7

Step 5) Take hold of the bottom-most fold and pull this up to the middle crease line and fold the paper down. Take care to line the fold up evenly before making your fold.

Step 6) Repeat this process with the top section. Take hold of the top-most fold and pull this down to the middle crease line and fold. It should butt up against the paper you've just folded in step 5.

Step 7) If you turn your paper over to the white side, you should now see a middle pleat. Turn your paper so that the pleat runs vertically or up and down the work-surface as shown in the Origami Dress 7 instructions photo.  

Origami Fashion Book for Your Papercrafting

Klutz Fashion Origami Kit
Only $15.88

#3 Making the Waist of the Origami Dress

Origami Dress 8
Origami Dress 8
Origami Dress 9
Origami Dress 9
Origami Dress 10
Origami Dress 10

Step 8) Take hold of the bottom edge of your paper and fold this about half an inch from the top. Make your crease line at the bottom nice and firm.

Step 9) Take hold of the top edge of the colored layer of paper only. Pull this back and down and fold about half an inch away from the bottom, folded edge of the paper. You can see this step more clearly by looking at the photo labeled 'origami dress 9.'

Step 10) Turn the paper over so the colored side of the paper is now facing upwards on your work surface. You might need to rotate the paper around so that it's facing in the same direction as the photo labeled 'origami dress 10.' 

Amazon Have a Great Selection of Origami Papers

Washi Style Origami Paper, 120 sheets #N8383
Only $299.0

#4 Making the Neckline of the Dress

Origami Dress 11
Origami Dress 11
Origami Dress 12
Origami Dress 12
Origami Dress 13
Origami Dress 13

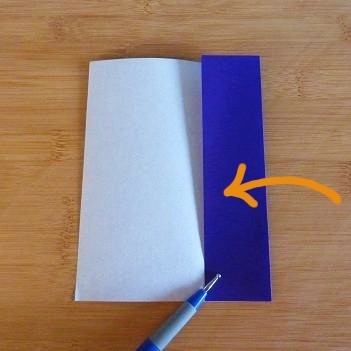
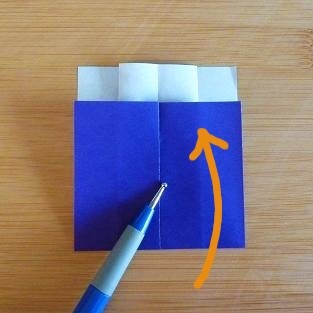
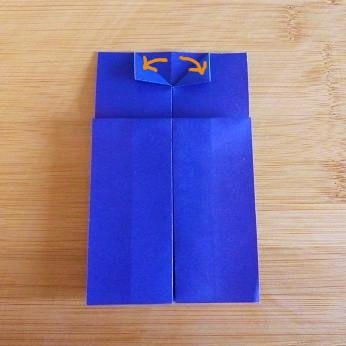
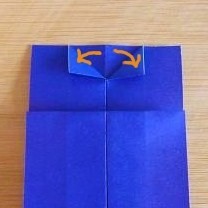
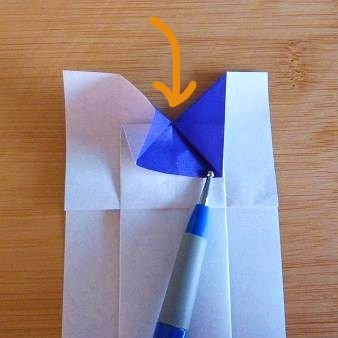
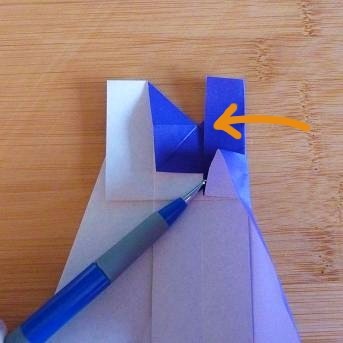
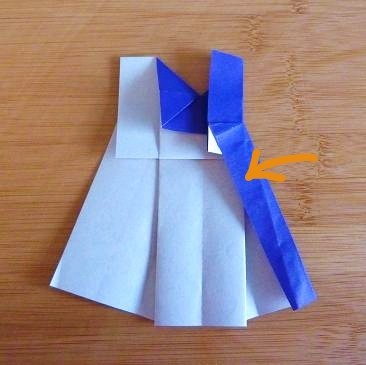
Step 11) Take hold of the top, middle edge of your paper and pull the top layer down a little to the right to make a tiny triangular fold as shown. Repeat this step on the left side so you now have 2 little triangular folds which resemble a collar on a shirt. Once you have made these 'collar' folds, push them back down again flat since it is just the creases we want there.

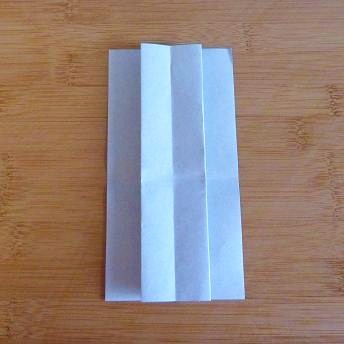
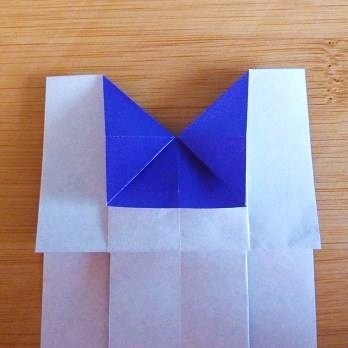
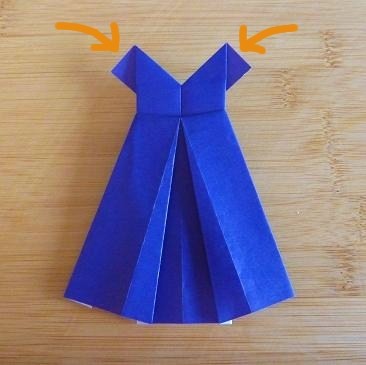
Step 12) Turn your paper over so the white side is facing upwards. Pull gently on the middle of the top edge of your paper and fold it backwards. Do this step slowly as you need to squash the paper down to make the 'V' cutaway edge at the top.

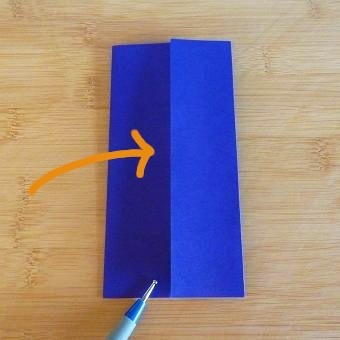
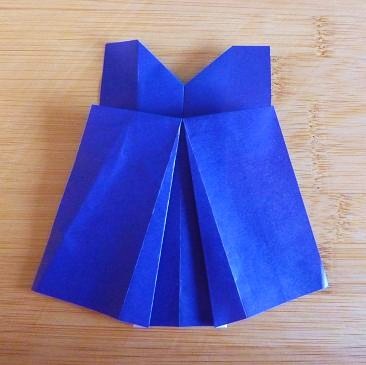
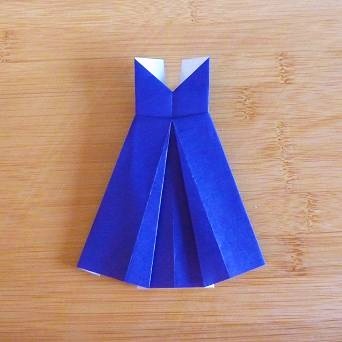
Step 13) Your finished neckline should resemble the one shown in the photo labeled 'Origami Dress 13.' Turn the paper over so you can see the colored side. 

Note: This is the folding part where you are most likely to get stuck! Don't panic. If you struggle with this section, make sure to watch the video instructions further down this page.

#5 Making the Front Dress Pleat

Origami Dress 14
Origami Dress 14
Origami Dress 15
Origami Dress 15

Step 14) You now need to adjust the waistband on the dress to make the front pleat. Start with the right side. Take hold of the right edge of the waistband and pull this up a little as indicated by the arrow. Make a crease along the waistband which should now be angled slightly instead of straight.

Take hold the the bottom middle of the dress on the right-hand side and pull this up a little. Make a new fold and you should now have a pretty pleat on the right side of the origami dress.

Step 15) Repeat this process on the left side. So you take the left edge of the waistband and pull it up slightly then make a pleat on the middle left of the dress to match the right side. You should end up with something that is really starting to look like a paper folded dress.  

#6 Shaping the Origami Party Dress

Origami Dress 16
Origami Dress 16
Origami Dress 17
Origami Dress 17

Step 16) Turn the paper dress over so you see the back with the mostly white paper. Take hold of the right edge near the top and pull this over to the middle of the dress which is the midpoint of the V shaped neckline. Make a crease on the top part only above the waistband.

Step 17) Still working on the right side of the paper, fold down the 'skirt' of the dress so that it sits at a \ angle. If you angle the paper correctly, you can see where it leaves a little triangle just above the orange arrow in photo no 17.

Repeat all of this on the left side but make a / angle with the skirt part of your dress to match.

#7 Making the Short Sleeves on the Dress

Origami Dress 18
Origami Dress 18
Origami Dress 19
Origami Dress 19

Step 18) Turn your paper over to the colored side to see a beautifully shaped paper dress. All that remains is to make the short sleeves.

Step 19) Take hold of the white flaps of paper showing on the V shaped neckline and fold them back to make a pair of short sleeves. You're all done. I hope you enjoyed making your dress. If there was any part you weren't clear on, then do check out the video below as well.

The folding instructions for this party dress are in the MiniGami book at the top which also features 49 other small origami projects that are ideal for handmade cards.

Origami Dress Video

Make Pretty Paper Dresses with Basic Origami Folding Techniques
by Author, Marie Williams Johnstone

Want More Cute Origami Pages?

Make Sure You also Check Out My Other Paper-Crafting Pages Because they're Fun!
Updated: 10/06/2017, Marie
 
Thank you! Would you like to post a comment now?
4

Did you Find these Origami Dress Instructions Useful?

Only logged-in users are allowed to comment. Login
Marie on 07/12/2016

Great thank you. Folding dresses is a lot of fun :)

Christine on 07/03/2016

Such a cute idea, and the directions are super clear. I can't wait to try this with some of my paper crafting projects!

Marie on 07/21/2014

Thank you - I hope you enjoy using the directions for your card-making :)

Rayma on 07/19/2014

These are adorable! Thanks for the directions. I have some idea son using them in my card making. Always looking for something new!

Marie on 04/19/2014

Thank you, Chloe - so sorry I missed out that very small but important point that you picked up on. I have added in the information so hopefully it is clearer.

Chloe on 04/16/2014

Step 11 - you don't say to unfold the little triangles! Can you add this in for others like me who don't realise and are forced to find out from the video?

Marie on 08/05/2013

Thanks, Tess :) It is a fun project and they look good stuck on the front of handmade cards too which is how I like to use the finished dresses best.

tess on 08/04/2013

i'm wildly excited to find these instructions! what a fun project for a warm summer night.
thanks so much!

Marie on 04/01/2013

Thank you, Rachel :) I'm so glad you found the instructions to be easy because it can be hard to show people origami and paper folding. It can be fun to use magazine paper to make pieces since you never quite know how it will turn out - and some pages are really pretty :)

Thanks for stopping by and have fun with your folding :D

RachelR on 04/01/2013

I LOVE Origami! Especially cute stuff like this pretty dress! I found a couple of ways to make a few dresses and i made a pretty clothesline to hang on my wall :D And i didn't have any fancy paper! So guess what i used... ? Magazine paper!! :D

Thank you for the instructions kinworm! This pattern is by far the easiest i came across!


You might also like

Folded Flower Card with Free Template

A folded flower rosette is so easy to make and makes a stylish centerpiece fo...

Easy Origami Heart Instructions: Simple Step by Step for Kids ...

Easy origami heart instructions for kids and adults. Cute as Valentine, weddi...


Disclosure: This page generates income for authors based on affiliate relationships with our partners, including Amazon, Google and others.
Loading ...
Error!