Salem (Beta, Feb 2013) – Settling down on a personal claim

by Wournos

Building your own property in Salem can turn into a massive migraine without proper planning. This article brings up most of the things to think about.

Sooner or later even the most seasoned pilgrim starts longing for a place to call home. A place where he or she can rest their tired legs inside a warm house with a proper stove where they can cook proper meals.
Owning land is also about status and prosperity. Anyone versed in the art of farming can grow their own food and either saves it for themselves or sell the produce to other pilgrims in exchange for items or silver coins.

To go from homeless to resident takes planning and hard work. Read on for pointers and tips from someone who has moved camps twice so far.

Prelude

Before we delve into how to find a location and settle down I would like to recommend reading up on what kind of game Salem is and also the type of game client I currently recommend.

Review of Salem Beta, Dec 2012 - Jan 2013
Comparing Salem clients - Default vs Ender's

What do I need to settle?

  • Writ of homesteading - costs 150 silvers and can be bought from any white stall in the server city.
  • Learned the skill Settling.
  • Material to build a claim stone.

Bonus:
Additional silver to expand the initial 5x5 area.
Learned the skill Whittling to be able to build the most basic fence available.

It’s all about location, location, location

Finding the perfect place to live is certainly not the easiest. Often, the good locations are already taken. But what makes for a good location then? Here are some pointers to consider.

Terrain – the more the merrier
The landscape of Salem consists of two different biomes – plains and forest. There are currently two types of forests – autumnal and coniferous. Plains come in three different versions – grassland, oak savannah and ‘badlands’.

It is preferred to live on or near at least two of these ecosystems, and one of them should be forest, as lumber is a primary resource in the game.

Each ecosystem has its own pros and cons in terms of items to forage and animals living there. For instance, coniferous forest is dark and gloomy but has a lot of Witch’s hats (mushrooms) growing there, which are great for increasing Black bile. Tumbleweed appear on grassland while bears stick to forests.

Terrain: autumnal, grassland (plus game trail), coniferous, oak savannah, badlands

Water and game trails
Living near water is, in my opinion, not a good idea. Players often follow coastlines, rivers, game trails and terrain borders when exploring, and it will result in increased traffic when living next to one or more of these conditions (been there, done that). Besides, once a homestead has been set it is possible to travel to the server city to collect water there.

Game trails are a welcomed treat as most animals spawn there once in a while.

Resource quarries
There are a few different resources in Salem – stone, lime and clay. Lime is the most sought after as it is mainly used for building stonewalls, fertilizing farmland and treat dried hides before tanning them. Many players choose to live close to a lime quarry, or set up a smaller secondary camp, to mine with ease.

Stone and clay are currently not of much interest to anyone as they have little use other than used as material for some buildings and storage.

Quarries: lime (white), clay (pink), stone (grey)

Neighbours
The common practise for anyone looking to settle, whether it is as a hermit or as a villager, is to find a location as far away from any other player as possible. It may seem anti-social but in Salem it could mean the difference between heartache and freedom.

But how far is far enough? Some say that an hour’s walking distance is a good start. From my experience, it will be quite difficult to not find anyone within that range. As a comparison, my team of characters live in the middle of the woods, roughly 10 minutes away from the nearest active neighbour and I have yet to see a single passer-by (knocks on wood).

Also, the farther away from the server city the better.

Darkness
Some players prefer to settle down in the area of Darkness. The farther away you get from civilization the more hostile and dark the environment becomes. Darkness slowly drains humours; so to be able to remain there, a character needs relatively high humours to avoid eating non-stop.

I do not recommend settling in this area unless you know what you’re doing.

AllPosters: Gorgeous trees
In DreamsAutumn Morning, Near Dryman, Stirling, ScotlandMedfield, Massachusetts

Planning a personal claim

Time to bring out pen and paper to create a blueprint of your future residence.

The size of the claim is important to consider before buying and developing the chosen location. If the claim is too small it might become a hassle to expand if walls need to be demolished and the character doesn’t have the Humours to do so. If it’s too big the upkeep of the land will be unnecessary large.

About 1300 m2 (tiles) is a reasonable size for a single hermit with farming as the only occupation. This area gives room for at least 8 tilled fields, farmer’s house, timber pile (including empty 5 square radius), turkey coop, cooking structures and various other appliances, and still have room for extra stuff, as well as 3 layers of walls. An area like this costs roughly 10 silvers per day (upkeep = 4 silver + (tiles/300) per day).

There is a lot of debate when it comes to walls and defences. In the past it has been a custom to have at least 3 layers of walls because the ranged defences (braziers) didn’t activate on the first instance of crime being committed on a claim. It activated on the third, hence the 3 walls.

Recently, defences have been changed and, as of writing this, only 1 layer of walls is required to activate ranged defence. For those who don’t want to dabble with ranged defence, multiple walls are to consider. However, there is a possible downside to this – the more protection the more interesting the claim may be to criminals. If you want to keep a low profile, keep your property basic.

Prepare food
Before having any major DIY session, stock up on food that restores Phlegm and Black bile. Crispy crickets work well. Have at least an inventory worth of food ready (16 pieces).

Claim and expand land
Build the claim stone on a flat tile, preferably as the centre point of your claim. Right-click the claim stone and click the directional buttons (north, east, south and/or west) to expand in those directions. The cost of the land is displayed near the top. Confirm the purchase or decline by clicking reset (or just close the window).

Flatten land
The very first thing to consider is flattening land. Most structures cannot be built on uneven land and I highly recommend flattening the entire claim to avoid problems. Fences and walls accept a maximum difference in level of 4 points but to achieve that, even with Ender’s client, is quite a hassle. And even if the project turned out perfect there is still the odd chance that you will end up with a message claiming the land cannot be built on.
Start flattening the tiles where the fence/walls will go, as well as adjacent tiles.

When you flatten land, make it a habit of “relocating” the dirt to other areas in or around your camp. You never know when you feel like expanding, and having even land from the get go will be bliss.

Negative effect: your dirt claim will be spotted on the mini map for weeks to come until the terrain grows back.

Claim stone menu: area 5x6 tiles
Simple claim; displayed in purple.

Fences and walls
Build a makeshift fence around your property to keep out potentially aggressive animals. The fence can easily be destroyed and replaced by something sturdier later. I also recommend building the fence/wall 1 tile inside the outer claim border. There have been reports of players adding walls to other player’s claims, walling them in.

If you decide to build several layers of walls, build weak to strong from the outside in. Strong walls will damage weaker ones when destroyed*.

Once your fence is up you can develop the rest of your property in peace (so to speak).

* This is the current view on defences. It may come to change in the future so go defence berserk on your own risk.

Houses
character sitting by stove
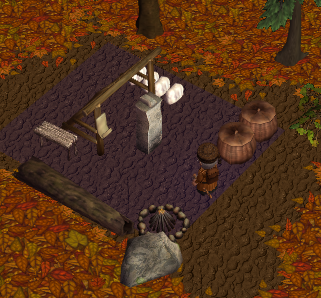
It is not necessary to have any kind of house on ones property. The one thing that speaks for them is they have space for a stove. The stove is used to cook food that cannot be cooked anywhere else. The fire will remain lit forever as long as branches are added to it every single day.

A house can have various types of storage inside. Even dead animals like beavers or deer can be stored inside a house without decaying, like they would if left outside.

One thing to note about houses is that they cannot be built on anything but flat dirt land (dug land) or paved flat land.

Two basic tips on protecting claimed land

There are two initial ways to protect ones claimed land. The first one is to never EVER give permission to “white people” (status, not race). A player’s status is white by default and giving permission to this group may allow any stranger to mess around on your property.

The second thing to be aware of is to not set a homestead secret in the claim stone menu unless you have to. Newly created characters with access to this secret can teleport to your claim and, if it’s the wrong person, can steal everything you own without triggering crime.

Salem digging: key shortcuts

The use of shortcuts is the key to landscaping

Ctrl Hold key to automatically stop digging when a tile is flat.
Ctrl + right-click tile Dump enough carried dirt to flatten a tile.
Right-click in dig mode Changes cursor from dig mode to regular click mode.

AllPosters: Gamer posters
Gaming20 Rules to Live ByKeep Calm-Gaming

Salem settling: random tips

  • If the prospected land is hilly, find a tile that is between the highest and lowest tiles and use as a reference. When you start digging the elevated tiles, use the dirt to fill and level the lower segments.
  • Wield a shovel to increase the speed of digging.
  • If you have a lit torch, build a fireplace, add branches and light it before placing your torch in your inventory. Keep adding branches to the fire to keep it burning until you need to relight the torch. This way you don’t have to mess with tinder drills.
  • Save all earthworms for fishing, or put them in compost bins to get humus for your tilled fields.
  • Any structure, or man-made storage, will decay on unclaimed land.
  • Make use of hollow logs for storage. Just remember, snakes sometimes emerge from underneath them if they are moved and could very well attack and poison you.
  • Keep a tree, preferably Maple, on your claim for easy access to branches (and maple leaves).
  • If you need to cut down trees make sure there is nothing behind it. A tree trunk is 4 tiles long, and if it lands with its centre on something, it can’t be lifted.
  • If you need woodblocks, cut them from woodpiles first and foremost as it drains less Phlegm (0.3 points per pile). Woodblocks can also be gained from hollow logs. Both of these are scattered around in forests.
  • Destroy stumps (Adventure > Destroy) if needed.
  • Paving looks nice and prevents the terrain from growing but are visual on the mini map. If you want to be anonymous – don’t pave.
    Also, any type of item that can be foraged has a chance of spawning on non-paved ground.
  • Setting the claim stone as ‘homestead’ allows you to teleport to the server city from your property. Keeping a homesteaded leanto on your claim only allows traveling to the server city if your character is standing close to the leanto.

Personal claim - Highway to Hell

My previous personal claim. Built on game trail, at the end of a river AND near terrain borders. It felt like an autobahn in the end.
Old camp, now owned by someone else

Building a village claim

I will not lie. I have no experience in developing a village claim. Research tells me the basics of developing land are the same as with a personal claim. The main differences are listed below.

Requirements

  • A Town Chart – costs 2500 silvers
  • Learned the skill Compacts & Constitutions
  • Additional material to build a Town Bell

The character who builds the Town Bell becomes the mayor of the village. The village claim has an area of 101x101 tiles (including Town Bell). Placing Boundary Stones, adding 31x31 tiles, or a Cross of Saint George, adding 51x51 tiles, can increase the village area. Anyone can walk on this area without using crimes.

Characters can then place personal claims on this land, as long as the mayor accepts it. It is currently unclear how close personal claims can be placed to one another.

Related articles

Ever wondered what it might’ve been like for the Pilgrims that set foot in the New World? Salem, the game, might shed some light on that.
Choosing the right client to play Salem can mean the difference between life and death of a character.
To survive, and perhaps even be successful in Salem, a character needs to learn skills by studying inspirational items to gain proficiency points.
Gluttony is viewed as a deadly sin – but not in Salem. Instead, it is a means to develop a character’s capabilities. Time to look into the very basics of fine dining.
Updated: 04/26/2013, Wournos
 
Thank you! Would you like to post a comment now?
3

Where would you settle?

Only logged-in users are allowed to comment. Login

You might also like

Salem (Beta, Feb 2013) – Arriving in the New World as a new pl...

So you have signed up to play Salem and have, or are about to, create your ch...

Chore Wars: Making Housework Fun

Want to inspire the whole family to help around the house? Or to establish fo...


Disclosure: This page generates income for authors based on affiliate relationships with our partners, including Amazon, Google and others.
Loading ...
Error!