
ArduWHAT?
The Arduino is a physical computing platform based on open source hardware and a free open source integrated development environment.
It was first released in 2006 and since then it has taken the electronics hobbyist world by storm.
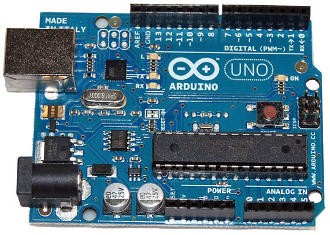 Arduino Uno |
A growing number of creative individuals have taken advantage of Arduino's easy to program interface to create unique and fun interactive gadgets. You can find an astonishing number of projects on the Internet if you search for "Arduino project". There is no limit to the fun creative possibilities of the Arduino.
The Wonderful World of Arduino
The Arduino can be used to develop all sorts of cool objects that sense inputs and collect data from a variety of sensors (light, force, temperature, sound, etc...), and then control buzzers, lights, motors, displays and other physical outputs in the real world according to the information gathered.
The contraptions thusly created can interact with each other and with our environment, a growing trend dubbed "The Internet of Things" (also a budding community over at pachube.com). Typical creations include temperature sensors that broadcast their readings over the Internet, tweeting air quality monitors, geiger counters, and interactive electricity meters.
Extending Arduino Functionality
In order to extend Arduino's functionality, add-on boards (called shields) were created that sit on top of the main Arduino board. These "shields" allow your projects to include additional features like motors, Internet or WiFi connectivity or any custom circuitry.
Several Arduino shields are available and still more are being created daily by the avid Arduino community. Some examples are Motor Shield (to control motors), WiFi Shield (to allow for WiFi connectivity), Proto Shield (to extend your project with a custom prototype area) and Xbee shield (a wireless ZigBee module for communication between Arduino devices).
Programming the Arduino
The Arduino Uno is based on the 8-bit ATmega328 microcontroller by Atmel. It has a 16MHz crystal oscillator, 14 digital Input/Output pins, 6 analog input pins, a USB connection, a power jack, an ICSP header and a reset button.
It contains everything needed to program the microcontroller, you just connect it to a computer with a USB cable and use the simple IDE to write and upload your code (called "sketches") to it. Once programmed, the board can be powered with an AC-to-DC adapter or battery.
Arduino on Wikipedia
A Simple Arduino Sketch to Blink an LED
/*
  Blink
  Turns on an LED on for one second, then off for one second, repeatedly.

  This example code is in the public domain.
 */

void setup() {
  // initialize the digital pin as an output.
  // Pin 13 has an LED connected on most Arduino boards:
  pinMode(13, OUTPUT);
}

void loop() {
  digitalWrite(13, HIGH);   // set the LED on
  delay(1000);              // wait for a second
  digitalWrite(13, LOW);    // set the LED off
  delay(1000);              // wait for a second
}
Interesting Arduino Projects Around the Web
Arduino and Ikea = Superb RGB LED Table Hack
Arduino RGB LED Spinning Night Light
Arduino Books and Boards on Amazon
 | Getting Started with Arduino (Make: Projects) This valuable little book offers a thorough introduction to the open-source electronics prototyping platform that's taking the design and hobbyist world by storm. Getting ... |
 | Arduino UNO board The Arduino Uno is an open source electronics prototyping platform based on the ATmega328 microcontroller. It is equipped with 14 digital I/O pins, six of which can be used as ... |
 | Arduino Cookbook Create your own toys, remote controllers, alarms, detectors, robots, and many other projects with the Arduino device. This simple microcontroller board lets artists and ... |
 | SparkFun Inventor's Kit for Arduino, a professional kit for Arduino sparkfun sku: KIT-10173 Description:This kit has it all. It now includes the new Arduino Uno, the fabled baseplate, and all the sensors you can shake a stick at. The SparkFun ... |
Arduino Projects from My Blog
I have a hobby electronics blog where I document my projects with the Arduino and hobby electronics in general. As a software engineer turned electronics hobbyist, I share my experience learning about electronics using the Arduino as my main platform.
You might also like
Unique Fish Tanks and Unique Fish Tank AccessoriesUnique Fish Tanks and Accessories help show off your fish raising hobby in th...
Have You Forgotten Your Macrame Knots?I wanted to send survival bracelets to the grandchildren but gasped at the pr...


 How to Clean Your Refrigeratoron 09/19/2013

Comments