
Easiest Way to Watermark a Photo
by Sheri_Oz
If I can do it so can you! I couldn't understand all the directions and made up my own. It's easy!
In a separate article, I described how to do basic photo enhancement using paint.net and geared for the beginner.
If you have not yet downloaded the photo programme to your computer, you can click to get paint.net here.
Three Ways to Protect the Rights to Your Images
Some of my photos are pretty good (in my opinion anyway) and I want to protect them with a copyright. There are three ways that I know of to protect your photos or graphics images:
1. Submit them to an online stock photo site and they take care of the rights to your photo - the only problem is, that you are restricting in the way you, yourself, can make use of the photos that they accept;
2. Apply the photo to a zazzle product (or something like it) and then the photo can only be used on the product/s to which you have applied it;
3. Add a watermark to the photo. This is a popular solution even though iIt is possible that some watermarks can be removed by technicians who really know what they are doing. But my main problem with the watermark solution is that I simply could not understand any of the directions I found anywhere. So I made up my own. Any similarity between my method and what is recommended on photo enhancing sites is totally coincidental.
Watermarking Photos for Dummies - Like Me!
Here are 6 easy steps for watermarking your photos and graphic images.
 watermark on powerpoint |
Designing the Watermark
Step One
Make the watermark on a powerpoint slide. I just wanted my email address. You may want your logo or website address. The text or graphics should be in black in the size and orientation you would like it to be and the background should be white.
When you are satisfied, save the slide as a jpg or png file.
Open paint.net and Open Both the Photo and the Watermark Files
Step Two
You will see only one photo at a time, but thumbnails of both photos will appear on the upper right-hand side of the screen as in the screen-shot below right.
 photo to be watermarked |
 Photo and watermark open in paint.net |
Adding the Watermark to the Photo
Step Three
(i) Click on the watermark photo to bring it up on the screen.
(ii) Go to "Edit" and "Select All".
(iii) Then click again on "Edit", followed by "Copy".
 Select and Copy Watermark |
(iv) Click on the photo to bring it forward onto the screen.
(v) Click on "Edit" followed by "Paste in to New Layer".
What you get will look like the photo to the left, with the watermark in the upper left-hand corner of the photo.
(vi) Pull on the lower right-hand corner of the watermark until it covers the entire photo and you can no longer see the photo beneath it.
 paste watermark on photo |
Making the Watermark Transparent
Step Four
If the Layers Window (as in the photo below) did not open automatically, go to "Window" on the upper bar and click on "Layers").
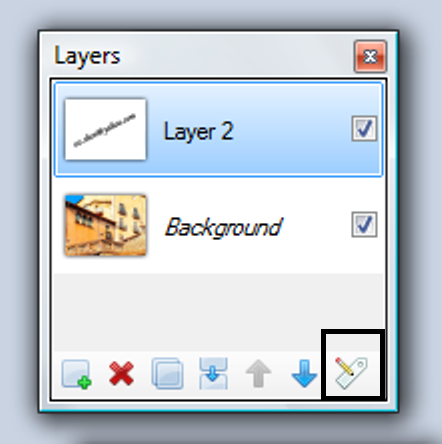 Layers Window |
Click on the icon on the lower right-hand side of the Layers Window, which I have indicated with a black square. Another window will open.
(i) Where you see the word "normal", click and select "overlay". You will immediately see the photo through the watermark layer.
(ii) Where you see 255, change it to 155 or any other value that you may prefer to make the watermark more or less prominent.
(iii) Click "ok".
Completing the Watermark Process
Step Five
The photo to the right shows what you have at this point.
Remaining in the watermark layer (Layer 2), go to the upper bar and click on "Effects", followed by "Stylize" and then "Emboss". You will see the colour return to the photo and you will be left with the original photo with the watermark appearing as an imprint on it.
 Watermark and Photo |
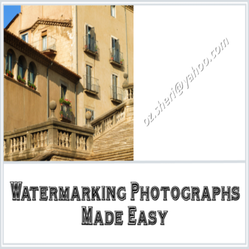
The photo below shows the final product - a photo with your watermark embossed on it. You can barely see the watermark on the image at the size and resolution appropriate for this article. This means that you can use your own photos for your blogs and websites without negatively affecting the image's visibility and with relative security that others will not steal it and claim it as their own.
 Completed Watermarked Photo |
More Help with Your Digital Photo Processing
 | The Digital Photography Book Scott Kelby, the man who changed the "digital darkroom" forever with his groundbreaking, #1 bestselling, award-winning book The Photoshop Book for Digital Photographers, now ... |
 | Improve Your Photography: How Budding Photographers Can Get Pro Results "Improve Your Photography" has been purchased by thousands of beginning photographers across the world and has been recently updated in this second edition. The book is packed ... |
Saving the Watermarked Photo
Step Six
On the Layers Window, click on the icon that has two sheets with an arrow between them (it is pointing downward). This will merge the two layers into a single layer. Then do "Save As" in order to keep the original photo in its original state. If you forget to merge the two layers, a window will open telling you that you can either "flatten" the image or "cancel" the save. If you are done, click "flatten".
Come Join Us Here on Wizzley
Have Fun, Share Your Knowledge (and make some extra cash doing it)

You might also like
DSLR Photography for BeginnersLearning digital photography? These DSLR tips and reviews of books for digita...
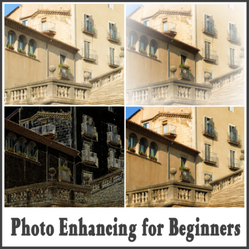
Enhance Your Photos: For BeginnersFree downloadable software and easy-to-learn tools can transform your so-so p...

 Visiting an Art Gallery With a Two-Year-Oldon 07/27/2015
 Using the News to Enhance Jewish Identity in Jewish Kidson 07/24/2015
 Xi'an - Not Just Terracotta Warriorson 06/09/2015
 Sew Your Own Wedding Dress - or Your Daughter'son 02/06/2015

Please leave comments regarding the ease at which you are able to use these instructions and how different or similar they are from what you have seen elsewhere.
I don't think so - I watermark my photos for Wizzley and others I just have my signature on them.
Cool article, Sheri Oz. I use a free software called GIMP to add signature to my photos, just using the Text tool in it. I had trouble using those photos, however, in the online writing site I'm from, 'cause they don't allow watermarks. Can I ask you, does Wizzley have any issues with photos with signature?
Happy to have you reference this article. The more people who know how to do this, the better. Thanks. I am so gratified that people are finding this article useful.
This is great, if you don't mind I would like to add this to my DMCA article. Important to know. I wondered about this as I wrote my copyright protection article and yet I had no idea as to how to water mark images, now I do thanks :)
Nice tutorial. Very easy and clear instructions. Thanks!
Hi, followed your instructions and it worked like a charm. The only thing I could not figure out was how to make the watermark on a powerpoint slide. So instead I made the watermark on paint first, saved it and then went by your instructions. Thanks for your informative article.
I just wanted to say the article is interesting. I have never had to watermark a photo but have been curious about the procedure. I do have friends that this may come in handy for. Thanks!
I never tried to watermark the photo, but that is mainly for the reason I never learned how to do it. This simple guide of yours for watermarking the photo really is for dummies- like me in this case. :)
I will try this out.
Thank you for this article!
very useful article. I've been wanting to see how to do this, thanks...
Great idea, sheilamarie - sounds like a great idea. Look forward to reading it. The more options we all have, the better.