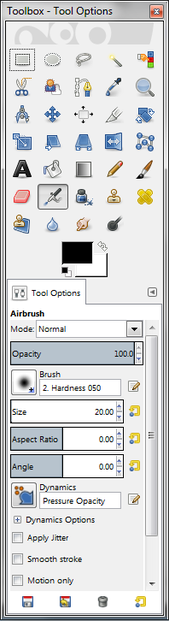
As the name suggests, this is where all of the tools are kept and where you'll be spending most of your time. There's quite a few tools to get used to and each of them have their own settings once you've selected the tool, but I'll provide a short explanation for what each is and when you might want to use it.
The best way to get to know these is to simply play around with the settings and try them out. It's surprising what you can create just by messing around!
There is a lot of tools at your disposal so the following list is quite long - it might be worth a quick read, but will probably be most useful to refer to if you're unsure of what something does.
 Rectangle Select Tool (R) - This is simply used to select a rectangular area of an image. Selections in GIMP allow you to only work on that part of an image you selected.
 Ellipse Select Tool (E) - Again, this is for selecting regions to work with, but instead of it being rectangular, it's elliptical.
 Free Select Tool (F) - This allows you to hand-draw the selection you wish to work on. It's good for defining precise selections.
 Fuzzy Select Tool (U) - Selects an area around where you clicked based on the colour of the pixel you clicked on. Good for selecting a large area of a certain (or very similar) colours that are directly next to each other.
 Select By Colour (Shift + O) - This is like the previous, but it selects all the pixels that are that colour no matter what their location. It's useful for eliminating a certain colour.
 Scissors Select Tool (I) - Similar to the Free Select Tool, however it intelligently snaps the selection lines you're drawing to the edge of what you're attempting to select.
 Foreground Select Tool - Used to select a region to be marked as the foreground.
 Paths Tool (B) - Used like the Free Select Tool, though you're able to create much smoother selections which are good if you're looking to use the selection for say a fill or cutting out a smooth area.
 Colour Picker Tool (O) - Used to select the colour that you've clicked on. Very useful for shading and getting colours close to those around it.
 Zoom Tool (Z) - I'm sure you're aware of what a zoom tool would be useful for.
 Measure Tool (Shift + M) - Allows you to measure distances and angles, good for very precise work.
 Move Tool (M) - Allows you to move selections or entire layers.
 Alignment Tool (Q) - Allows you to align objects and layers easier than by hand.
 Crop Tool (Shift + C) - Used to remove parts of the picture you don't want.
 Rotate Tool (Shift + R) - Used to rotate selections or entire layers.
 Scale Tool (Shift + T) - Used to scale entire layers or selections.
 Shear Tool (Shift + S) - Allows you to "slant" an image.
 Perspective Tool (Shift + P) - Enables you to change the perspective of a selection or layer.
 Flip Tool (Shift + F) - Allows you to flip an entire layer or selection vertically or horizontally.
 Cage Tool (Shift + G) - More precise version of the Perspective Tool. Gives you more control over how the perspective changes. It's somewhat tough to use. We're not the best of friends.
 Text Tool (T) - Adds a new layer and allows you to add text.
 Bucket Fill Tool (Shift + B) - Allows you to fill in a selection or layer with a certain colour or pattern.
 Blend Tool (L) - Like the Bucket Tool, but allows you to fill selections and layers with gradients.
 Pencil Tool (N) - A brush with a hard edge meaning that it uses solid colours and no semi-transparent pixels.
 Paintbrush Tool (P) - Allows you to create smooth strokes, but isn't a hard edge meaning that it can get troublesome if you then wish to select the line.
 Eraser Tool (Shift + E) - Erases whatever's in its path leaving either the background or transparency.
 Airbrush Tool (A) - Much like the Spray Tool in MS Paint, it allows you to draw as if you were using a can of paint.
 Ink Tool (K) - Allows you to draw in a style akin to calligraphy.
 Clone Tool (C) - Allows you to select an area and then clone the selection elsewhere. Very useful tool for anything relating to adding something in to a picture as it allows you to blend the edges easier.
 Healing Tool (H) - Removes blemishes from photos. This is what you'll want to use if you'd want to perhaps enhance a picture yourself - not that you need it, I'm sure.
 Perspective Clone Tool - Used like the Clone Tool, but this allows you to clone to a perspective meaning that if your image is at a perspective, the clone will conform to that perspective rather than simply duplicating.
 Blur/Sharpen Tool (Shift + U) - Allows you to blur or sharpen an image with the use of a brush rather than applying it to the entire layer.
 Smudge Tool (S) - Used to blend two parts of an image together. Use it sparingly however as the more you use it, the more noticeable it becomes.
 Dodge/Burn Tool (Shift + D) - Allows you to create either lighten or darken a part of an image.
Phew.


 Microsoft Reveals New Next-Gen Console: Xbox Oneon 05/21/2013
 Duolingo - Learn A New Language Easily And Entirely Freeon 04/03/2013
 How Ghost Pictures Can Be Fakedon 01/28/2013

Comments
http://avgfreedownload2017.com/
http://mozillafirefox2017freedownload...
That’s what I was looking for.Very nice blog indeed, thank you so much admin
http://wordcookiesgame.com/
http://hotmail-account-login.com/
http://freehotmail.info/
Your topic is very nice and helpful to us ... Thank you for the information you wrote.
It depends what you're using it for - if you're not dealing with transparencies, an alpha channel isn't needed.
Oh dear! I was forgetting the alpha channel! I was putting it directly onto the layer. Is that really bad?
Thank you!
Excellent!
Gotcha, thanks! :)
Just treat the transparency as a colour and treat it as normal. :)
Paul, how do I add a coloured background to transparent one?