How To Create Animation "Cels"

by AnomalousArtist

Find out how to create old-school-animation-style "cels" for fun and perhaps even profit!

I began my (fairly) long and (mostly) happy career in animation at the end of an era of traditional techniques; when I got into the business computers were just beginning to become common tools in animated films at Disney Studios. I worked on the last Disney cartoon painted traditionally, by hand, "Prince And The Pauper" (1990). I also worked on one of the last hand-painted American films made, "The Swan Princess" (1994). The painting of "cels," a short name for clear sheets of celluloid plastic, has since become something of a lost art.

Original cels from Disney animated films still command unbelievably high prices, upwards of $5,000 for a nice image from Snow White or Pinocchio. In the late 1980s cels from ANY production--even the cheapest TV efforts--were gold at auctions and galleries. Interestingly enough, in the early days, cels from some of the Disney projects were washed clean--so the cels could be re-used!

In time it became clear that the medium was unstable and didn't warrant spending too much money on anything but the most classic cartoons. One good heat wave and an expensive work of art could shrivel up like the plastic in that old 70's toy kit, "Shrinky Dinks!" Paint would eventually chip away or fade in color or damage and mis-use affected the overall value of a piece. If one intends to become a collector one also has to be wary of bootlegs and knock-offs--I've seen some remarkable copies of animation artwork, it can be difficult to spot a phony sometimes.

In the 90s Disney began offering "serio-cels." A whole staff worked full-time on the lot to reproducing beautiful works of art from the classic and current films (that weren't even made with cels) to be sold for top dollar to collectors. One artist even admitted to me she couldn't afford to buy one of the paintings she worked on with what they paid her for her work on the piece! The value of these works is determined mostly by the interest of buyers, of course; the top-draw works will always be original pieces, in good shape, from the films made during Walt Disney's lifetime.

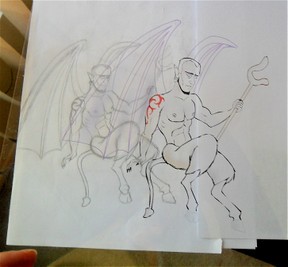
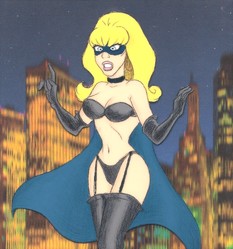
I've always had an interest in cel animation, I love the tangible aspect of it, the fact that, at least with the earlier films, you were looking at an actual cel on a movie screen, the artwork itself was moving..."alive." Each cel represented 2 (or sometimes even one) frame of film and to own, or even SEE an actual cel from a movie was to see an actual "living" frame from the film itself.

I taught myself (poorly) how to make my own knock-offs of Disney cartoon frames, then spent some time learning the craft from artists who were employed full-time in this discipline at the first animation studio I worked at. I then learned the craft first hand when I made an animated film from scratch, a project that required some 5,000 or more individual drawings!

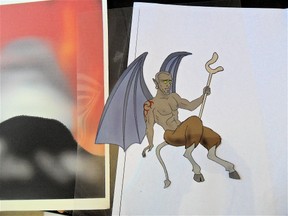
Recently I found a way to create my own cels and have had some small success (and huge satisfaction) creating and selling these unique, beguiling pictures to people who were interested in them.

If you'd like to learn how to create a piece of cel animation art or are just interested in how it's done, read on!

Amélie's Workshop: Art
Ad AllPosters

Step 1: What you'll need

In a perfect world we'd all be rich and you could just order your supplies from the one-stop shopping hub for all things animation, "Cartoon Colour Company" located in Culver City, CA (see link below). 

I've found their prices a bit steep and that substitutes work just fine.  To create a cel picture you will need:

  • Paint brushes in various sizes.  You don't have to get expensive ones, you can get cheaper ones and tailor the tips to whatever size you want, but the more I have, and the THINNER they are,  the better I feel.

  • A sturdy work area with space to spread out and tons of NATURAL light.  There's no other way of really scrutinizing your work than good, strong, natural lighting--many times I've looked at my pictures with the best indoor lighting available only to look again the next morning and see flaws I hadn't picked out before.  It's best to work, or at least check your work, by a window in the morning to see it clearly, I've found.

  • Acrylic paints in primary colors.  Theoretically you could buy different paints for all the colors you expect to use but for me, buying the basics (red, blue, yellow, black, white and I got all wild and purchased a nice "brown" too) was fine, and I can mix whatever hues I want.  You'll use a LOT of some colors and not much of the others depending on what you're painting but you'll always need tons of white and black. 

  • Celluloid sheets you can run through your printer.  I found "Graphix" brand sheets affordable and high quality.  The main thing you have to get right is that the sheets are *printable* and work with your printer.  I made the mistake of buying actual production-quality cels once and they're incredibly expensive and no one I've encountered will run them through their printer.  Anyone want to buy them from me, cheap? Ha!

  • Paper.  You should have some "scratch" paper for testing your prints out on and sketching and whatnot.  If you want to make your own background  (again, you can make one or grab something nice off the 'net but I didn't tell you to, 'kay?) I'd suggest using some stronger form of paper--I actually use canvas-textured painting pads for my backgrounds.  I used to actually paint them but I get better results now, I think, building them in Photoshop and printing them off.

  • Assorted plastic cups.  You can get these at the grocery store or 99 cent store cheap, or you might have them around.  You'll use these for mixing, for washing brushes in water, diluting paint a bit if needed.  But get things that are semi-disposable, the last thing you want is to spend your time and energy scrubbing away on some fine china covered in sturdy acrylic colors!

  • Assorted towels.  I'm torn on this--sometimes I use cloth towels and old rags for keeping things clean, knowing the work I'm doing will render them useless eventually, sometimes I use paper towels, knowing I'm wasting resources with their one-time use.  I feel guilty either way so try not to think about it, use whatever works best for you! 

  • Gloves, cloth or plastic.  I have an old pair of cloth gloves made for this sort of work I use, the fingertips are cut out.  You can also use plastic gloves that come with hair dyes.  The idea is you want to keep your hands off the celluloid sheets as much as possible. 

Step 1: Design a picture

You don't have to be an artist for this one...I'm not encouraging stealing images from the net but you CAN do it if you like.  What you want is something that is a drawing or image with a clean line in black and white or color, with limited or no shading. 

In animation, we'd sketch out a rough drawing then go over it with a line so clean it looked like a computer drew it.  Nowadays you can do this with Photoshop (or, if money is an issue, "Gimp," a free sister program to Photoshop that's pretty good) and a digital pen/pad.  If you plan to draw your picture on physical paper you just have to be able to scan and print it. 

Step 2: Scan and print

The first thing I would do is run some test shots to see how strong the print looks on paper before running celluloid sheets, which cost more money. Eventually you probably WILL have to waste a sheet or two getting the printing quality just right but if you can avoid it with some test runs it's a good idea. 

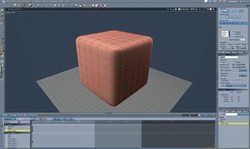
Another thing I do is "audition" my colors in Photoshop (or Gimp) to see if they're complementary.  You could also do this with paints or crayons on a drawing.  The idea is just to make sure you aren't painting "on the fly," once you've started glopping paint on your cel it's sometimes hard to get it off completely and mars the delicate surface of the plastic. 

Step 3: Start painting

Once your image has been copied onto the plastic sheet you can turn it over and begin painting the back side.  This is where technique is all--it takes a while to get the "flow" of it. 

First and foremost, your paint--mixed or straight from the bottle, should be about the consistency of yogurt--if it isn't you might either water it down or mix in another color to thicken it. 

You can start with big dollops in the center and work out or work from the edges first and then fill in, whichever is your preference, I go back and forth depending on the image or my attention span!  The main things to keep in mind are:

  • Start with the smallest areas, in the center of the image, first...eyes, fingernails, jewelry, details.  Small areas will dry faster and then you can paint over the top of them later rather than trying to fill in the details AFTER you've painted the larger areas.  

  • Don't be timid with the paint.  You really have to glop it on.  If you have ever tried painting on glass or some other slick surface you know you have to be very liberal to get a solid color.  You also have to watch your stroke patterns; it's best to keep the amount of paint the same thickness everywhere.  The best way I've found to check this is hold  your image up to sunlight and see if any light comes through.  If not, add another layer, either at the time (if you're impatient like me) or after it dries.  Another trick, if you have lighter colors, is to lay down the first color, let it dry and then paint over it with a slighter darker shade.

  • Let certain sections dry before moving on--otherwise you'll get a smeary mess.  And try to keep your palms up at all times, at least once you have a lot of colors down, you can, and will, smear colors by accident sometimes.

Step 4: Clean the image up

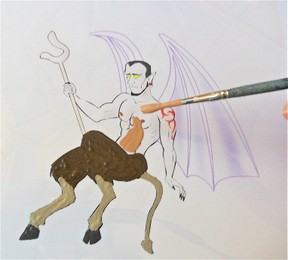
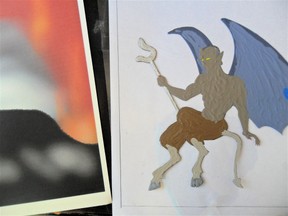
Chances are, despite your best efforts, when you examine your cel later it'll have sections where the paint has gone outside or inside the lines.  If you were good and saved all the colors you mixed in little bottles (I didn't mention it because I never do it, I'm too lazy) you can go back and touch up places you missed.  If you went outside the lines you can use an Exacto knife or other sharp point to scrape the paint back a little.  I like to use the head of a mechanical pencil (without lead in it) and do it before the paint dries, you can kind of "push" the color into place. 

You can do a little polishing with water but I've yet to find any chemical that doesn't somehow affect the picture.  You definitely don't want to use alcohol--if it gets on the printed side of your picture it'll eat at the emulsion that makes things printable and create ugly scars, if you get it into your paint it'll become a watery mess.  Actually, if you know of a good chemical to do this kind of polishing on this material I'd love to hear about it!

Step 5: Eh, voila!

I like to wait 24 hours to lay my image over the background just to be safe, but acrylic paint usually dries fast--often faster than I can paint with it! 

When the paint is dry you can lay your image over your background and either stick it in a frame or otherwise marry the two. 

And that's all there is to it, really!  Some final tips:

  • Mix in fluorescent paints, they make colors more vibrant sometimes, Disney did this a lot (Madame Medusa's hair in "The Rescuers").

  • Experiment with acrylics--some have a shine or sparkle to them, but sometimes they're not very opaque.

  • Sparkles and glitter.  You could lay down a touch (a very LIGHT touch) of spray glue or mix them into your paint or something.  I experimented with using sticky-backed celluloid for a while and that made sparkles easier but I found them un-workable ultimately.

  • Once your picture is done you want to keep it out of direct sunlight and you don't want to HANDLE it too much.  The paint and inks are pretty sturdy but the final work is still fairly delicate. 

Conclusion

I find painting cels rather relaxing and I really like the vivid results, and they're a great conversation starter.  I've also sold some of them, which is always fun!  I'd be curious to know if anyone else has experimented with this medium. If you have, or if you decide to, drop me a line, I'd love to know about it. 

Meanwhile, if you'd like to see more examples of my work, check out the link below.  Some of them are not (ahem) particularly "work safe," just fyi! 

Thanks for reading and good luck!

Cels I've created

(I'm not advertising my work or this site, this link to Etsy is just to showcase examples of cels I've completed)

Cartoon Colour Company

(A have no affiliation with this company and I'm not promoting their products, just making the link available)
Animation Unleashed: 100 Principles Every Animator, Comic Book Writers, Filmmakers, Video Artist,...

Make your animation say what you want it to say. Animation's potential as a powerful tool for communication is just beginning to be understood. This book reveals key principles,...

View on Amazon

The Animator's Survival Kit--Revised Edition: A Manual of Methods, Principles and Formulas for Cl...

The definitive book on animation, from the Academy Award-winning animator behind Who Framed Roger Rabbit?Animation is one of the hottest areas of filmmaking today--and the maste...

View on Amazon

Updated: 05/23/2013, AnomalousArtist
 
Thank you! Would you like to post a comment now?
4

Comments

Only logged-in users are allowed to comment. Login
AnomalousArtist on 03/10/2017

Sorry for the delayed response--I think the heat in regular printers will melt anything not specific to a printer, and the ink doesn't stay on (and there will be glare!) That's been my experience anyway, sorry!

PHanimations on 08/31/2016

I'm thinking about using clear book covers as animation cels for a animated short that I'm making. Can I scan the pictures with the cels with a regular printer scanner and not get glare?

AnomalousArtist on 05/13/2013

I'm so glad you enjoyed it, thank you! I actually think animated films that are colored on computer end up looking better, to be honest (don't tell some of my friends, he heh), but I really miss this "lost" art and it's fun to create these things!

katiem2 on 05/13/2013

My daughter is fascinated with animation, she sketches for hours and is looking forward to learning more about the advanced technology you've outlined here. She will be thrilled to read this. Thanks

dustytoes on 05/13/2013

I can't imagine having to make thousands of these for one movie. But they come out so nice looking. I come from the "pick up a pen and draw" times myself so I love this idea of creating art. This page was very interesting to read, thanks for sharing.

You might also like

Improve Your Drawing Ability...Quickly

Working in the animation business I was surrounded by brilliant artists who s...

Animate a melting object in Carrara

A tutorial for creating melting object in Carrara, a Mac 3D visualization sof...


Disclosure: This page generates income for authors based on affiliate relationships with our partners, including Amazon, Google and others.
Loading ...
Error!