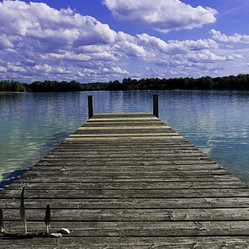
The sky and clouds are often an important part of the scene that the photographer wants to record, but unless he knows how to deal with them, they often reproduce as blank white paper in the resulting print. There is a reasons for this: The sky is more often than not the brightest part of any outdoor scene.
And, all black-and-white negative emulsions are more sensitive to light and medium blue than to any other color.
Cloud and Light
The greater the contrast between sky and cloud, the easier it is to photograph them, and the contrast varies according to the light and the type of cloud. Some clouds are much brighter than others; the brightest are the "cotton wool" cumulus clouds, and because they generally occur in a dark blue sky, they are the easiest type of cloud to photograph. Cumulus clouds are about twice as bright as the upper part of the low-level nimbus (rain) clouds which tend more to a gray tone. Half-way between those two types in brilliance, are the high, wispy cirrus clouds (mares' tails), but they usually have a very pale sky as background and therefore show very little contrast to the sky.
The darkest part of the sky is always near the zenith but slightly to the north; the blue lightens towards both the sun and the horizon. Just above the horizon the sky is almost white and clouds do not stand out from it.
The direction of the lighting also influences the brightness of clouds. Front lighting produces the greatest reflection towards the camera and therefore the greatest brightness. But what is gained in brightness is apt to be lost in modeling. The sun shining on clouds at an angle of about 45° (i.e., over the photographer's shoulder) produces both good modeling and bright clouds. Haze. In the course of the day, over-all contrast again varies considerably. The best time for photographing clouds and skies is between one and four hours after sunrise and from four o'clock in the afternoon up to about one hour before sunset. Atmospheric haze always tends to lower the contrast of the scene, and during the middle hours of the day there is much more haze in the atmosphere than at the beginning and end of the day. And there is also more haze in summer than in spring and autumn. The finest and clearest cloud formations are often found in April and May.
There is far more haze in the air over the British Isles than in continental climates, and more over big cities than over country districts. The amount of haze diminishes with increasing altitude and disappears altogether at about 6,000 feet in summer and 3,000 feet in winter. Film. The brighter types of cloud can be photographed satisfactorily against the darker parts of the sky on panchromatic film without the need for correction filters.
Color
The cloudscape for its own sake is not nearly as often attempted in color as in black and white, except for sunset effects where color really does score. The more delicate sunset is better than the lurid type which may come out rather exaggerated. In landscapes where the sky plays a secondary role it usually records well even without special care, and distant clouds are still separated from the sky by the film.
Filters
With black and white film medium yellow or green filters in normal conditions give a true rendering of sky tones; orange and red make them dramatically dark. At high altitudes a U.V. filter provides all the correction necessary; even a pale yellow gives too much contrast.
There are also graduated sky filters in which the tint deepens towards the upper half, and the lower half is quite clear. Such filters prevent over-exposure of the sky while leaving the landscape unaffected: they call for no increase in exposure.
With color film, the only filters that can be used are colorless U.V. filters and neutral grey polarizing screens. These darken the blue of the sky by cutting out the polarized light rays which are reflected principally from just above the horizon. In this case the effect must be studied either on a focusing screen, or by looking through the filter and rotating it until it is in the position that gives the desired effect.
Although all makes of films and filters show as many subtle differences as there are variations in the color of the sky, the table above will help to produce good results in most conditions.
Exposure
Correct exposure is vitally important. Over-exposure eliminates the delicate nuances of tone between sky and cloud and gross over-exposure will even cancel out the effect of filters. The danger of over-exposure is greatest when photographing against the light, when clouds are brilliantly rim-lighted, but the landscape is usually in shadow.
Under-exposure has the opposite effect and increases contrast between cloud and sky by darkening the blue tones. This effect can be exploited either by choosing a foreground object which appears in silhouette, or by lighting the foreground subject with flash. The flash exposure is calculated so that the sky is under-exposed by about two stops. This expedient is also useful with color film.
Clouds rarely stand still and 1/10 second is about the longest exposure that can be given safely.
In the darkroom, a slightly over-exposed sky can be darkened on the print by shading; if it has been heavily over-exposed, it may be reduced with persulphate reducer.
Excellent cloud effects, particularly at sunset, can be created by photographing straight against the sun when it is partly hidden or even slightly veiled by cloud or mist.
Very dark storm clouds which are not brighter but darker than blue sky present no problems. Normal photographic technique is all that is needed to reproduce them in their correct tones. Beautiful pictorial effects can also be obtained by waiting for the sun to break through holes in wind-driven storm clouds.
Printed-in-Clouds
Combination printing can be used to print in a good sky from another photo in place of an unsuitable or overexposed one. In this case the lighting and cloud type in the other shot should be chosen to match the subject conditions. Clouds can also be put in or reinforced with Adobe Photoshop.
You might also like
Photographing Dogs and PuppiesPhotographing dogs is difficult. The best tip to anyone attempting to take pi...
Photographing Cats and Kittens


 Photographic Styleon 10/14/2011
 Interchangeable Lenseson 09/28/2011
 Negative Blisters and Blemisheson 09/17/2011
 Photographyon 08/22/2011


Comments