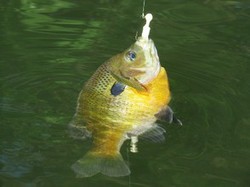
How would you like to hook and catch the next fish on a rod you have built yourself? It is a thrilling moment to experience that, and is not that difficult to do. You don't need many tools, either and it's quite likely you already own (other than the rod blank and components) whatever you'll need to build your first rod.

Build Your Own Fishing Rod
by flyfishing
By building your own fishing rod, you can have one that is of much better quality than what you can buy off the rack. As well, it can be customized to you.
Let's Get Started
Selecting your rod blank and components
Selecting the blank and components you will be using to build a fishing rod may appear confusing at first if you've never built your own custom rod before. But before we delve into that, in our introduction, I wrote that you likely have the tools you will need to build a rod, already. If not, they are easy and inexpensive to obtain. Here's a list - (although if you decide you enjoy building rods and go on to craft more, you may want some additional tools which can help you build rods faster and more efficiently):
- Fine sandpaper
- Flat file
- Round file
- Masking tape
- Good quality 1/4" or 1/8" brush
- Coffee mug and a couple of heavy books (I'll tell what this is used for later).
And really, that is about it!
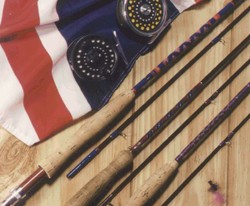
Now, let's look at blank selection and components. First though, perhaps you are not sure what is meant by the "blank." Well, the blank is that part of the fishing rod that the handle (or grip), reel seat, and the guides are attached to. If you take a look at your fishing rod right now, and imagine you were to remove the guides that the line runs through, remove the handle, reel seat and butt cap, what you would be left looking at is the "blank." It is most likely that you will be interested in a graphite blank; the majority of fishing rods today are sold with graphite blanks. When you are looking at the blanks that are available, you of course will want to keep both your budget and your fishing situations in mind. Blanks can range in price very widely - this is due to a number of factors, but newer graphite cloths that use advanced resin systems will be more expensive than earlier generation graphite.
When you are looking at blanks, you will usually be provided with a "butt diameter" and a "tip diameter." Both of these will be important in selecting your grip and the "tip top" guide.
When you build your first rod, I highly recommend that you purchase a pre-made cork handle kit. These are made of reasonably good quality cork, and some even will have a reel seat that comes with them, but not all of them do. You will want to buy the cork handle that has a smaller diameter hole that the blank goes through. You do not want to buy a cork handle that has a hole that is larger in diameter of the rod blank!
If the cork handle or grip you select does not come with a reel seat, then you will have to select one of those. They come in a variety of sizes and are meant to match a variety of fishing rods (fly, ultra-lite, medium, saltwater, etc).
The next component you will need to make sure you order is a "winding check." This is generally a piece of round nylon that slips down the blank, and sits against the top of the cork handle. If you look at your fishing rod that you have now, you will likely see a ring of some sort that has been fitted at the top of the the cork. That is a winding check. Your winding check inner diameter should be smaller (if it's the stretchable type) than the diameter of your rod at the point where the cork grip ends.
You will then need to decide on what type of guides you are going to attach to your rod blank. Again, there are so many variables, but generally speaking light to medium (and even some medium-heavy) rods use single foot guides. Heavy rods will generally speaking, use double foot guides. Saltwater rods will require guides that will not rust or corrode easily.
Fly rods are a bit different again - traditionally, fly rods have either one or two "stripper" guides, at the lower end of the rod, and then the rest of the guides were snake guides. However, many modern fly rod makers use a single foot guide with a hard ring, that are especially made for fly rods and are smaller than those used on spin, baitcasting and other types of fishing rods.
For the next item, you will want to consider color! You can really dress up a rod depending on the color of thread you buy. The guides are attached to the blank by winding thread, beginning just below the guide foot, and up and over it. If you take another look at your present fishing rod, and see that epoxied area over the guide foot, that is where thread has been used to attach the guide.
Many rod building and component shops will also sell you a complete "rod building kit" that comes with everything you will need so you won't have to select anything except the blank you want. This might be a good way to get started on building your first rod, but as you build more of them, you will more than likely want to have some further knowledge so that you can select exactly the components that you prefer.
The final two things that you will need to get are thread epoxy finish and an epoxy cement. The finish is what you will brush over the thread wraps on the rod to protect them. My own preference for this is the "U-40" brand - it is easy to work with and I've got rods that have U-40 finish on them that were built 20 years ago, and they still look fantastic!
Don't worry if any of this is confusing at first. The majority of the places that you can purchase blanks and components know about custom rod building and they will be able to give you great advice on what to get to build your first rod!
Will You Try To Build Your Own Rod?
Putting It All Together
The blank and components have arrived! Now what?
So a big long tube has arrived at your door, and you've discovered your rod blank and the other components have been delivered! Now what? What is the first step after unpacking everything and getting going at building that first fishing rod?
I am going to recommend some books and resources to you that are going to help you get through this process - but you're going to have a lot of fun doing it, and when you catch that first fish, a lot of thrill, too! But to provide an overview:
Before you do anything in regard to putting it all together, you need to "spine" the blank. This process will ensure that you are putting the guides (and of course, don't forget to match the right axis with the reel seat too) along the correct axis of the blank. Almost every blank will have an axis along which it wants to bend - and putting the guides anywhere else will reduce casting efficiency as well as fish fighting abilities of the finished rod. You can find a very good "how to" on spining a rod blank here.
Next, you will want to inspect the components and ensure that you received everything you need. Let's assume you did. The next thing you will do, assuming you're building a rod like spinning rod which has a cork grip, then a reel seat, and then more cork above the seat, is slide down the first long section of cork onto the grip. This will give you and idea of where it will fit without the hole being bored further.
Using some common sense, you will need to bore the hole of the cork grip larger. This is where the round file comes into place that we discussed above in the tools section. You are aiming for a "tight fit" here.
When you have bored the hole of the cork grip to this point, you can prepare the blank for it. If your rod blank has a shiny surface that has been finished, you should gently rough up the area where the grip and reel seat will be attached, with the fine sandpaper. Doing this will create a better bond for the epoxy cement. Once you have done this, spread liberally some epoxy cement to the blank where the butt cork grip will be. Then slide that part of the handle down the blank into place.
At this point, you could also attach the Butt Cap to the recessed end of the cork grip.
Now, you will want to attach the reel seat. The inner diameter of the reel seat will be quite large, and what I like to do is to make "pillars" with thin strips of masking tape on the blank where the reel seat will go. As you build the pillars, slide the reel seat down so you know you much more masking tape to wrap around until you have a snug fit.
Once you have completed this step, fill the gaps between the masking tape pillars with cement, being sure to also coat the top surfaces of your pillars. Slide the reel seat down being sure to align the axis which holds the reel along the same axis that you will be attaching the guides on!
Next, repeat the steps you did for the butt grip with the foregrip, filing the inner diameter of the hole so that it will fit on the blank snuggly where it is to be attached, right above the reel seat. Expoxy it in place and using a small bit of epoxy, attach your winding check.
At this point, it would be a good idea to let the epoxy cure for 24 hours before you go to the next step of attaching the guides.
Attaching The Guides
We're Almost Done!
After you've let the epoxy cure on your grip and reel seat assembly, it's time to attach the guides to your blank. One of the first things I do is attach the tip top guide with hot melt glue, being sure of course that it is aligned along the axis the guides will go. I do this because I generally "test cast" the rod before deciding upon the final guide placement. However, this article is not intended to go into the myriad ways of determining guide placement, but resources for your research will be provided at the end.
Indeed, for your first rod, it is probably safe enough to use a suggested guide placement chart, one which provides a general guideline for both the size of the guides and their distance along the blank, where they should be attached.
I'm going to assume that for your first rod, this is what you will do. First though, if the feet of the guides has not already been tapered, you will want to dress them with a flat file so that they are tapered in such a way that there is not a big "jump" for the thread as you wind it up onto the guide from the blank. After filing down a nice taper, you will want remove any burs that are left behind with sandpaper, preferably a silicon carbide paper. When you are satisfied that the metal guide foot is very smooth and free of any burs that could puncture through your blank, you are ready.
You'll attach the guides in a temporary form with thin masking tape, up towards the guide leg. Once you have them in place where they are to go on the blank, you can start to permanently attach them with the thread.
Once you get the hang of this, it's pretty easy to do!
Remember I mentioned the coffee cup as a tool you would need along with a couple of heavy books? This is where those come into place. Put the spool of thread into the deep coffee cup after unwinding a long length of the thread. You will the books as a tensioner device, keeping tension on the thread as you wrap it around the guide.
A Note About Thread Tension:
You do not want to have too much tension on your thread which causes it to be wrapped to tightly around the blank! You do need some tension, and this might take a bit of time to get it "just right," but ultimately, you want enough tension such that the guide foot is quite snugly attached, but not so much that you can't make some adjustments by wiggling the guide to move it after the thread has been wrapped into the exact alignment you want it to be in.
Guide Wrapping
At first, guide wrapping can seem tricky, but once you get the hang of it, it will come as if you never ever had a problem in the first place. If you've ever done any fly tying, then you'll probably understand how to start the thread on the blank. You bring the thread around the blank, and then start wrapping over the tag end, up toward the guide foot. In this case, "wrapping" means turning the rod blank so that the thread is self wrapping as you continue to turn the blank. It is easier if you have some type of support for the blank, but my first rod I simply used my knees as a rest for my elbows as I turned the blank with my hands.
As the thread approaches the masking tape that has been temporarily securing the guide, remove the tape once the guide foot is fairly secure under the length of thread you have wrapped over it. Once you have nearly completed wrapping the length of the guide foot, slip a length of floss that you've doubled over against the thread, and begin to wrap over it. When you've reached the point where the thread is touching the guide leg, while maintaining tension on the part coming from the blank, trim the thread, put the end through the doubled over floss, and pull that thread underneath the other ones, and then trim off the excess.
You simply repeat the same steps for each guide and you are done wrapping!
Decorative Wrap
It is always nice to have some kind of trim or decorative wrap above the winding check on the blank, but it is not necessary. You can simply wrap thread for some length that you like, or certainly you can learn some more advanced decorative thread wrap techniques like weaving or creating diamond patterns. However, you will definitely want some more advanced equipment, especially a much better support system, for your rod when doing this.
Finishing The Thread
There are two types of thread generally used, "Regular" nylon thread and "NCP" thread. Regular thread requires several coats of color preserver before an epoxy finish is applied if you want to keep the color of thread, otherwise it takes on a transparent like color. NCP on the other hand will not do this when you apply the finish directly to it.
Having said that, I like to use color preserver regardless of the type of thread. NCP thread tends to be less dense than regular thread and as such, can hold air and cause some bubble problems when you apply the epoxy finish. So that is why I usually always use color preserver and several coats of it before applying finish. I also find that if it is later necessary to remove a guide for repair, this is done more easily when the thread wrap has had color preserver applied before the finish.
When you apply the finish to the guides, you will want to have some kind of support for the blank as after you have applied it, you will want to have the blank turning at a slow rpm for some time. This can be accomplished with good results manually by turning the rod for about ten minutes to ensure the epoxy finish does not run down and form a glob if it was just let to sit on its own.
After ten minutes, the epoxy will start to harden and you can then give it a half rotation every five minutes or so for half an hour, and then increase the time in between to 10 minutes until it has sufficiently set that it won't run and glob up.
And there you have it! Your own custom home made fishing rod that you can be the proud owner of!
Hand Wrapping A Guide Video
Further Resources
Learn More!
General fly rod building resources:
http://about-flyfishing.com/cs/custom-fishing-rod-resources.html
Rod Maker's Forum:
Common Cents Method of Guide Placement:
Custom Rod Builders Guild
RodMaker Magazine
Updated: 06/09/2012, flyfishing
You might also like
Freshwater Fishing BasicsThis article provides basic information about freshwater fishing in North Ame...
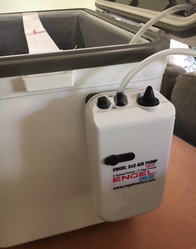
Engel Coolers For Fishing and Storing Live BaitSturdy Engel coolers for deep-sea fishing and keeping live bait at home or on...
Disclosure: This page generates income for authors based on affiliate relationships with our partners, including Amazon, Google and others.
 The Value Of A Fly Fishing Guideon 06/13/2012
Comments