When creating designs for apparel, the whole process can be a little overwhelming in terms of the sheer amount of options available to the seller. This article will go over a variety of tips and tricks to help you when making choices about the artwork you create, the way you create it and finally the products you use to display your artwork.

Designing Clothing on Zazzle - Tips & Tricks
Here you will find a variety of tips and tricks to help you when producing your designs and applying them to a range of apparel in the Zazzle marketplace.
File types and image sizes
File Types
When you are in the early stages of producing artwork intended for apparel, it is best to start off by thinking about the way you want the image to combine/blend with the material of your chosen products.
In general the best option is to save your image as a .png file with a transparent background layer. This way (as long as no sections of the image are cut off) you will just have the design printed on the material (example shown on the right) without an ugly rectangular background clashing with the clothing colour. However, if the background colour of your image is white then you could also try using the "Show whites in image as transparent" option within the Zazzle product creator. But remember that this option will remove ALL white areas of the image, so if your design contains several other white areas it may be best to stick to the .png file method.
Using these techniques you can also create layer upon layer of seperate .png files within the product creator (as demonstrated to the right again) until the image looks exactly how you want it.
Its also worth mentioning that Zazzle wont print white ink onto any white/light coloured apparel (any white parts will have the colour of the current clothing item showing through) so factor this into your thought process when creating designs. We will go into this further in the section entitled "Designing for light & dark apparel".
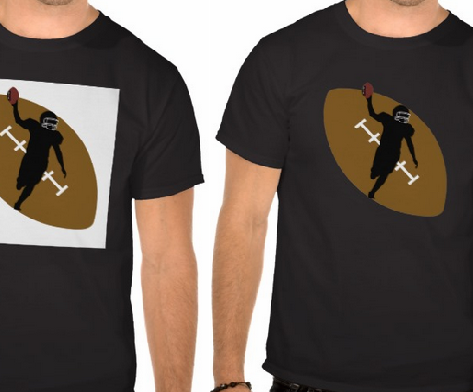 |

Image Sizes
When deciding on the image sizes to create your initial artwork you need to consider a few things. Firstly, do you intend to apply your design to the largest scale products such as Posters/Canvas Prints etc or just Apparel? If you plan to create a range of products, then base your original image document size (and the full resolution of any separate images you plan to use in the design) on the dimensions of the largest items you wish to print on.
Make sure to create a separate folder and name it something along the lines of 'Original Image Files', that way you can always go back to the original and scale it down as required. If you are using vector files as opposed to .jpeg/.png and so on, you can disregard this as the image quality will remain the same and so can be resized to suit. This may all seem obvious, but on several occasions I have found myself caught up in creating an image specifically for a T-shirt or a Hoodie; Then at a later date I decide that I want to adapt the image to something of a larger scale, but I either haven't saved the image at full quality or I haven't labelled it clearly enough in my documents. This isn't too much of a problem when you just have a few designs & variations, but when you start to work with thousands of items it can become a real issue over time.
Designing for Light & Dark apparel
When designing for apparel it is worth keeping in mind that a design that looks great on light clothing, may not look so great on dark clothing and vice versa. So before deciding to make your design available on 'All Clothing Options' in the final step of creating your products, I would suggest previewing the design in various shades on a selection of items. That way, if you decide that a certain element of your imagery isn't being displayed correctly on a specific colour, you can choose to only display the design on either light or dark apparel. This will keep your marketplace looking clean and your artwork will always look its best.
As I mentioned previously (in the "Image & File Types" section) Zazzle will not print any White ink onto light clothing. To explain further; I will go into the printing process for light and dark clothing below;
Light Clothing: Any sections of your image that are currently white will appear as transparent; So as an example, if you were printing your design onto a white shirt then any white areas of your image would still look as intended (because the colour of the white fabric would still be showing through). However, if you change the colour of the shirt to say a light blue then any previously white areas would show up as light blue. Occasionally this can actually improve the look of the design, giving it a washed out vintage feel but if your image contains something that is only intended to be white (i.e. a polar bear) then this could cause issues on any light apparel other than plain white. Its really a case of trial and error and after previewing a few of your designs on a variety of coloured apparel you will start to figure out what works for your style and what doesn't.
Dark Apparel: When printing on Dark clothing, Zazzle will initially print a layer of white onto the area (before any of your design is applied). This means that any white areas of your original design will still be transparent, but they will remain white (no matter which colour of dark apparel is chosen) due to the initial layer of white that was printed underneath.
Creating Alternate Designs:
It may also be worth creating two separate designs; one specifically for Light Apparel and one for Dark Apparel. This means that you can publish products on all colours, without risking the quality of your design.
If you follow this approach make sure that you label your product clearly and let customers know there are alternative versions available, both in the Title & Product Description of your item. Customers will often find your items in the general marketplace (and rarely visit your store homepage directly) so write something along the lines of "Check out the Dark Apparel alternative of this design in my store!) to let potential buyers know. This could also lead to a sale of another of your items that the customer would never have seen otherwise!
I would also suggest leaving the 'Customize It' option available for customers to make changes to the colours and layout as they wish. You may think the design is exactly as it should be, but the customer may not agree (and they are the ones handing over their hard-earned money) This way you have more chance of selling an item, rather than the customer moving along to find something more suitable.

Using separate images & text to create designs
If you don't have access to any image editing software but you have a collection of separate .png files that would work well together, then you can add layer upon layer (as mentioned previously in the "File Types & Image Size" section) to create the desired effect.
Useful Tip:
You can also make use of the text tools available to create elements of your design when using the Zazzle product creator. To give you an example, you could use the text tool to add a symbol (such as a # or *) and then pick an unusual font, enlarge, rotate and alter the colours to create a background for a logo. You could use a capital letter O as an outline for an image or combine multiple letters to create an abstract pattern, the possibilities are endless when you start to experiment. To give you an idea of the potential I created a design (featured below) made purely from text, specifically for this topic.

The @ symbol was created from 3 different layers of black and white text, which were then enlarged to different sizes to create the spiral effect. I then selected all three layers (ctrl & left mouse click) and turned them into a template by going to the options button and clicking "Make this a template object". This will mean that if the customer decides to change the text, it will change all three layers at once and maintain the layout. I then did the same with the text at the bottom and moved onto the decorative background.
Creating imagery like this is more tricky, but once you get used to the tools available it isn't much different to using other image editing software. However there are no options to add filters/gradients/textures etc and instead you will have to rely upon the use of the color palette, the rotate tool, the text tool, and the option to shrink and enlarge your images (with some creativity thrown in). The backdrop for this design was created using 11 separate letters and numbers in a decorative font which were then rotated and enlarged until things started to look the way I wanted.
*Useful Tip* The "Rotate" button on the product design page only allows you to turn an item 90 degrees at a time. This really restricts your options, however if you hold down CTRL on your keyboard and click the rotate button with the left mouse button; you can then select your own degree of rotation!
Once the background was finished I also created an alternative design specifically for light apparel (inverting the colors) and labeled both products clearly explaining the versions available.
Choosing products to create
And finally we move onto the products available to the seller and the way in which they appear in the marketplace.
As mentioned previously, it is always worth creating 2 separate designs specific to light and dark apparel. This means that your store wont be full of designs that are barely visible due to the color of the fabric they are being displayed on and provides the customer with more options.
In terms of the selection of different products you to choose to make add your design to (i.e. Regular Men's & Women's tees/ Hoodies/ Baby Clothes/ Hats/ Pet Clothing etc, it all depends on your design. Its best to think about the best target audience for your design, and then choose your products accordingly. Again this means that you wont be flooding the marketplace and cluttering up your store with inappropriate designs, but you can still make your product available on all products. That way your leaving the choice to the customer while also keeping your store looking presentable.
There is an age old argument of Quantity over Quality when it comes to sellers on Zazzle, but there is no right answer and every store is different. There are stores thousands upon thousands of products that barely make any sales (and obviously some that make a lot) and other stores with just a few products that sell constantly.
The best advice I can give is to create designs that you are proud of and add them to products that you would consider buying, either for yourself or for friends and family!
Updated: 09/03/2014, SquareiDesign
You might also like
Starting with Nothin' and Ending up with Somethin' | My Journe...From despair came hope. From hope came drive. From drive came knowledge. Know...
Earn Money Online With Just Paypal And Wizzley AccountsThings I love about Wizzley #5. Making money online from home just got much e...
Disclosure: This page generates income for authors based on affiliate relationships with our partners, including Amazon, Google and others.


 Getting the most out of your Zazzle store & the tools availableon 08/17/2014
 Make Money Online with your Artwork, Designs & Photographyon 08/15/2014


Comments
Thanks Emma, glad you enjoyed it!
Thanks younghopes, Zazzle has been great so far for me as a seller. I've also just ordered a shirt to test out the quality, so I will update you guys (or create a new article) when it has been delivered.
Very useful post, since i have just started on zazzle, hows your experience on zazzle?
Thanks for your comments Mira & Telesto, glad to hear it has been of some help!
Thank you for these tips. I wondered about some of them, such as whites on light apparel, for instance, so this has been helpful.
Thank you, this is really helpful. I haven't tried designs on clothing yet, a job for the weekend, so this has come at exactly the right time!