Germinating flower and vegetable seeds indoors, requires using a grow light / plant light to ensure seedlings develop into strong healthy plants. For this reason alone, frugal hobby gardeners like you and I find us faced with the dilemma, buy an expensive light like those designed for use with hydroponics gardens, or make something we can use much cheaper that will help us germinate seeds.
After many hours spent researching, and discussing with fellow gardeners what doesn’t work, things that are overpriced and what really works well. I have come up with this how to build a grow light plans that work surprisingly well. Please by all means, continue reading this article so you too can build a grow light that I honestly believe will help you start all your favorite flowering and vegetable producing plants this year.

Easy to follow how to build a grow light plans
by teddletonmr
You too can easily build a grow light using common materials available online or your local home improvement center.
You too can easily build this grow light in a few hours.
Following the plans in this article, you will easily be able to build a grow light, assemble a seed germination station, and plant your tomato seeds in the same afternoon.
 Homemade grow light teddletonmr |
 | Hydrofarm JSV4 4-Foot Jump Start T5 Grow Light System This 4-foot T5 Grow Light System makes a great choice for the gardener that rather buy, than built their own complete seed germination station. Only $162.83 |
What you will need to build a grow light
You too can easily build a grow light using common materials available online or your local home improvement center.

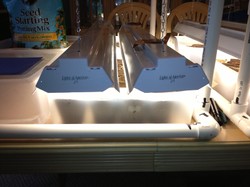
First, determine how many plants you wish to start from seeds. In the picture to the left, you will see the setup we use for starting our tomato and pepper plants. The 4-inch deep by 16-inch wide and 22-inch long storage container holds twenty-four 3-inch Jiffy pots. The 3-inch pots make it easy to start our seeds, and then plant the 8-10 week old plants straight into our vegetable garden without the need to repot tender young plants.
 | Jiffy 5311 3-Inch Seed Start Pots, 10-Count Start your favorite hybrid and heirloom tomato plants from seeds using these 3-inch Jiffy Pots. Only $1.29 |
1-inch PVC water pipe
The 1-inch PVC makes a sturdy frame that is lightweight, strong, durable and easy to take down for storage.
 1-inch PVC water pipe teddletonmr |
1-inch PVC elbows / 90-degree bends
Used to make bends
 1-inch PVC 90 teddletonmr |
List of materials you will need: these items are available at lows, Home depot, Menards, and other home improvement stores.
- 3 10-foot sections of 1-inch PVC water pipe, we will use this to make the frame that supports the grow light fixtures.
- 8 each 1-inch PVC elbows / 90-degree bends.
- 4 each 1-inch PVC T's.
- Small can with applicator, PVC purple primer, and general purpose adhesive.
- 1 bag of medium duty 8-inch nylon zip ties aka wire ties.
- 2 each 4-foot fluorescent shop light fixtures with T-8 daylight lamps / light bulbs.
- 1 power strip with on / off switch.
1-inch PVC Tees.
used to attach light supports to base frame
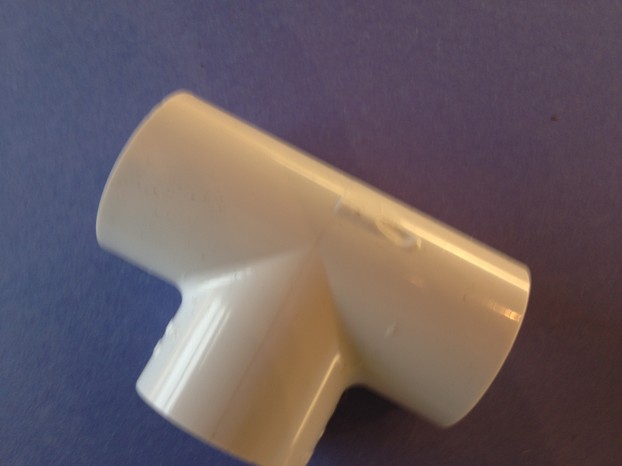 1-inch PVC T teddletonmr |
1 power strip with on / off switch.
Used to turn grow lights on / off
 Power strip teddletonmr |
 | GB 46-315 Electrical 14-Inch Cable Ties, Natural, 100-Pack You can never have too many nylon wire ties; they will come in handy for hanging the light fixtures, keeping the power cords neatly bundled, and many other fastening jobs around the house and garden. Only $8.99 |
 | Fellowes 6-Outlet, 15-Foot Power Strip (99026) This Economical office grade power strip works well as a way to turn all your fluorescent grow lights on and off at the same time. Just remember to keep it high and dry. Only $34.96 |
How to build a grow light plans
Measure twice and you will only need to cut each piece of PVC pipe once and eliminate waist.

I am sure many of you fine folks have noticed the pictures of our seed germination, and plant grow set-up is a bit larger than others you might have seen online. The fact of the matter, we rather enjoy having the ability to start a combination of 96 of our tomato and pepper seeds in the 3-inch Jiffy pots with this set-up. The overall length works well with a 4-foot shop light, however, feel free to lessen the width in order to take up less space, and plant fewer seedlings if you like.
How and what sizes to cut the 1-inch PVC water pipe into.
What you need to cut the thin walled PVC water pipe, hacksaw with 32-tooth blade, reciprocating saw, or my personal favorite compound miter saw with finish blade makes a square, smooth clean cut every time
4) 32-inch pieces of the PVC1-inch Plastic pipe
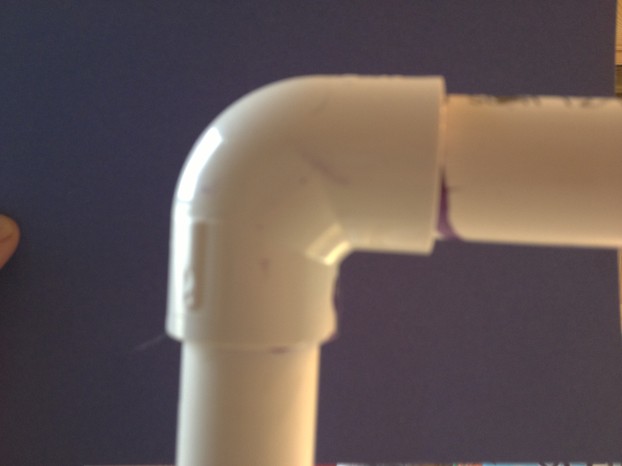
In the picture, you will notice a 32-inch piece of the 1-inch PVC running from left to right (the width). The top piece supports the light fixture and the bottom piece of pipe makes up each end of the base frame. You will need to cut 4 pieces of the 1-inch PVC pipe 32-inches long.
2) 40-inch pieces of the 1-inch PVC plastic pipe
In the same photo, you will see on each, the right and the left sides of the grow light support frame, a piece of the 1-inch PVC pipe running from front to back. Each of these pieces of pipe measures 40-inches long.
4) 18-inche pieces of the 1-inch PVC plastic pipe
In the photo, you will see 4 vertical pieces of the 1-inch PVC plastic pipe; these support the top portion of the frame that the grow light fixtures hang from.
4) 2-inch pieces of the 1-inch PVC plastic pipe
What you cannot see in the picture, there is a 2-inch piece of the 1-inch pipe connecting the 1-inch T that supports the light hanger support, and elbow at each corner of the base frame.
 | Hitachi C10FCE2 10-Inch Compound Miter Saw This Hitachi C10FCE2 15-Amp 10-Inch Compound Miter saw is a good value for the handyman, woman that doesn’t want, or need to spend a lot of money on a powered trim saw. You will need to buy a good finish blade for this project. |
Assembling the grow light support frame
Dry fit all the pieces of PVC pipe before gluing everything together.

Assembling the end frame is really quite easy. Simply gather 2) of the 32-inch pieces of the PVC pipe, 2) 18-inch pieces, 2) 2-inch pieces, 4) of the 1-inch PVC elbows and 2) of the 1-inch PVC pipe T’s. Remember we want to dry fit all the pieces before gluing anything.
Here is a helpful time and aggravation saver for you, check each end of the PVC pipe for burs and rough edges where you cut it. Take time to smooth out any burs that will prevent the pipe and fittings sliding together before trying to force the PVC pipe, elbows, and T’s together.
Step one: Start assembling the light support section of the grow light frame by attaching one of the 90-degree elbow fittings, to one end of each 18-inch piece of pipe
Step two: Complete test fitting the light support section by attaching one of the 18-inch pieces of pipe and elbow assemblies, to each end of one of the 32-inch sections of pipe. Laying all the assembled pieces lying flat on a table or floor to ensure everything is square and lines up. Repeat the process for the second light support section.
Use a pencil or Sharpie to establish indexing marks located on each elbow, T fitting, and sections of pipe where they connect, this will make disassembly, reassembly, and gluing all the parts squarely, much easier on final assembly.
Grow light support , frame connection
Use one of the 2-inch pieces of pipe to connect the elbow and T fittings at each corner.
 Grow light support base frame teddletonmr |
Assembling the grow light frame
Paying close attention to the details will make assembling the frame less frustrating.
 When assembling the bottom portion of the grow light stand. We will need:
2) 40-inch pieces of the 1-inch PVC pipe
2) 32-inch pieces of the 1-inch PVC pipe
2) 2-inch pieces of the 1-inch PVC water pipe
4) elbows, one at each corner
4) t Fittings, one for each leg of the light supports
Remember to pay special attention when assembling the elbow, and T fittings, they must align perfectly at each of the four corners as shown in the picture above.
Attach one of the elbow fittings on each end of the remaining 32-inch pieces of PVC water pipe. Make sure the corners squarely aligned.
With the corners aligned properly, slip one of the 2-inch pieces of pipe into the open end of each elbow; this is where the T fittings attach.
Slip the T fitting onto the bit of the 2-inch piece of pipe, and make sure the opening for the light support points straight up. Go ahead and push the light supports vertical legs into the T fittings. This will make aligning everything easier.
You now should have both ends of the grow light frame assembled dry fitted no gluing yet.
Connect the two pieces of 40-inch pipe, to the open ends of the T fittings connecting both end frames together. All should fit together properly.
Mark each joint using a sharpie like we talked about earlier, slip each connection apart, clean, and prime and glue each joint taking great care to align your alignment marks.
Easy way to adjust hanging grow light
 Chains make adjusting grow light easy teddletonmr |
Shop light makes a good grow light
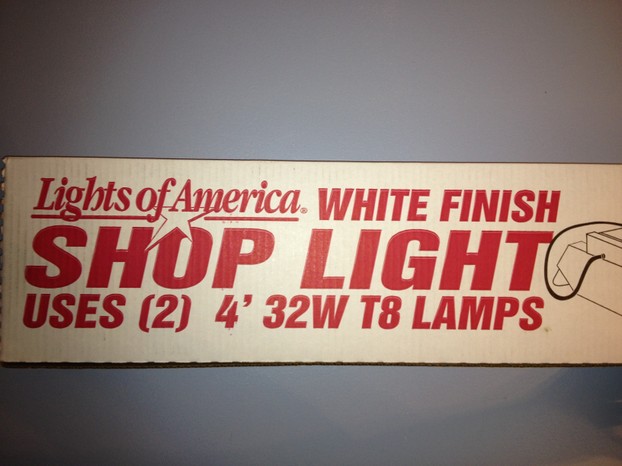 4-foot shop light teddletonmr |
These are the 4-foot day light bulbs we use
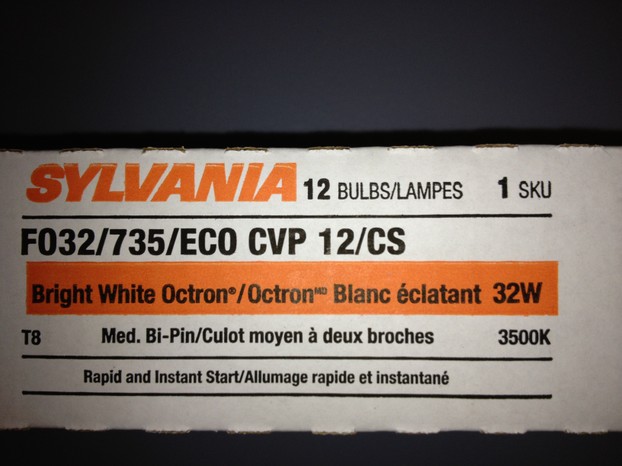 4-foot day light bulbs teddletonmr |
 | Shop Light, 48" White This 4-foot florescent light fixture comes with easy adjustable chain hanging assembly, 3-wire, 5-foot power cord, and plug. Thermally protected. 48" length x 4 3/4" width x 3" height. Some assembly required. |
Easy way of hanging 4-foot Florissant grow light fixtures
Nylon wire ties are inexpensive, easy to adjust and require no need to drill holes.

Rather than go to all the bother of drilling holes, attaching screw in metal eyelets or similar fasteners. Nylon wire ties will make attaching and adjusting your grow light fixtures much easier. Not only will you need to rise or lower your grow lights as your tomato and pepper plants grow big and strong. Moving the fixtures to the right and left along the supports come in extremely handy at times.
Simply wrap a nylon wire tie around the 1-inch PVC pipe used to support the light fixtures, slip the chain hook in the loop created by the wire tie, and pull the wire tie snug and you’re done.
I hope you enjoyed putting your homemade grow light to work this season and grow your own fruits, vegetable, and flowers in great abundance.
Happy gardening, be well and if you like share your thoughts in the chat section below.
Thanks for sharing, teddletonmr
LED grow light for houseplants and seedlings
Looking for a plant light for your house plants or just a few seedlings that looks as good as it works, this is a good choice.
 | Fertile Earth LSG-1 LiteStik General House Plant Light This Lite-Stick automatically provides supplemental light to any indoor houseplant where supplemental lighting is required. This indoor plant light Uses advanced LED grow light technology to provide our indoor plants and seedlings with the proper amo Only $79.99 |
You might also like
Selecting the best vegetable garden siteSelecting the best garden site makes it easier to grow your own tasty nutriti...
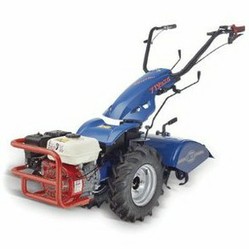
Review the best garden tiller featuresBefore you buy the best garden tiller for your gardening needs, check out thi...

 Apple Watch the Best Talking Watch Bargainon 01/16/2023
 In-depth review of a Bushcraft Backpacking Survival hatcheton 12/05/2014
 Winterizing windows – Easy and inexpensive DIY projecton 11/17/2014
 Growing cucumbers on a trellis is fun and easyon 08/05/2014

Easy to follow how to build a grow light plans chat
You are most welcome BrendaReeves, I hope you enjoy starting all your favorite flower and vegetable plants from seeds using these grow light plans.
Happy gardening, Mile :) .
Thank you for the tutorial. I never would have thought of this. I have just the place to put it.
Mike, I like that honor system set up to sell your little tomato plants. I can't imagine you will need all those tomatoes! I would love to get some little plants cheaply (heck, I'd even pay a dime!) - they are so darn expensive around here, but I don't buy many. I can't grow much of anything inside my house - it's only 60 degrees in here in winter during the day and there is no sunlight making it inside. Cherry tomatoes are one plant I grow every year in the garden though. I hope you will continue on with the story of your garden throughout the summer.
Thanks Katie, I have a friend that has a cherry tomato as a houseplant; they simply pick a handful as they walk by the plant, and enjoy a healthy snack What could be better than that? .
Happy gardening. Mike
Thanks Pam, just so you know we do share several of the tomato and pepper plants we start from seeds with friends and neighbors.
I'm thinking of setting a few plants on a table next to the mail box this year with a mason jar to see what happens. Maybe someone will enjoy the idea of a free tomato plant they will drop a nickle in the jar. What do you think? :)
Be well, Mike ,
wrapitup4me thanks for asking, yes using a daylight bulb will work when startting tomato and pepper plants from seeds.
You may find the Fertile earth LED lightstick a good choice, you can check it out at the link at the bottom of this article. Just thinking, you can get a better idea of what plant light will work best for your needs.
Thanks , be well and make it a great day. Mike
If I read the material correctly, any bulb that gives off daylight will be sufficient. I can't buy from amazon - they don't ship to Israel. So if I get a LED bulb that gives off daylight and put it into a lamp closer to the plants, that should work?
This is exactly what I need, here in Ohio one day the sun is shining creating the perfect environment for seedlings to thrive and the next it's icy and dark just enough to end the growth process, wilt the seedlings and unfortunately withering away... This light plan will eliminate that process. Plus we have a later planting season due to the common late frost we get. Great how to do it yourself lighting system for starting and caring for seedlings and young plants. :)K
First thing I want is some of those zip ties - they are handy items to have around! The fact that you start this page by saying how you've checked with other gardeners and then come up with this, is very reassuring. I also like all those Amazon links so I can see how much things cost. Your set up is huge! I plant about 6 tomato plants a year, so I would not want something that big, but now I do have the general idea of how to go about it - type of lighting etc. Like wrapitupforme, I am thinking more of a small area grow light. The fact that you do use those peat pots successfully is encouraging too, because I do like the idea of just plopping them in the ground. Thanks for writing this very helpful page Mike!
I can't wait to see the pictures of your HUGE garden!
This is perfect timing for me - but I have a different question. I have a plant corner in my living room and the way my house is designed there is no window in my living room - I get light from the kitchen that has a huge window but is far away. Sooo. . . I want to know what kind of lights I need to set up to make sure the plants grow well - they are plants that do well indoors, but they do need some more light than the lights on the ceiling provide. Ideas?