Four Easy Science Experiments with Vinegar

by Jimmie

These science experiments rely on the power of vinegar, a common household substance, to cause the chemical reactions.

Giving your children hands-on experience with science will not only jet start their motivation but will also help them remember the scientific concepts of their academic lessons.

When science projects require expensive ingredients or special orders from a catalog, mom's own motivation goes down -- way down. That's why I love vinegar experiments. You probably nave a bottle of vinegar in your cabinet right now. Any kind will do, but to be frugal you will probably want to use an inexpensive white vinegar rather than a fancy basalmic vinegar.

Here are four different science experiments that involve humble vinegar as a major ingredient.

Making Science Hands-on Through Experiments

Vinegar is a Safe Chemical for Science Exploration
Baking Soda and Vinegar Reaction

1. Vinegar and Baking Soda Volcano

A Classic Science Experiment that Never Grows Old

This experiment is so fun that my daughter used to request I buy extra baking soda and vinegar at the grocery store just for her playtime.

Day-Glo Play-Doh Volcano w/ Baking Soda & Vinegar Eruption

Step 1: Prepare Your "Volcano"

The volcano is optional, but some children like to form a cone from playdough or a glass jar covered in playdough. If you don't want the volcano effect, just select any container. A taller glass vessel really shows off the reaction well.

If you are inside, prepare your surface for a lot of bubbly mess. Use a tray or work in the bathtub or sink. A great option is to work outside so that the mess can be hosed away.

Step 2:  Add Baking Soda

Put baking soda into your dry container. Part of the experiment can be testing different quantities to see how the reaction changes. Let your children have free reign to "waste" some ingredients for the sake of science. Baking soda is ridiculuosly cheap.

Optional -- Add a few drops of food coloring.

Step 3:  Pour in Vinegar

Get ready for some excitement! Pour on the vinegar and watch it bubble, fizz, and foam.

Why it Works

Baking Soda is sodium bicarbonate. Vinegar is acetic acid. When the two are mixed, carbonic acid is formed. That immediately decomposes into water and carbon dioxide. Thus, the bubbly reaction you see is carbon dioxide escaping.


Setting Up a Vinegar Experiment

Taking it Outside is Smart
Experimenting with Vinegar

Vinegar and Baking Soda Rocket

Add your baking soda and vinegar to this Baking Soda Rocket Kit. You assemble the rocket before mixing the reactive ingredients that propel the rocket up to 100 feet into the sky!

Experiment with different ratios of baking soda and vinegar to see what creates the biggest push.

2. Blow Up a Balloon with Vinegar Power

Harness the Reaction in a Visible Way

Once your children understand the reaction between baking soda and vinegar, it's fun to adapt the experiment to blow things up!

Balloons

First you can inflate a balloon with the reaction. 

1.  Use a funnel to add baking soda to a balloon.

2.  Add vinegar to a plastic drink bottle.

3.  Then attach the mouth of the balloon to the mouth of a plastic drink bottle. This part is tricky because you don't want the baking soda to touch the vinegar until the balloon is securely on the mouth of the bottle. So either crimp off the baking soda with a twist tie or just pinch it with your fingers.

4. Holding the balloon securely on, allow the baking soda to fall into the bottle and mix with the vinegar. Watch how the reaction inflates the balloon.

Then you can do a variation of this experiment with a ziplock bag.

1.  Take a double layer of paper towel and mound baking soda in the center. Fold it up in a neat package, with the paper towel protecting the baking soda. You will need to delay the reaction long enough for your to add the vinegar, so wrap it well.

2. Place your baking soda packet into a zip top bag and zip almost closed.

3. Pour vinegar into the bag and quickly seal it. (It might be helpful to use a funnel for this step.)

4. Agitate the bag if the reaction seems slow.

5. Watch the bag inflate and finally explode!

Why it Works

The reasons are the same as in #1 experiment. But the balloon or bag allows you to capture the gas that is emitted during the reaction.

More Science Ideas

Amazing Kitchen Chemistry Projects Yo...
Nomad Press
Only $29.99
Kitchen Science Experiments: How Does...
Sterling
Only $1.99
365 Simple Science Experiments with E...
Black Dog & Leventhal Publishers
$16.98  $1.77

3. Oxidize Steel Wool with Vinegar

Generate Heat as Rust Forms

For this experiment, you need a glass jar, steel wool, and vinegar. A thermometer is useful, especially if you are doing this experiment with older children.

Steps in the Experiment

1. Soak the steel wool in vinegar for three minutes.

2. While the steel wool is soaking, measure the temperature of the inside of your jar. Place the thermometer into the jar and attach the lid. Take a reading and remove the thermometer.

3. Drain the vinegar from the steel wool and wrap it around the thermometer. Put it into the jar and attach the lid.

4. After five minues, look at the temperature on the thermometer. It should be a much higher reading that before. Or if you are not using a thermometer, simply hold the jar in your hands to sense the rising temperature.

Why it Works

The vinegar speeds up the process of oxidation or rust. Oxidation is an exothermic reaction. That means that it produces heat. So as the steel wool rusts, it emits heat which the thermometer (or your hands) can feel.

Use Plain Steel Wool

Not Soap Encrusted SOS Pads
Red Devil 3332 Steel Wool Multi-Grade Pack
Red Devil
$7.14  $6.95

Steel Wool and Rust

Stainless steel wool 1
rusted dumpster ladder

Examining an Egg That Soaked in Vinegar

Egg and Vinegar Experiment

4. Remove Calcium from a Bone or Eggshell

Turn Bones Rubbery and Soft

This experiment takes some days to accomplish, but it is worth the wait.

Rubber Bones

The Relics

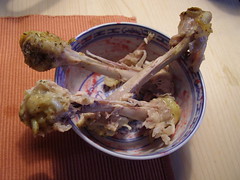
Use any leftover bones from your meal. A chicken leg is perfect, but other bones will work too. Remove all meat, gristle, and skin. Completely cover the bone in vinegar in a glass jar. Attach the lid and set aside.

Check the bone after three days, five days, and seven days. It should progressively become more pliable so that you can bend it in half without breaking it.

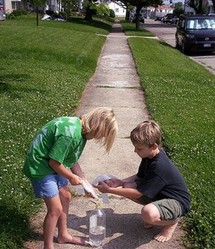
Disappearing Eggshell

You can use either a fresh egg or a hard boiled egg for this experiment. In fact, you can simply use eggshells themselves and bypass the entire egg. 

1.  Immerse the egg totally in vinegar and let it sit.

2.  After one day, check the egg. Look for bubbles on the shell. Those are carbon dioxide bubble that the reaction creates. Feel the eggshell to see that it is changing.

3.  After three days, check the egg again. By seven days, the eggshell should be completely dissolved. 

Why it Works

Bones and eggshells are hard because of the calcium content in them. Vinegar is an acid (acetic acid) which dissolves calcium. After soaking in the vinegar, the calcium from the bone is dissolved away so that all that is left is the soft tissue which is pliable like rubber.

Eggshells are 94% calcium carbonate, so after the vinegar dissolves the calcium, there is little left except the thin membrane that protects the egg. 

Words of Wisdom from the Bible

Proverbs 25:20

Whoever sings songs
to a heavy heart
is like one who takes off
a garment on a cold day,
and like vinegar on soda.

Keeping a Science Notebook

With Your Experiment Results

Lab Report Printables
Free printables for recording your experiments. Put these into a science notebook.

Science Experiment Log Booklet
A single fold booklet that makes it easy for elementary aged children to record their observations in a science experiment.

Chemistry Notebooking Page
Lined paper with a chemistry theme. Great for science notebooking.

Learning Science With Vinegar

These four experiments foster a fascination for science that can expand as children mature. Be mindful to allow your children time for science exploration just as you are deliberate to take them to the library for books and to the zoo for field trips.

Updated: 02/21/2012, Jimmie
 
Thank you! Would you like to post a comment now?
15

Comments

Only logged-in users are allowed to comment. Login
sheilamarie on 09/14/2011

I love this kind of stuff! Great article!

puerdycat on 07/22/2011

I did these when I was young and wound up going into science.

GonnaFly on 06/15/2011

Ah yes. We done most of these. Vinegar is a homeschooler's best friend! I love the way you explain WHY it works.

Dianne on 06/14/2011

Vinegar experiments are fun! We did some of these too.

tandemonimom on 06/12/2011

We've done a few of these. Vinegar is great fun!

WordCustard on 06/11/2011

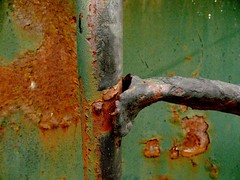
Great ways to make science fun. Who wouldn't love to make a volcano! I learnt something cool too as I didn't know that the process of oxidation produces heat. Clearly my science teachers didn't make it half as interesting as you do.

TerriRexson on 06/11/2011

Excellent. My son is fascinated by science but hasn't started school yet. He will love the rubber bones experiment - that's perfect for him.

nightbear on 06/10/2011

Very cool science experiments. The one about the chicken bone is kind of icky. Leave it to you to come up with such fun for your child to learn.

PeggyHazelwood on 06/10/2011

Great article! These sound like experiments my grandkids would love. Thanks for the explanations too (I am science challenged).

You might also like

Ant Farms: Observing Insects at Work

Watching ants at work is a fascinating business. Children and adults alike wi...

Collecting Seashells: Types of Shells

A look at some seashells you may see on Florida beaches with photos of my own...


Disclosure: This page generates income for authors based on affiliate relationships with our partners, including Amazon, Google and others.
Loading ...
Error!