This article will help to teach you the fundamentals of Visual C#. We will cover all the core features of the language as well as the use of form application controls to make basic GUI applications. It is worth noting that while this tutorial will teach you the core C# language, practice will be needed to master the stuff below, and further reading of more in depth and advanced resources is always recommended, this goes with all programming languages, not just C#.

Full C# Reference and Tutorial
by CoderCloud
A Full Reference and Tutorial on the C# Programming Language, covers the basics and shows you how to improve.
Hello World
As with all other tutorials, we will start by writing "hello world" to the console, and while were at it, will go through the different ways you can write to the console as well as a small precaution to make when you make console applications.
Just remember:
 |
//Writes hello world to the console
Console.Write("Hello World");
//Writes ! to the console on the same line
Console.WriteLine("!");
//Tells the program to wait for user input
Console.ReadLine();
You may have noticed the semicolons after each line, in C# this is required to let the compiler know that the line has finished and that we are on to a new line. You can also see comments in the above example. Comments are always proceeded by the "//" and will not be read by the compiler and so are mainly used to allow us to understand more complex pieces of code.
On top of that you probably noticed the fact i used two different ways to write to the console, the different is pretty simple, console.write will write to the console regardless of where its written, while writeline will always write onto a new line. The last line ( Console.ReadLine(); ) tells the program to wait for user input, without this the program would simply run and close.
Variables
A variable is simply a piece of data stored in memory. in programming we use variables to store data we will later use for manipulation. Variables in C# have to be declared with a datatype beforehand so the compiler understands what type of data the variable is storing. Since i will be mentioning compilers a lot during this, think of the compiler as the thing that turns the code you make into machine code, which is a language the computer can run and understand.
[DATATYPE] [VARIABLE NAME]
Above is the core syntax for variables in C#, pretty easy right? below i will give some examples of how this would look:
Int integer; //Integer variable (used to store whole numbers)
String string; //String, used to store stings of letters
Float floatingPoint; //Floating point numbers
Double double; //more precise floating point number
While above i showed you the syntax for 4 of the many possible variable data types available to us in C#, there are far more that are readily available to us to use. This handy table below shows off the rest of these variables and their range respectively.
C# Data Types
 C# Data types MSDN (Now MS Docs) |
We can use what we have learned so far to make more complex applications, by utilising both the ability to write to the console, and the ability to store variables. On top of that, we will also spice things up by allowing the user to type something in and it be stored in the variable and then shown back to them in a lovely formatted string.
//Variable to store the users name.
string name;
//Asks the user their name
Console.WriteLine("What is your name?");
//takes what the user writes and stores it in the "name" variable
name = Console.ReadLine();
//Uses concatenation to say hi to the user
Console.WriteLine("Hi, " + name + " nice to meet you!");
//Stops the program from closing.
Console.ReadLine();
When you run the program, what you should find is that it asks for your name and is stored via the "name = Console.Readline()" which we then show back to the user in the next line. We can use concatenation ("one string" + variable + "another string" kind of thing) to allow for the variable to be shown back the the user in a nicer, more formatted way.
So by this point we can make some rather cool programs that, in a way, react to the user and their input, but are very linear in how they do so, in the next section we will cover conditional logic.
Arithmetic
Arithmetic is more than possible in C# and allows us to do any form of maths needed as part of our program. The syntax is faily simple and requires little explanation, as you will see below:
//You can declare variables of the same data type like this.
int num1, num2, total;
//assigning data to variables.
num1 = 10;
num2 = 15;
//increments num1
num1++;
//decrements num2
num2--;
total = num1 + num2;
Console.WriteLine(total);
//variable re-use is also possible
total = num2 - num1;
Console.WriteLine(total);
As you can see, the syntax is fairly simple and can be quite easily incorporated into what we have learned so far, there are far more arithmetic operators we can use in our code, check below to see:
 C# Operators MSDN (Now MS Docs) |
Conditional Logic
So here we will cover conditional logic, like i quite literally said in the previous paragraph...
When we refer to conditional logic in programming, we are simply referring to code that allows for branching paths, this can be done in numerous ways, this section will cover how to do so via an "if..Else.." statement.
The scenario we will be using to create our conditions will be that of a pub, where you will be asked your age, and if your 18 or over (legal drinking age in the UK) you will be served.
int age;
Console.WriteLine("How old are you?");
age = Convert.ToInt32(Console.ReadLine());
if (age >= 18)
{
Console.WriteLine("Have a drink");
}
Console.ReadLine();
The code above asks for the users age, then converts it to an integer via the "Convert.ToInt32()", as by default the "Console.ReadLine()" function only takes in strings, and will then compare it and see if it is greater than or equal to 18. if so it will print "Have a drink". if not, then, well, nothing happens.
We can easily make something happen though, by adding an else to the if statement, like so:
int age;
Console.WriteLine("How old are you?");
age = Convert.ToInt32(Console.ReadLine());
if (age >= 18)
{
Console.WriteLine("Have a drink");
}
else
{
Console.WriteLine("Have some juice");
}
Console.ReadLine();
The main addition to this code is the "else" which follows very similar syntax to an If statement and allows us to have multiple outcomes in an If...Else statement. An "else" fundamentally allows us to have something happen even when the statements parameters aren't met, of course an else statement becomes far more useful when we are working with multiple if statements in the same block. This is done via an ElseIf:
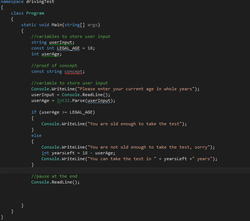
int age;
Console.WriteLine("How old are you?");
age = Convert.ToInt32(Console.ReadLine());
if (age >= 18 && age < 60)
{
Console.WriteLine("Have a drink");
}
else if (age >= 60)
{
Console.WriteLine("Have a pensioner discount");
}
else
{
Console.WriteLine("Have some juice");
}
Console.ReadLine();
There are two additions to the code above you should take not of, the obvious one being the else if statement, which allows for one block of code to check for two parameters, which if neither is met the code within the else statement is ran. This allows you to check numerous parameters within one block of code, which allows code to be more optimised (run faster) and readable.
The other thing you may have noticed was the change of the initial if statement to "if (age >= 18 && age < 60)", the "&&" allows you to check whether two statements are correct before running the code, so the code will only run if if age >= 18 AND age < 60, there are others, like an or (||) for checking whether only one is true, a handy reference below.
 C# Operators |
Switch Stataments
When you have a very large if statement with many elseifs, it can become a tad difficult to read, or perhaps you want to know a different way of doing conditional statements. This is where switch statements come in, with syntax that is simple once you get the hang of it, this is what the drinks scenario would look like if formatted into a switch statement.
switch (age)
{
case 18:
Console.WriteLine("Have a drink");
;
break;
case 60:
Console.WriteLine("Have a pensioner discount");
break;
default:
Console.WriteLine("Have some juice");
break;
}
The syntax is fairly simple once you get the hang of it, inside the brackets on the switch line is the variable you want to manipulate. you then write "case" followed by an output, so 18 for age = 18, and then a colon and write what you want to happen, and finish off with break. You do this however many times you need to get all the expected values, and instead of else, you use the word "default". One issue with using switch statements is that it expects a constant result, so you cant test whether its greater than or equal to, it has to be the same output as expected, use of arithmetic isn't even allowed in a switch statement.
You can work around the lack of arithmetic at some points, an empty case statement followed by one with code to execute like so:
// A switch section can have more than one case label.
case 0:
case 1:
Console.WriteLine("Case 0 or 1");
// Most switch sections contain a jump statement, such as
// a break, goto, or return. The end of the statement list
// must be unreachable.
break;
allow for an "OR"esque statement. This is because switch statements work like a rock thrown off a cliff, it will keep falling until it hits something and breaks, or in this case, finds a statement that is correct and then breaks via the "break;".
This means there are benefits and drawbacks to using switch statements, but ultimately boils down to what the best tool for the job is and/or what you feel more comfortable using. I often find switch statements used in menu's for console applications.
Loops
There is tons to talk about for loops, as there are just so many different types of loops all for different purposes, but i will try my best to be brief where i can.
The idea of loops inside code is to be able to loop around a block of code X amount of times, with certain loops handling the way X is handled differently. The benefit of this is less wasted time coding and also easier expansion, as while writing 1 - 5 in the console is painless enough, 1 - 1000 is less so, but with loops is extremely easy.
While Loops
Arguably the easiest loop to work with, the content within the loop will be executed as long as the condition within the loop is true, take a look at belows code:
int number = 0;
while(number < 5)
{
Console.WriteLine(number);
number = number + 1;
}
The code is fairly simple to grasp, as long as the code within the brackets is true, then the code will run. So this code will run until number is equal to 5, the code will stop running. For a while loop and other loops, you need to increment the number yourself lest you risk an infinite loop.
Do Loop
Similar in quite a few ways to a while loop, the do loop has the distinction of checking the condition after the fact, which means that this code will run at least once. Below is the syntax for a do loop:
int number = 0;
do
{
Console.WriteLine(number);
number = number + 1;
} while(number < 5);
As with while loops, you need to increment the number yourself lest risk an infinite loop. For the example above, the output will be the same as a while loop, but if "number" was 10, the loop would never run in a while loop, but will still run once in a do loop.
for Loop
A for loop is quite different when compared to the two above loops, as for loops increment as part of the loop, meaning infinite loops are easier to avoid. They also only increment as much as you say in the loop, no more, no less, making these ideal when you know exactly how times you want the program to loop.
int number = 5;
for(int i = 0; i < number; i++) {
Console.WriteLine(i);
}
The syntax can be somewhat difficult to pick up when it comes to for loops, i find that these are usually one of the harder things to pick up in C#. The syntax in the brackets is what tells the program what to start with, the condition and the increment, so think of it like this:
(StartNumber; Condition; Increment)
So for the above example, it declares i as an integer starting at 0. It will then Compare that to see if its less than one, and if so will run the code in the block, it will then increment, so in this case by 1. So, in short, the program will write the number stored in the "I" variable until "I" is the same as "number" which is coincidentally 5.
Foreach Loop
Working with an arraylist, which is very similar to an array (spooky i know, arrays will be discussed further later, actually really easy) is what foreach loops work with. Imagine an array list called "arrayList" and stores 5 peoples names (what they are doesn't matter for this particular example) and want those names printed to the console, then the code below would do just that.
foreach(string name in arrayList) {
Console.WriteLine(name);
}
What the code above does is create a string called names, which will store the next "arrayList" and then print it to the console.
And thats loops! quite a bit to digest, but with a bit of practice you should get these down fine, and now onto methods!
Method
Often referred to as functions, these allow you to move code into its own special places to be called on by other bits of code, when we cover forms and controls, you will see how heavily methods are used within visual C#.
The use of methods are that they allow you to use the same block of code in multiple places without repeating yourself, which allows for lower file-size, and faster programs.
they follow this format:
[visibility] [return type][name]([parameters])
{
[function code]
}
to then use this code, you call it with its name, so if its called "Add", you would write "Add()" plus any required parameters.
This above may look weird now, but once i go through a few examples and how they work, it will seem much less scary i promise.
below is an easy example of how a function would work:
public void Stuff()
{
Console.WriteLine("Magic Mate");
}
"Public" ensures that the method is public, meaning that it can be called anywhere in the program, it's optional, not having it will default the method to private. "Void" is the type to return, void could be "int" "string" or any other type, depending what you want to return, since we don't want to return anything, void is what we use. No parameters are passed into the brackets, but they are still needed. Within the braces ("{}") is where we put the code we want executed when the function is called.
That example is methods in its most basic form, the next example will be a tad more complex, using a data type, having a return and passing in parameters, showing you the other end of the spectrum.
public int AddNum(int num1, int num2)
{
int result = num1 + num2;
return result;
}
Now quite a bit has changed in this example, its a public int now, so the inputs and outputs are integers. It has paramaters passed in, meaning that while before you would write "Stuff()" here you will write AddNum(num1,num2) which is referred to as passing in paramaters. This is useful since it allows you to move data from variables outside the method into the method to be worked with. The integer declared in the method takes a calculation, and is then returned. The return keyword here is important, since it tells the program what data to send back to the calling code.
And thats methods, while there is more to methods, above will give you a core understanding of methods and how they work, further reading will be given at a later point to allow you to fully grasp methods, but before that, its time to look at arrays!
Arrays
Arrays are a collection of items of the same datatype stored under one variable, this might sound complex, but the syntax is very simple and accessing the data within a variable is also very easy as you will see from this section.
int[] numbers = { 6, 3, 9, 2, 11 };
As you can see, the syntax for arrays is rather simple, to tell the datatype that it is going to be an array, you simply append "[]" after the data type, and assign it within braces with commas separating each piece of data.
Accessing data within an array is also fairly simple, you simply append the [] with the number of the place the array is stored. So if we wanted to access "9" in our "numbers" array, we would access via "numbers[2]". Why 2 but not 3 though? its the third number in the array? while this is true, when it comes to arrays, they are indexed from 0 instead of 1, so while we count 1..2..3..4.. an array counts 0..1..2..3.. which can be quite confusing at first, but practice will easy train you into this.
While we have covered the core part of arrays, arrays are huge and i could write pages (if we did those, luckily we just have one page so less ads) on arrays and how they cover, methods for sorting and even multidimensional arrays, in the further reading section you will find resources to help you expand your learning, but what has been covered here is a great starting point.
Forms and Controls
By now you should have a solid understanding of C#, but so far haven't made anything more than console applications. In this section we will cover how to easily make a UI based application that asks for the users age, and depending on their age, will offer them a drink.
Firstly we are going to need to set up the project, so go file --> new project like before, but instead of clicking "console Application" we are going to click "Windows form application".
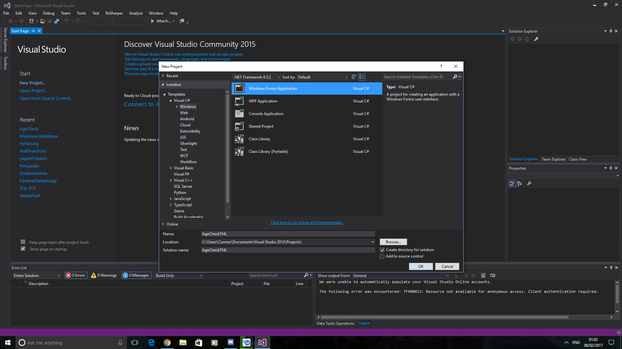 Setting Up A Project |
From there you should see a UI that was similar to what you were working with before, but with a few changes and additions that you should note. Below we will look at these and what they do, so you understand what we mean when we tell you to access a part of it, as we will utilise all of the UI while making this application.
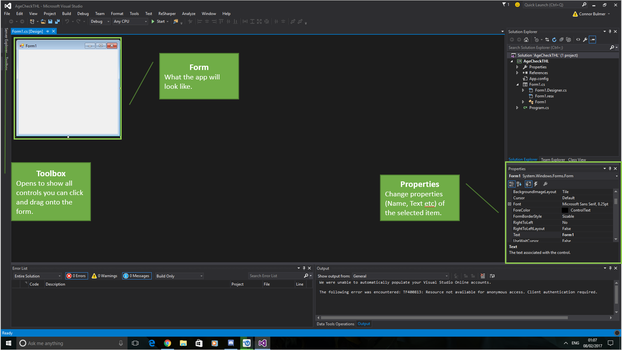 IDE Overview |
So now we are going to make an application, on the toolbox, click and drag in:
- A Button
- A TextBox
- A label
These are going to be the core components in our IU driven application, now to use the properties panel. Click on each item and and find the "Name" property, it by default will have something like "button1" in it. Rename it to something more useful. I find it is best to use prefixes to make the code more manageable, so rename like so:
- btnCheck (Button)
- txtAge (Text Box)
- lblAge (label)
From here you can add the previous code we used for the drinks task (switch statements )into the button (double clikc the button to get the backend code), if you run the program now, you will see it doesn't work right now, thats because Console.WriteLine is for console applications and wont work for GUI applications as you would expect...
Firstly, click on the label and go on the text property, you can then change this to something more fitting.
From there change the line:
age = Convert.ToInt32(Console.ReadLine());
To:
age = Convert.ToInt32(txtAge.Text);
This code will make it so when the user clicks the button, the users age will be the text content of the textbox, easy right?
now change the line:
Console.WriteLine("CONTENT - REFERENCING ALL CONSOLE.WRITELINE IN PROGRAM");
TO:
MessageBox.Show("CONTENT - REFERENCING ALL CONSOLE.WRITELINE IN PROGRAM");
This will make it so the text content pops up in a message box window.
And with that you have ported an application from console to GUI, very basic, but the further reading section can help!
Further Reading
While this is a great resource for beginners, there is no way that i can cover everything C#, this covers some of the .Net framework as well as the syntax for C#, but if you want to be able to use this language for coding in the workplace, i suggest you have a look at these resources.
MSDN - Official Reference for everything C# .Net
Arrays - Further learning of arrays in C# via MSDN.
Methods - MSDN Resource for C# Methods, to get a better understanding.
Winforms - MSDN resource for further covering of winforms.
ASP.NET - Use C# to make web applications - finding hosting can be a pickle, i have found that you are best with Microsoft Azure for paid, HelioHost for free (500mb space cap plus the servers are donation based - no support and unstable at times, great for testing for free though!) but if you need a cheap place to host non asp (PHP, static code etc) then give Elixir Digital a go, I will hopefully be teaching PHP soon so hopefully the above will be useful!
Updated: 12/26/2017, CoderCloud
You might also like
Main Differences Between LAMP and MEANWhich one is better? And what are the main differences between them? Let's ad...
What is: C++?C++ is an all-purpose programming language which is based upon one of the mos...
Disclosure: This page generates income for authors based on affiliate relationships with our partners, including Amazon, Google and others.


Comments