How To Re-Caulk A Bathtub

by CountrySunshine

An easy DIY project, this step-by-step guide with photos provides detailed instructions on how to remove and replace the caulk on your bathtub

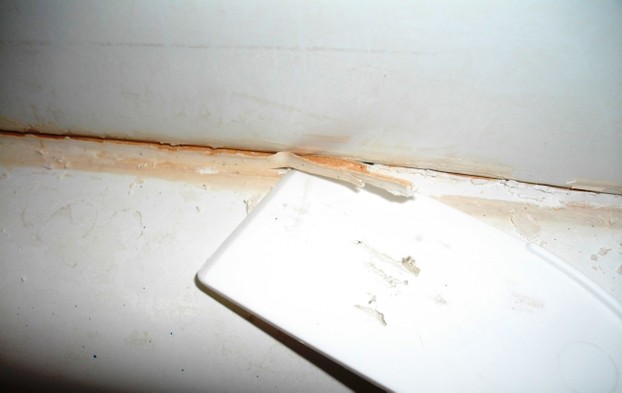
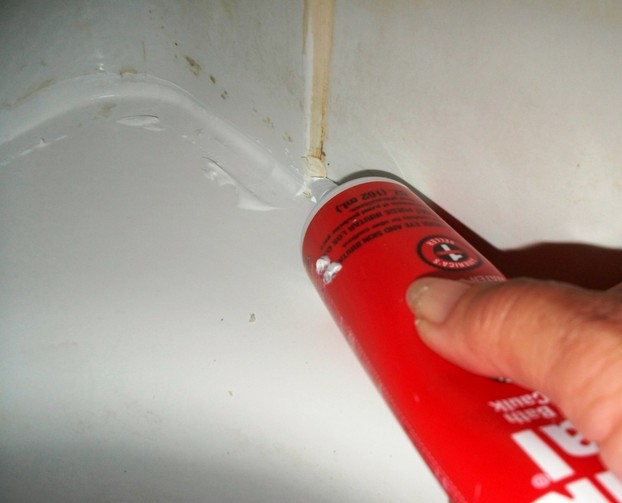
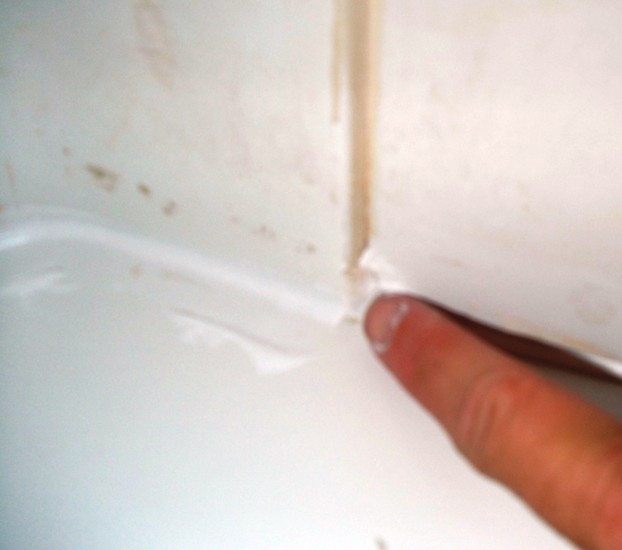
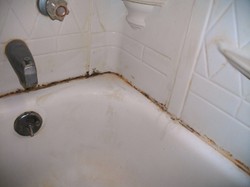
If you find that the seam around your tub is turning brown with mildew; separating between the tub and surround, or has cracked and peeled in places, it’s time to replace the caulk. While you could consult a professional who would charge $30 or more an hour to complete the job, it is simple to do yourself.

This is an inexpensive DIY project that takes only about an hour, requires common household tools, and is easy enough for a beginner to complete. Follow the steps below, and you'll have a bathtub that looks like new!

Tools & Supplies

The following are needed for your DIY caulking job:

  • Acrylic latex caulk
  • White vinegar
  • Plastic 5-in-1 tool or putty knife
  • Sponge, rags or non-abrasive pad

How to Select Caulk

Caulk can be applied either with a caulk gun or squeezed directly from the tube, depending on the type you have on hand.   Either can be used, as long as it is rated for “Tub and Tile” or “Kitchen and Bath”.  Both of these types have ingredients that resist mildew, unlike the common household caulk.

There are two types of caulk:  silicone and acrylic latex.  While either can be used to caulk your tub, it’s best to use the latex.  It is almost odorless, and cleans up with water.  The silicone based caulk has an odor, and can leave a residue that must be cleaned up with mineral spirits.

Acrylic latex caulk comes in several colors.  If you don’t go with the standard white or beige, choose one that will complement the color and glaze of your tub and tile.

Step 1 - Remove the old caulk

Start on one end, and begin removing the old caulk with a plastic putty knife or 5-in-1 tool.  Do not use a metal tool or razor knife, as it may cause scratches or cuts in your tub or wall surround.  

It’s best if you can get the tool under the edge of the caulk, then simply pull it away from the seam.  If it does not remove all at once, you’ll need to slice it away.

Remove old caulk with plastic putty knife
Remove old caulk with plastic putty k...
Country Sunshine

Step 2 - Clean the joint between the tub and wall surround

There are many commercial caulk removal products on the market, and they can be purchased at most hardware and building supply stores.  Keep in mind these contain toxic chemicals, which may harm both your tub and your body.   

I have found that white vinegar works as well as the commercial removers.  Simply dampen a paper towel,  rag or non-abrasive pad with vinegar, and wipe it onto the joint seam.  Let it sit for 5-10 minutes, then wipe away any residue.  Continue until all caulk dust, mildew and dirt has been removed.

Step 3 - Dry the area thoroughly

Before applying the new caulk, make certain all surfaces are completely dry.  If you have the time, you might wish to let the area air-dry.  If not, use a towel or hair dryer to remove all moisture.

Draw tip along seam joint, using even pressure
Draw tip along seam joint, using even...
Country Sunshine

Step 4 - Apply new caulk

Cut off the tip of your caulk tube at a 45 degree angle.  The resulting hole should be no more than 3/16 of an inch in diameter.  

Starting at one end, position the tip in the middle of the seam, squeezing out the caulk  under even pressure.  As the caulk emerges, draw the tip along the joint, creating one long ‘bead’.


Step 5 - Smooth bead

Wet the tip of your finger, then run your finger down the seam to make a concave bead.  This will push the caulk into the seam, resulting in a tight seal.  You may need to wipe your finger off about half-way.

Smoothing bead with your finger tip
Country Sunshine

Step 6 - Remove any remaining caulk

Run a dampened towel or sponge the length of your seam, removing any excess caulk from the seam, tub or wall surround.  

Remove excess caulk with dampened rag
Country Sunshine

Step 7 - Dry before using

Allow the caulk to dry for a minimum of 24 hours before running water in your bathtub.

Wasn't that easy?

This is how your tub should look when you're done.
Re-caulked bathtub
Re-caulked bathtub
Country Sunshine
Updated: 09/08/2015, CountrySunshine
 
Thank you! Would you like to post a comment now?
1

Have you ever re-caulked your tub? Do you have any tips to share?

Only logged-in users are allowed to comment. Login

You might also like

The Home Improvement Contest I Didn't Enter but Won

I felt I had a chance of winning the contest for America's Most Desperate Lan...

Why I Love My Rockwell Versacut Circular Saw

When I was growing up, I always wanted to be able to do what my Dad did aroun...


Disclosure: This page generates income for authors based on affiliate relationships with our partners, including Amazon, Google and others.
Loading ...
Error!