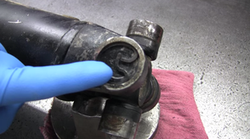
This article assumes you have already successfully removed the driveline from your truck and are now ready to replace the u-joint. First let's remove the bearing caps and inspect the trunnion. Wipe off any excess grease or dirt so that you can get a good look at what's going on here. In the first image, you can see that the trunnion is worn and will need to be replaced.

How To Change A U Joint on a Pickup Truck
by Donacker
Learn how to replace a U-Joint on a Truck. They are all pretty similar. All you need is a understanding of what to do and you can replace a U-Joint on most any vehicle. U-Joints ar
 Remove Bearing Cap and Inspect |
This is a classic case of needle bearing wear or brinelling for you tech junkies out there. It's time to replace this joint. Let's go ahead and get this U joint out of the drive shaft yoke. Whether you're using a press or a hammer, I'm going to show you how to get it out safely and correctly. The first and most important step is eye protection.
 Needle Bearing Wear |
Let's get started by removing the snap rings from the yoke. Your Universal joint may have an inside snap ring like this:
 Inside Snap Ring |
...or an outside snap ring like this one. For outside clips, a good set of needle nose pliers will help remove the clip easily.
 Outside Ring |
For inside clips, a flat head screwdriver works best. With a hammer, punch the clip from the yoke. You want your flat head screwdriver to seat right behind the clip to force it off. Before you do this, place a rag behind the yoke in order to catch the clip as it flies off, now place your flat head screwdriver in its spot and give it a firm strike with the hammer. Repeat this step for the other clilps. It may take a few tries before it comes out.
Now let's get the joint out. If removing it with a press, roll the press down to meet the bar. Then pull on the bar to force the cap out of the yoke. Turn the yoke 180 degrees and repeat the process for the other cap. Once the caps are removed, remove the trunnion and you're finished.
 Press Cap Out |
If you're using a hammer to do the job, you'll need a cradle or a table vice and an impact socket with a hole inside it large enough for the U joint cap to go inside. To begin, firmly position the trunnion into the cradle. Position the socket directly over the cap. With a forceful strike from a hammer, push the cap out of the yoke side. Turn your shaft 180 degrees and repeat this process until both caps have been removed. This may take several strikes.
 Hammer Removal Method |
If you're using a vice to remove your joint, never by any means clamp down onto the drive shaft tubing. Doing this can result in damage to the tube causing vibrations and drive shaft failure. Instead, use the vice ears to rest the trunnion on just like you would use the U joint cradle. Remove the caps same way you would using the cradle. Once the caps and trunnions are removed, go ahead and clean the snap ring grooves. This will ensure a proper seating for your new clips later on. You'll also want to deburr and clean the U joint holes. Failure to do so may result in a tight fit and possibly premature failure. Once you're done with the cleaning you're ready to install your new U joint.
Now it's time to install the new joints. You can pick up new joints for your truck and most automotive parts supply stores. If you're using a lubed or surfaceable U joint make sure to add grease to your cap before the installation. Go ahead and put the joint in place. First slip the trunnion through one of the joint holes. Next insert a cap into the hole while slipping the trunnion into the cap.
 Insert New Cap |
Be careful here as to not displace any of the needle bearings inside of the cap. If this happens, remove the cap from the trunnion, re-stack the needles, and try again. Once you're ready, roll the press down until it meets the top of the cap. Then pull down on the handle forcing the cap into the yoke eye. Your optimum spot for the cap is just below the snap ring groove. Turn the shaft over and repeat the procedure for the other cap. When installing the U joint back into the yoke with a hammer, the same rules and procedures apply. Be careful not to use the ball part of a ball peen hammer on your caps, doing this can damage the cap internally and may result in premature U joint failure. Instead, use the flat part of the hammer for a more flush strike.
 Don't Use Ball Part of Hammer |
Once your cap is seated properly, turn the shaft over and repeat the steps. Use a flat faced punch to seat the cap properly into place. Strike the punch until the cap rests just below the snap ring groove. Insert the snap rings with a set of needle nose pliers. Ease the clip into the snap ring groove until it expands or snaps into place. Turn the shaft over and repeat the process for each cap you're installing. When installing your U joint equipped with inside snap rings, follow the same steps. For this type, make sure the snap ring groove that's machined into the cap rests just below the retaining wall of the yoke. Take your clip and set it gently into the cap's groove. With a firm bump from a hammer the snap ring should slide easily into its spot. Repeat this step as necessary for the remaining clips.
It may be necessary to strike the side of the yoke to remove the pressure on the U joint in order to make it rotate properly. Another way to relieve pressure is to strike the punch on top of both caps in order to free the tension. A smooth turning radius is optimum for joint life and wear. If you have an attaching yoke to install, all the same steps apply. Never strike any yoke seal surface. Doing so can result in a leaking transmission or differential. One more thing before you're finished is to top off that greaseable U joint. Make sure grease purges through all four caps to ensure proper lubrication. Congratulations, you're finished!
Updated: 08/19/2015, Donacker
You might also like
Easy Truck UnloaderA simple light weight product easy to install and easy to remove yet unloads ...
Bucket Truck Inspections - DOT, ANSI & OSHANo one likes inspections. Some states require them for all MVs. If you're buy...
Disclosure: This page generates income for authors based on affiliate relationships with our partners, including Amazon, Google and others.


Comments