Easy Origami Snail Instructions

by Marie

Easy Origami Snail Instructions and step by step photo tutorial to make super simple, flat paper snails which are very cute. Paper folded snails just perfect for handmade cards.

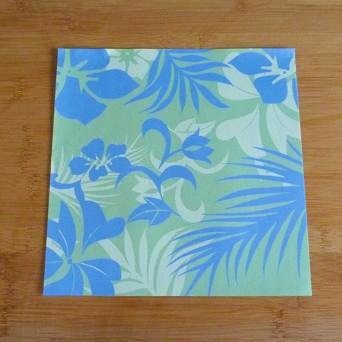
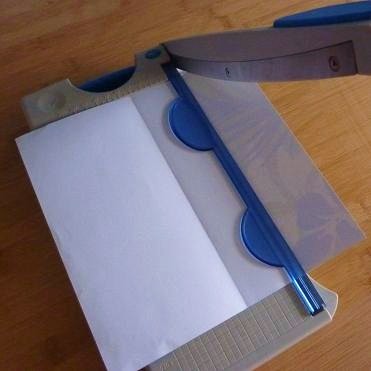
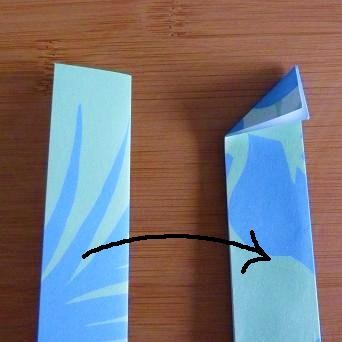
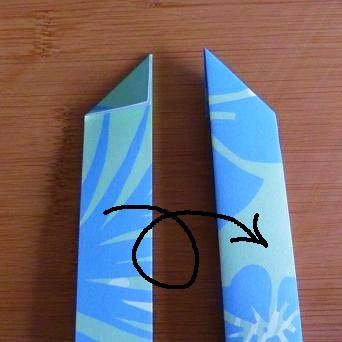
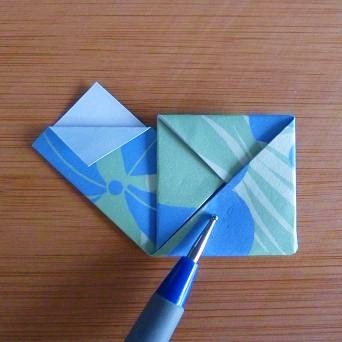
Here's some instructions to make an easy origami snail. Just once piece of Square Origami Paper will make a cute family of 4 snails for you. I hope I inspire some snail love in you with this step by step photo tutorial.

Snails are beautiful creatures. I can't ever get enough of crafting them - I've got embroidered snails, felt snails, fabric snails and paper snails. Anything but the real things which are best left in their natural habitats. Discover how to make your own cute snails below.

Cute and Easy Origami Snails

Paper Folding Origami Snail Tutorial and Instructions

Simple Square Paper Snails

Here's some super easy instructions for Snail Origami. These very cute paper snails are easy to fold from rectangular strips of paper.

You can use any paper for this project and not just specialist origami paper. Scrapbook paper is paper I love to use for origami projects which don't have too many intricate folds. You can get some stunning paper designs. These snails just 'pop' more when folded from randomly patterned paper rather than plain paper.

Step 1
Step 1
Step 2
Step 2
Step 3
Step 3

Preparing and Cutting Out the Paper Strips

You Can Make 4 Paper Snails from 1 Piece of Square Paper

Start with a square of paper. I love to use pretty patterned prints for my origami snails where one side is printed and the other is blank. Once you know how to fold these snails, then you can use a small square of paper as your base. But I recommend starting out with a square of paper at least 6 x 6 inches.

A square sheet of paper will give you enough to make 4 paper snails. Fold your paper in half (doesn't matter which way) to work out the center line - this divides the paper into 2 pieces. Then fold from each edge, up to the middle line you've just folded. This will mark out 4 rectangular pieces of paper which you can then cut into strips with scissors or with a paper trimmer.

Origami Snail Step 1

Fold a strip of paper in half length-ways, so it makes a thinner rectangular strip with the white or the blank side of the paper folded inside so it isn't showing. You can see how this looks with the first paper strip in Step 1 A.

Step 1 A
Step 1 A
Step 1 B
Step 1 B

Place your folded strip before you on your work-surface with the folded side on the right and the cut paper edges on the left.

Pull down the top left corner (both layers of paper) right across to meet the right side of the folded strip. This will make a small, folded triangle at the top of your strip of paper as shown on the left of the photo labeled Step 1 A.

Now flip the paper strip completely over so that the folded edge now runs along the left and the cut edge along the right side as shown in Step 1 B

Origami Snail Step 2

Now take hold of the bottom of your paper strip and pull it up and right over to the left.

In the photo, it looks like I've rotated the paper around. It hasn't been rotated at all. The paper has been lifted up completely from the bottom and folded so that the bulk of the long paper strip is now all over on the left.

Think of it as moving the paper from the number 6 on a clock face over to the number 9. That is exactly what you are doing and it's harder to describe than to do!

Step 2

Origami Snail Step 3

The strip of paper on the left of the photo show what your paper should look like at this point, although you can't see the full length of the strip over to the left.

On the right hand side of the photo is what you're going to do next. You now want to twist the paper strip so that it goes from a 9 position on a clock face up to 12. You twist the paper back and up. Now you can start to see a diamond shape forming with the folds.

Step 3

Origami Snail Step 4

It's like we're twisting the paper strip up into a folded diamond by working our way around. Once you know the steps, this is so fast to fold.

Now twist the length of your paper strip down so it makes a point on the left hand side and the length of the paper is pointing towards the 3 on a clock face. You've almost made a folded diamond shape.

Step 4

Origami Snail Step 5

The folded paper at the top of this photo shows how your paper should look right now with the length of the strip folded over to the right.

The folded paper at the bottom of the photo is showing where you need to fold next. You need to twist your strip over to make a point and down so the length of the paper is now directed down to the number 6 on a clock.

Step 5

Origami Snail Step 6

By now, you will have folded most of the length of your paper. There is enough left to fold the remainder of the strip behind what now becomes a very definite folded diamond. The rest of the paper should be pointing over to the left or towards the 9 on a clock.

The diamond section is the snail's shell and the rest of the strip is the snail's head. You should be able to see that if you move or rotate the paper down so the diamond becomes a square.

Step 6

Origami Snail Step 7

Fold down a small triangle of paper from the 'head' of the snail (just the top layer) to give the appearance of the antennae. 

If you reach behind the snail on the right of the square shell, you should find two layers of paper that fold back to make a triangle pointing in this direction > 

Step 7 A
Step 7 A
Step 7 B
Step 7 B

Origami Snail Step 8

One final fold and your snail is complete. Push the top end of the triangle you've just folded out at the rear end of the snail, down and behind so you fold the triangle in half.

You will probably need to pick up your snail to fold the top of that triangle backwards and neatly behind. If you're not planning to glue or stick your snail onto a card or a paper project. I recommend taping it at the back to keep the shape from wanting to unravel.

Step 8

Origami Books to Start Paper Folding Fun

Easy Origami (Dover Origami Papercraft)
$5.95  $4.99
Updated: 10/06/2017, Marie
 
Thank you! Would you like to post a comment now?
2

Will you be making an Easy Origami Snail?

Only logged-in users are allowed to comment. Login
Marie on 01/19/2012

That's such a lovely comment, Sheila. Actually, I think my kids think I'm just a litle bit mad! But we do have lots of fun crafting and baking :)

sheilamarie on 01/19/2012

Another beautiful origami page, Kinworm! Your kids must have such a lot of fun with you as their Mom!

Marie on 01/19/2012

Yes I do need to look into making videos which will be another thing to learn! Or I could just see if someone else has done one already :) Thanks, @Lissie

Lissie on 01/19/2012

At least I don't feel like eating these! You'd need to give me a video to follow (hint,hint) to have any hope with origami - no patience!

You might also like

Complete Origami Dress Instructions

A complete photo tutorial with Origami Dress Instructions that you can easily...

Hunger Games Mockingjay Origami

Here's an easy step-by-step Mockingjay Origami tutorial with complete photo i...


Disclosure: This page generates income for authors based on affiliate relationships with our partners, including Amazon, Google and others.
Loading ...
Error!