
Photographic Enhancement Panorama
by Ralpapajan
Continuing the series of Photographic Enhancement series using free or very economical software. Here I show the steps taken when creating a simple panorama photograph.
Creating a Horizontal Panorama Picture
Using a free program called Serif Panorama Plus
These photographs were taken in Southampton on the South Coast of England. My photographic Album on Picasa Web Albums details the photographic expedition.
I took both my old Sony WS30 and my newer Sony A390 DSLR with me.
I also took a Hama Monopod to try it out in less than ideal conditions. My first use of this gadget was in Malta and it worked a treat. In Southampton I found it difficult to hold steady and take photos that would be easily converted into a panorama. Following this episode I bought and modified a professional bean bag and also made up my own out of a wheat kernel heating pad. But more of that in a later article.
The three photos featured here are taken with a freely held camera ~ the A390.
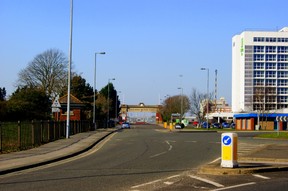
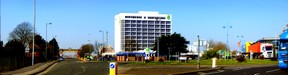
Picture 1
This is the main entrance to the docks. At this point I was deciding whether I should go in there or have a walk around town.
The walk won! As can be seen in my album.
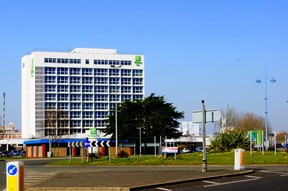
Picture 2
A sweep to the right. A large white office block that stood out ~ something to do with government departments.
When composing a panorama it is necessary to look for and keep in mind reference points. Notice that the left hand edge of the office block is to the right hand side of Picture 1
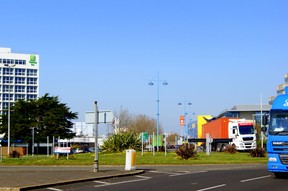
Picture 3
Another sweep to the right and the last in the series is recorded.
I thought of taking another one but the movement of the traffic precluded this. I could also have used the small white building centre/left but again the traffic was coming fast and furious so I hurried the shot.
Now comes the interesting part. Stitching the whole lot together!
I have tried several Panorama programs over the years including ClevR Stitcher, AcroPano and Auto Stitch. All worked well but I have been a paying customer of Serif for some years and bought their original PanoramaPlus Pro for Windows XP. I still have it on my old PC. However, it wasn't compatible with Vista so I went to them to get an updated program. I was delighted to find that they are giving away a free program on their site. See Serif PanoramPlus.
This is a Starter Edition and you may upgrade to Serif Panorama Plus X4 it get more benefits such as evening out exposures. The cost currently is only £14.99 (US$23,02)
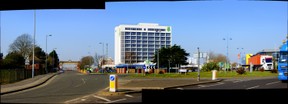
Picture 4
The instructions are very easy to follow. Simple add the photos sel;ected to a panel, (you will get an advertising drop down here exhorting you to upgrade ~ just click the X in the top RH corner) and then Stitch it together. This is the result.
The snag is that with a hand held camera one tends to shake a bit. I was standing right next to the road so in addition to normal movement I was also affected by passing trucks both by them obstructing my view and by the air they displaced. I tried using the monopod but found it to be unstable in the conditions. I should have used a tripod, of course, but didn't have it with me.
The next step is, then, to crop the photo to get an acceptable final picture.
 Picture 5
I used Picasa 3 to crop out the black bits and then tuned the photo. This tuning or tweaking should always be done after the stitching to get a uniform effect. The X4 version would iron out the exposure and would also set up the photo to a smoother finish.
It must be noted that this is quite a long winded way of taking panorama photos. Some cameras have the ability to take several photos when you hold down the button. They work the same way but I must admit do get a smoother result.
However, my favourite cameras, the Sony range, have now come out with a Sweep Panorama function that does the whole job on board. I will be getting a new Sony soon but in the meantime have a look at the range in Amazon.Com. (See Below)
Some Sony Digital Cameras
These Sony Cameras all have a Sweep Panorama Function.
 | Sony NEX-5N 16.1 MP Compact Interchangeable Lens Touchscreen Camera with 18-55mm Lens (Black) The performance of a DSLR, in about half the size and weight. The NEX-5N is the interchangeable lens camera that fits in your pocket. Enjoy Full HD 1080/60p or 24p movies, ... Only $338.0 |
 | Sony Cyber-shot DSC-HX5V 10.2 MP CMOS 10x Wide-Angle Zoom Digital Camera with Optical Steady ... Capture stunning low-light images and sweeping panoramic views with the DSC-HX5V featuring an “Exmor R” CMOS Sensor. Plus catch fast action shots with up to 10 frames per ... Only $185.0 |
 | Sony Cyber-Shot DSC-H70 16.1 MP Digital Still Camera with 10x Wide-Angle Optical Zoom G Lens ... Shoot life at its fullest with the compact DSC-H70 Cyber-shot® digital camera. Featuring a 10x zoom and 25mm wide angle lens, you'll be able to get closer to your subjects ... |
 | Sony Cyber-Shot DSC-WX9 16.2 MP Exmor R CMOS Digital Still Camera with Carl Zeiss Vario-Tessar ... Start snapping better photos with the Sony WX9 DSCWX9 Cyber-shot Digital Camera, featuring a 16.2-Exact megapixel "Exmor R" CMOS image sensor that brings out the best in the ... Only $151.99 |
 | Sony Cybershot DSC-HX1 9.1MP 20x Optical Zoom Digital Camera with Super Steady Shot Image ... Sony Digital Still Camera with 9.0 MegaPixel / 20x Optical Zoom image sensor for photo-quality pictures up to 13 x 19 inches.20x optical zoom , 28mm wide-angle Sony G ... Only $103.0 |
Creating a Vertical Panorama picture
Still using the Serif Panorama Plus program
In the Horizontal example I "tweaked" the photo AFTER the stitching, In the Vertical I had to change the photos BEFORE stitching them together. You will see why when you look at the photos below.
Picture 1
Note the lean to the left. Whereas with the X4 version one may correct the photos using Serif Panorama Plus with the free version one has to straighten this before adding it to the program. I used Picasa 3. and the second photo is then result.
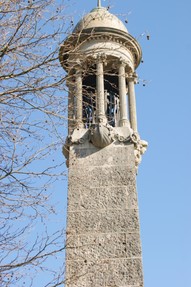
Photo 1 straightened using Picasa.
This looks better.
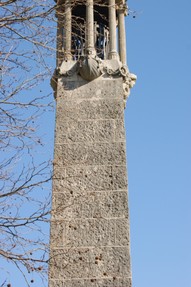
Photo 2
All these photos from now on have been straightened prior to uploading.
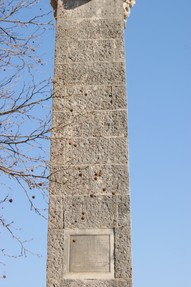
Photo 3
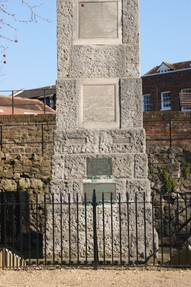
Photo 4
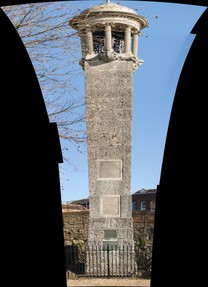
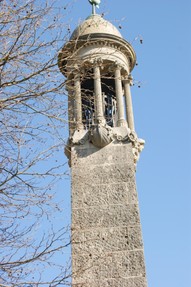
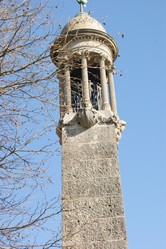
Photo 5 ~ Before cropping.
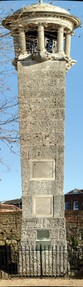
The finished photograph of the Pilgrom Fathers' Memorial Southampton.
Note that the photo is top heavy. It is NOT a true reflection of this Memorial.
I tried to get far enougth away to take it as one picture but building works precluded that.
Why not visit the web site of
Talented Photographer Alison Avery ~ Beautiful England
to not only see what it really looks like but also nto see her other work. Get inspired.
Bear in mind that my photographs are meant to demonstrate the Panorama Technique ~ not to show that I am a good photographer. Compared to Professionals I am rather mediocre.
You might also like
The Arduino Open Source PlatformUnique Fish Tanks and Unique Fish Tank AccessoriesUnique Fish Tanks and Accessories help show off your fish raising hobby in th...

 The Bicycle - A Magic Carpet of Dreams?on 02/19/2014
 Only a bike? No, it's also a tripodon 02/16/2014
 Nikola Tesla ~ Serbian Geniuson 08/28/2013
 Matt Orchel ~ Artiston 08/09/2013


Is this series of any assistance to you. Please let me know. I appreciate your input.
You surely can. Picasa 3 ~ The easiest Photo Enhancement program on the Web.
simple easy to understand and I bet I can do this!