Tips for Photographing Sculptures

by photography

Photographing sculptures calls for as great, if not greater, skill in the use of lighting and technique as most other branches of photography.

When photographing sculpture the aim of the photographer should be not only to give a correct record of its form, but also to interpret it in such a way as to lift the photograph from the "record" level and place it on the level of pictorial photography. This needs the right lighting, angle of view and background.

Most photographers have seen portraits with deep shadows in their eye sockets, or one side of the face a glaring white from overstrong backlighting; or distorted features as the result of using a lens of too short focus; or one feature over-emphasized to the detriment of the rest of the face because of a bad viewpoint.

Such mistaken technique and lighting would give as completely false an idea of a piece of sculpture as they do of a human face.

Vital Photo Equipment

A firm tripod is necessary to eliminate any possible movement during the long exposures customary in this field. The tripod should also have a pan and tilt head. Reversible legs, spiked one end for outdoor work and rubber-tipped the other end for indoor work, are also useful.

If you are photographing sculptures outdoor you will get vastly better results by using support than doing it freehand. Even a lightweight travel tripod will make a big difference on results.

Shooting Ornaments and Sculpture and In the Studio

When photographing sculpture in the studio, the photographer has the choice of background, angle and lighting under his direct control. If, when the photograph is printed, any of these is at fault, he can duplicate the same conditions and eliminate the fault.

A spotlight gives hard lighting, casting sharp shadows, and is best for sculpture finished in a rough texture. The beam cast is easier to control than with other types of light. A floodlight, having a larger sized light source than a spotlight. gives a softer effect. Sculpture having a delicate form (children's faces for example) is better rendered with a floodlight. The hard light of the spotlight divides the highlight and shadow areas too sharply, while the soft fringe of the floodlight merges one smoothly into the other. Still softer lighting can be obtained if the floodlight is diffused. Overcast daylight has still greater diffusion.

The secondary light or fill-in calls for a fine degree of judgement. If it is too strong, it overpowers the main light: if it is too weak, the shadow areas lack form. The direction of this light is also important.

Backlighting, if used with restraint, can give sculpture an edge, which can add considerably to the effects of both modelling and texture. Any shading of tone on the background is best done with lighting. On a plain, neutral background it is possible to get a range of tones from black to white, or to merge gradually from a light tone on one side to a dark tone on the other. This shading can counterbalance the lighting on the sculpture: the light side can be set against the dark side of the background, and the shadowed side against the light part of the background. By arranging the lighting in this way the subject stands well away from the background and the whole outline is thrown in relief without the need for backlighting. A patterned background is likely to detract from the sculpture, unless it is made part of the composition.

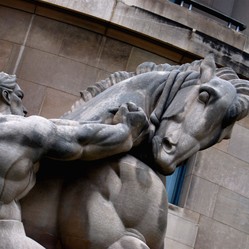
As a very general rule the angle of view should be approximately that from which the sculptor intended his work to be viewed. But very often. by choosing a high or low angle, the pictorial effect can be increased. Having a low angle gives a feeling of strength and height to a subject. A high angle. has the opposite effect, which is useful if the height of a large statue needs to be minimized.

As sculpture is three-dimensional, a better idea of its full shape can be conveyed if separate photographs are taken of two or three sides of the subject. This also helps to give a better impression of its dimensions.

Outdoor Sculpture Photography

Good opportunities for photographing sculpture can be found in the outdoor exhibitions that many local authorities arrange. And even familiar statues, seen by everyone in their home towns, provide an exercise for the photographer's ingenuity in finding an angle that gives them fresh interest.

Unlike studio photography, the factors of background, angle and lighting are not under the photographer's control. When photographing outdoors, the background seen from a particular viewpoint depends on the position of the subject, and the photographer cannot always get the angle he wants. Again the right lighting conditions are generally a matter of luck or patient waiting.

Spring and autumn are probably the best seasons for photographing outdoor sculpture, and during the summer months the mornings and evenings are most suitable. The sunlight then is not too harsh and does not come from too high an angle.

In open places the sky is the simplest background. Some measure of control can be had in the choiceof filters used. The deep blue of the sky on a summer's day can be controlled from a light tone (light yellow filter) to a dark tone (orange or red filter) using a panchromatic film. Light statues found near tall buildings can be taken with the dark shadowed side of a building as a background, whereas dark statues are best taken against a light background.

On large statues in particular a good photograph can often be had from one detail, a hand or a foot, or from a small group of details that together make a tight, well knit composition. It is useful to carry a large white folded card to act as a light reflector when photographing details, to balance the lighting of the highlight and shadow areas.

Very large monuments may have an architectural setting which needs a camera with a rising front lens panel so that all vertical lines can be made upright in the photograph. If a roll film camera is used and tilted up, the distortion of the verticals must be corrected on the enlarger. Correcting in this way may introduce some distortion but it is not likely to be very noticeable.

Taking Pictures of Sculptures In Churches

Sculpture in churches provides another rich source of subjects. Fonts, effigies, decorations of roof bosses, and bas-reliefs offer an endless choice.

A rigid tripod is essential for taking photographs in a church; the use of a weak tripod may result in camera shake during long exposures. The roll film or miniature camera is quite adequate when taking photographs of subjects which have no verticals to be corrected, but, if there are verticals to correct, then the camera possessing the rise and swing movements is preferable. A telephoto lens is useful in obtaining close-ups of subjects out of reach of the normal focus lens, such as gargoyles and details in vaulted roofs, coats of arms, and the like.

Unless the church is well lit the photographer may have to provide his own lighting with portable equipment. Before attempting any photography the vicar's permission should be sought and, if lights are needed, the voltage of the electricity will have to be checked. Flashlighting is convenient, but the number of bulbs needed for good modelling is apt to be rather expensive. If a single flash is used on the camera, the lighting will be flat and will not show the form of the sculpture; if it is used away from the camera, the lighting will be too hard, unless a fill-in flash is used. Electronic flashes, fired from a succession of points during a time exposure, are an effective way out.

When daylight can be used, which is usually better than flash, the ideal outside lighting conditions are those on a bright day with no strong sunlight. The diffused lighting from such conditions is often preferable to strong sunlight, which would need a bright fill-in light to illuminate the shadow detail. In a church where the light comes from many directions, the lighting is apt to be very flat. A floodlight in this case could be used as the main light source, and the natural light act as a fill-in. In winter months the daylight intensity may change rapidly. An exposure meter should be used constantly to check this.

If a subject has to be photographed in very poor light, it will sometimes be found on developing the negative that, although the correct exposure was given according to the meter reading, it is still badly under-exposed. Digital photographs will tend to be somewhat grainy if the contrast and lightness is increased greater than 10%.

Updated: 09/09/2013, photography
 
Thank you! Would you like to post a comment now?
4

Comments

Only logged-in users are allowed to comment. Login
BrendaReeves on 07/11/2012

Great article. I was planning on doing some sculpture photography this week. You taught me some things I didn't know.


Disclosure: This page generates income for authors based on affiliate relationships with our partners, including Amazon, Google and others.
Loading ...
Error!