Detailed Clover Pom Pom Maker Instructions

by Marie

Step by step how to photo tutorial for making yarn and wool pom poms with a plastic maker by clover. These detailed instructions explain everything you need to know to make them.

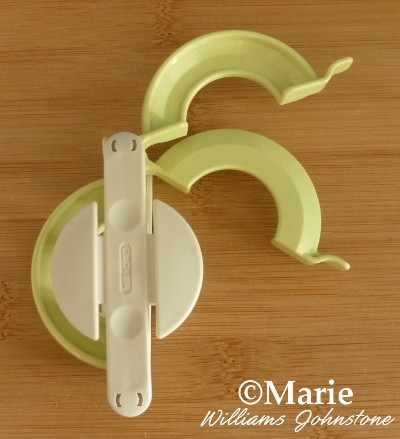
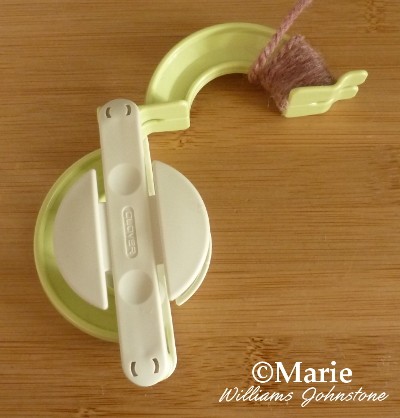
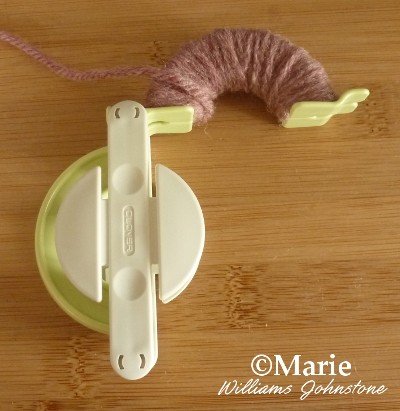
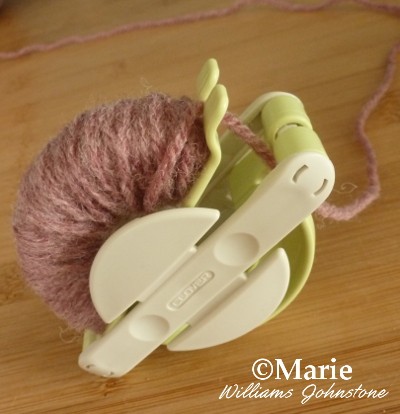
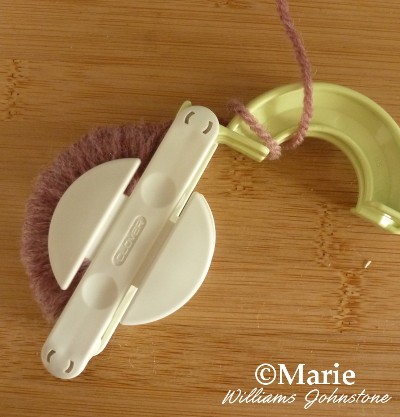
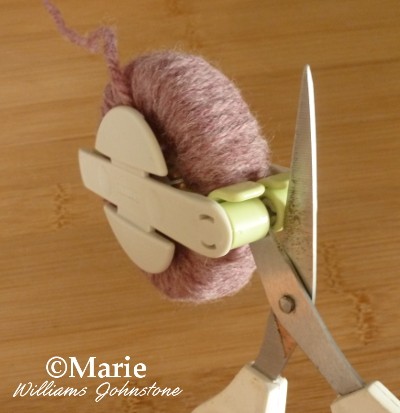
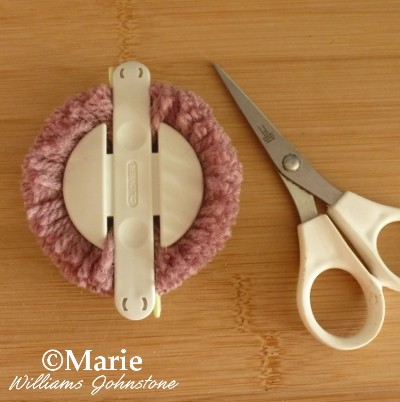
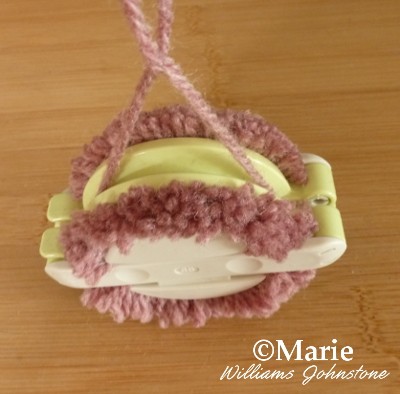
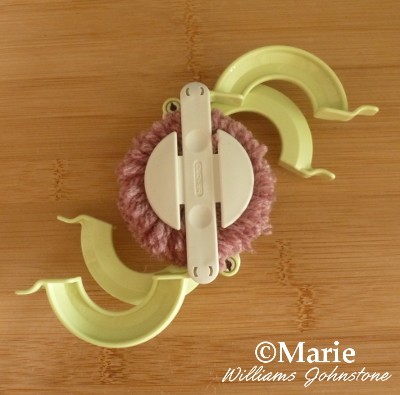
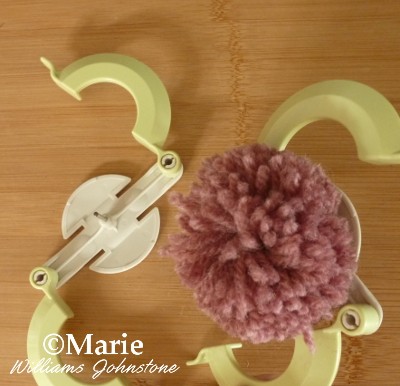
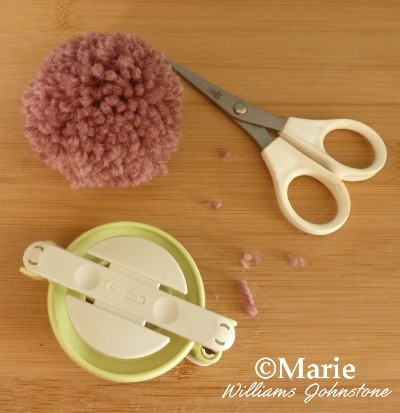
Making up yarn pom poms has never been so easy now you have some fabulous and easy plastic tools to use which make your job much easier. These very clever implements are made by the company Clover who design lots of cool products mainly for yarn crafters and those who knit and crochet.

I've been using these brilliant tools for a little while now and am getting quite addicted to making up these sweet fluffy balls of yarn which are ideal to jazz up and decorate cushions, throws, pillows, banners, clothing and more. Come and see how to use this wonderful set of devices so you can have fun creating them too.

How to Use a Clover Pom Pom Maker - Photo Tutorial

With the following set of detailed photo instructions, you'll discover just how easy it is to make up a quick batch of lovely fluffy pom pom balls of yarn with these very clever and ingenious range of devices. Clover have come up trumps again with yet another set of products which soon become indispensable tools for avid crafters. 

If you are used to the old method of winding yarn through a piece of cut card, take heart! These devices are much more user friendly and are made from strong plastic so are ready to use whenever you need them. It can be very quick to make each ball - my regular sized ones take around 3 minutes from start to finish. The great thing is that you can use them with odds and ends of yarns and wools that you don't want or are too small to knit or crochet with. 

Clover pom pom maker instructions 1Clover pom pom maker instructions 2

Materials and Tools:

  • Yarn - a good way to use spare yarns
  • A sharp and small pair of scissors
  • A Clover pom pom maker

Step 1: Put your maker out in front of you on your work surface - I use the 2.5 Inch Diameter Green One which comes in the large pack. This one is my favorite size. The outer green parts are all 'arms' which pull out. You want to pull out a pair of these 'arms' on just one side of your device. Since I am right handed, I prefer to pull out the 'arms' on the right side for winding.

Step 2: Once you've pulled these arms out, you need to line them up together as I've done in the second photo above. Now you need to start wrapping your yarn from one end of the 'arms' - and it makes no difference which end you start at, by the way. Don't knot the yarn around before you wrap, just hold the end of it with your thumb and wrap around the end until it is covered over and secured in place.

This is The One I Use from the Large Pack
Clover Large Pom Pom Maker

Two sizes approx. 2 1/2-inch & 3 3/8-inch. Ideal for embellishments and perfect for scarves, bags, sweaters and more.

$8.97  $8.82

View on Amazon

Clover pom pom maker instructions 3Clover pom pom maker instructions 4

Step 3: What you are aiming for is to cover the whole of this plastic section with yarn and you definitely don't want to see any parts of the plastic peeking through. There is little danger of over-wrapping since, if you add too much yarn, you won't be able to push the movable 'arm' section back into place - so that's an indicator that you have added too much. However, a common newbie mistake is not to add on enough which will end up with a really limp and rather pathetic looking finished product. 

Step 4: My process is to wrap a little and then push the wrapped strands back towards the side I started wrapping from which makes a tighter and denser wrap and a firmer pom at the end. You need to completely cover the 'arm' with a nice thick layer and this could mean going back and forth across this section several times depending on how thick or thin your fiber is.

Clover pom pom maker instructions 5Clover pom pom maker instructions 6

Step 5: Keep wrapping on this side until it feels quite thick. You should be able to push the 'arms' back into the middle of the circle - if you can't it means that you've added too much and you'll need to unwrap a bit of yarn. Look at the first photo above so you can see where to place the yarn next - you want it through the middle so you can start winding it onto the next pair of 'arms' in order to finish your pom pom.

Step 6: Now you need to pull out the other pair of 'arms' and start wrapping on this side. Make sure this pair are level before you start to wind around.

Try Using a Color Change Wool Blend for a Fun Look
Lion Brand Yarn 825-212 Amazing Yarn, Mauna Loa
Only $14.99
Clover pom pom maker instructions 7Clover pom pom maker instructions 8

Step 7: Wrap this pair of 'arms' just in the same way as you did with the first pair. You want to aim to get roughly the same thickness too which is easier to judge when you push the maker back into a circle shape. Once you have finished winding, push the 'arms' back down again.

Step 8: Now it's all closed back up again, you can snip the end of the yarn or wool off since it won't unravel while closed up. You'll need a pair of really sharp and small scissors (such as embroidery scissors) to insert and snip around the middle with. Pop the bottom blade of the scissors where shown in the photo above and start cutting all around the center.  

Clover pom pom maker instructions 9Clover pom pom maker instructions 10

Step 9: For me, the cutting is the really fun part. I just love cutting through and freeing the ends of the fibres - snip, snip! When you start cutting around, you'll notice that there are groves around the middle to aid your scissors to cut in the right place. Even my young daughter is able to do this so they made it easy to cut in exactly the right place.

Step 10: Cut all the way around but the one thing you MUST NOT DO at this point is to open out the arms. The closed arms with the maker in the circle position keeps all the yarn safely secure. If you open or loosen these right now then you'd end up with a mess of cut fibers instead of a lovely, fluffy yarn ball.

Clover pom pom maker instructions 11Clover pom pom maker instructions 12

Step 11: At this point, you will secure your wrapped pom so it is unable to unravel. You do this by cutting off a length of yarn and placing it around the grooves in the middle of the maker where your scissors just cut around. Tie it at the top with a single loop knot (the same way you tie laces - but single rather than double) and pull to tighten this simple knot so the yarn goes between the middle groves and tightens around the bulk of woven fibers. Then make another loop knot to fasten off. Snip off any loose ends.

Step 12: Now it is all secure, you can open up all the 'arms' on your device. Spread them all out as shown in the photo above.

Clover pom pom maker instructions 13Clover pom pom maker instructions 14

Step 13: Ignore the arm sections now and focus on the middle circle sections. You need to get hold of each side of these circles and pull outwards to pull apart your Clover device and release the finished pom pom. You can then pop the device back together, first pushing in the middles together. Once you've done this a few times it becomes very easy to remember what to do.

Step 14: To tidy up my finished piece, I like to just gently roll it between my hands which helps to fluff it up and also removes any stray pieces. I don't tend to snip it further but some people like to snip their poms right down into a tight ball. The choice is yours! I hope you've enjoyed reading my wizzles page today, thanks for your visit. Enjoy making plenty of these for all your textile crafts!

Now see how to make luxury pom poms from tulle netting

And how to turn them into a fun garland ideal for birthdays and occasions

Make lots of fluffy pom poms with the Clover maker in no time at all!
Updated: 12/10/2018, Marie
 
Thank you! Would you like to post a comment now?
4

Your Comments

Only logged-in users are allowed to comment. Login
Marie on 08/12/2017

You're so welcome. Yes I totally agree that the Clover pom pom maker package isn't helpful with instructions. Enjoy making your pom poms.

Aidacloth14 on 08/09/2017

Can't thank you enough for the great photos and directions! Just made my first one and it's perfect! Directions on the package are pretty worthless.

Ivka on 08/22/2016

Just made it - thanks for the tutorial we lost our instructions - yay!!!

HomeArtist1 on 04/11/2015

Love this tutorial!

Marie on 03/01/2015

Yes, I believe these are made by a Japanese company. Great gadgets - not great instructions for those who read English! Thanks, Mandy.

Mandy on 03/01/2015

Thanks! The directions on mine are in Japanese.

Marie on 02/24/2015

That's awesome, Helen. Yes that is the one downside - the lack of instructions. Once you know how to use it, it's great. Thanks for letting me know this worked well for you :)

Helen on 02/24/2015

Thankyou. I received my pom pom maker today without any instructions and your tutorial was great :)

Marie on 01/19/2015

Thank you. It is much more fun with the clover tool because they are quicker to make :)

WriterArtist on 01/16/2015

I was never good at knitting but this looks like fun. Never thought making pom poms with wool could be so artistic.


You might also like

How to Make Stuffed Felt Hearts Tutorial

A step by step photo tutorial on how you can make stuffed felt hearts with co...

Runescape Fans! Make Yourself a Hat for Runefest

Have you wanted a really unique hat that you can wear any time? How about mak...


Disclosure: This page generates income for authors based on affiliate relationships with our partners, including Amazon, Google and others.
Loading ...
Error!