Rectangular Skylight Shades | An Easy DIY Project

by CountrySunshine

Simple steps to creating shades for the skylights in your ceiling. All you need are pillowcases, dowel rods, cup hooks and seam tape, plus a few hand tools.

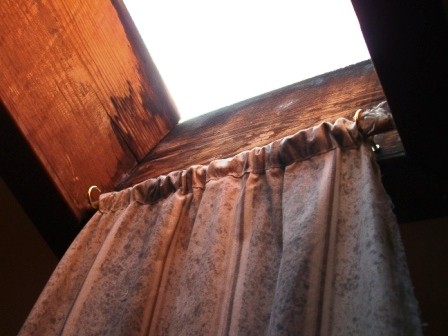
I have rectangular skylights in most of the rooms of my house: all 3 bedrooms, the living room, and kitchen. I really like having the light brighten up the rooms during the winter, but it can really heat up the rooms in the summer.

I visited a number of stores to find skylight shades or shutters, but found them to be quite expensive. I also found a few websites on how to make your own. But the instructions were difficult to follow, and I didn't have the supplies close at hand.

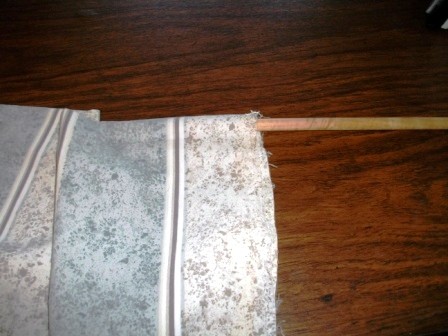
After looking around my house, I found that I actually had the materials to make my own skylight shades, and you can too! These shades are inexpensive, use items you probably have around your house, and can be made in just a few minutes.

Want to try your hand at making shades for rectangular skylights? Here's how:

Tools Needed For Skylight Shade Project

You should have these tools around your house, as they are quite common. If not, they are inexpensive, and you can purchase them through the links below:

  • Measuring tape
  • Small hand saw
  • Seam ripper or scissors
  • Iron

Supplies Needed For Your Shade

Supplies to make skylight shades
Country Sunshine

Each of the items below will make one skylight shade. Just double the amounts for each additional shade you will be making:

  • 1 pillow case
  • 2 wooden dowel rods
  • 4 cup hooks
  • Iron-on hem or seam tape

Step 1 - Measure your skylight

A simple measuring tape is all you need. Simply measure the inside height and width of your skylight. Jot down the measurements, so you don't forget!

Step 2 - Cut your dowel rods

Using the width of your skylight, cut the dowel rod so it will fit inside the skylight frame. It can be up to a ¼ of an inch less than the width if necessary.

Remember: Measure twice, cut once!

Step 3 - Prepare Your Pillowcase

Remove the stitching from each side of your pillowcase with scissors or a seam ripper, so it becomes one long piece of fabric.

Take your iron, and press it until all the wrinkles are removed.

Rip the seams of the pillowcase
Country Sunshine

Step 4 - Create A Pocket

Using the length of your skylight, measure the length of the pillowcase. Fold over each end until the measurement matches. The ends will become the pocket where you'll insert your dowel rods.

Note: You may wish to cut the ends down a bit if there is excess fabric.

Measure pillow case to create a pocket
Country Sunshine

Step 5 - Create a Crisp Edge

Using your iron, press the folded ends of the pillow case, so you’ll have a straight, crisp edge.

Crease edges of pillow case
Country Sunshine

Step 6 - Time For Seam Tape!

Apply seam tape about 2 inches from your newly created fold. If you are using a large dowel, you might wish to make this bigger.

Fold your pillowcase back over the seam tape, then apply a warm iron to seal the two pieces together.

Apply seam tape
Apply seam tape
Country Sunshine

Step 7 - Insert Dowel Rods

In the pockets you have created on each end, insert your wooden dowel rods. You'll find that the fabric is wider than the the rod, so you'll need to bunch it up to fit.

Insert dowel rod
Insert dowel rod
Country Sunshine

Step 8 - Install Cup Hooks

You'll need four cup hooks. Screw them in the long ends of your rectangular skylight frame, as close to the ends and sides as possible.

Screw cup hooks into skylight frame
Country Sunshine

Step 9 - Hang Your Skylight Shade

Now that your shade is finished, it's time to hang it! Start at the top, as it is easier to work with. Insert the dowel rod into the cup hooks, then move down the skylight to the other end. Repeat by inserting the other dowel rod into the hooks at the other end.

Hang the shade on the cup hooks
Country Sunshine

You're Done!

Finished skylight shade
Country Sunshine

I've gotten quite a few compliments on my skylight shades, and you will too! This is an easy DIY project, and it's inexpensive as well! If you've made skylight shades, please let me know how it worked out!

------------------------------------------------------------------------------------

Copyright L.C. Clifton / Country Sunshine.  All Rights Reserved
Originally published October 3, 2012 on Squidoo

-------------------------------------------------------------------------------------

Updated: 12/18/2015, CountrySunshine
 
Thank you! Would you like to post a comment now?
1

Are you crafty? What do you use as a skylight shade?

Only logged-in users are allowed to comment. Login

You might also like

How to Clean Glass Doors on Your Wood-Burning Stove

Step-by-step detailed instructions with photographs on using simple items to ...

How To Re-Caulk A Bathtub

An easy DIY project, this step-by-step guide with photos provides detailed in...


Disclosure: This page generates income for authors based on affiliate relationships with our partners, including Amazon, Google and others.
Loading ...
Error!