
Have You Forgotten Your Macrame Knots?
by barbarab
I wanted to send survival bracelets to the grandchildren but gasped at the price. Then when I really looked at the bracelets themelves I thought, well, perhaps I could copy it?
What is a survival bracelet?
One of the sites I read explained that the bracelets were worn by Army Rangers in Vietnam as a way to identify the Rangers from ordinary Army. Course the first thing that popped in my head was well duh, like the Rangers NEED to have something that will prove they are different?
However, further reading turned up the information that the bracelet is actually just a neat,portable piece of rope! Too cool! Ten foot of rope as a lightweight bracelet. Very nice, and you don't have to worry that the rope will get tangled at the bottom of your backpack!
http://survival-bracelets.com/survival_bracelets
Could I copy it?
I loved macrame so much the kids were off in their own apartments before I finally let hubby take the nail out of the doorjam!
Knotting is very soothing, the cord sliding through your hands, a pattern slowly forming in front of you and it can hang there and be picked up again easily. The knots won't come loose, there are no stitches to count, no problem of needles slipping out; just tie up the loose cords off the floor and it will be fine while you wander off! Macrame is almost as easy to learn as the names of the piano keys; the knots play off different variations of the same thing and just like the piano, once you know about seven knots, the rest comes naturally.
So when I looked at the knot used in the survival bracelet I thought, well geez, I remember that one! It is called the 'cobra knot' for the survival bracelet but looks like a square knot to me. The only snag I could see was the ones online are woven with one piece of cord so there are no loose ends. Either that or the knotting itself is done after the bracelet fastening is attached. If that is so then how do you untie it in an emerency? I decided not to worry about it and just go for it!
The Army Navy Store! Dude, I love it, don't you?
Our favorite is the one on 6th Street...where is your favorite?
Course it is called a "Surplus" store now but I can't figure out why...it always had more than just Army and Navy stuff in it but OKAY, whatever, let's go shopping!
Isn't it cool that the set up of the Army Navy Store remains the same? The cash register is smack up against the front door and you have to go either right or left.
We always go to the right, I don't know why.
Well, could be cause the caps (ones for your bald spot, not the ones that make the bombs go BOOM!) are on the right and hubby loves caps but probably cause the pins, tie tacks, etc are on the left and he knows if he steers left I will never move from that spot again! PSSSTTT! The coins are in that spot too!
Today, though, I was on a mission and went willingly right. The macrame cord (excuse me, paracord) is next to the caps and thank goodness they had hot pink! (cord, not caps.)
What? You don't think an Army Ranger would be using hot pink paracord? Well then why is it in the Surplus Store? HHHMMMM??????
Where were we? Oh, right, you interrupted me, casting disparity on the soldierly-ness of hot pink! Honestly!
And there was the dark green, just right for the little jarhead grandson :)
Here is a new thing though, to crimp the ends of the cord, an eletrical outlet on the post with a pointed nail like thing sticking out. The young lady flipped the switch and touched the end of the cord to the nail and it seared the end fast! Neat! I asked the young lady if she did pyrography but got a puzzled look and I was on a mission so could not stop to explain the joys of burning so to speak...
The eyebolt was next to find and I thought I would have to search through boxes (I was dissapointed to find that would not be necessary; so many lovely finds in dusty boxes) to find what I wanted but it was easy! In fact, they had several taped to the counter with the price tag!
I think there might be more grandmoms in Tucson than I who are copying the survival bracelets!
The one I wanted was shaped like a 'U' and screws into place. They had the plastic kind and other metal ones but I liked the way the metal ones felt. Funny, too, the cord was only eight cents a foot but the eyebolts were nearly five dollars each. Whew! Still, the cheapest bracelets I saw on line were six dollars, then shipping and handling and not even able to touch them first...this was better. Poor hubby couldn't find a black cap for himself but bless him, he got the grandson a camo cap! (I asked him if he found a pink one but he just gave me a sideways look...you know the kind of look I mean?)
I tried to slither over to the pins but hubby knows my wiles and snagged me with a "Want a cherry Pepsi hon?"
Sigh, I am so easily led...
Now to work.
I had a small fright in the truck; I couldnt get one of the eyebolts to loosen! But hubby managed it at the stop light so all was well.
Once home I researched the making of the survival bracelets again and found many writers ahead of me. There are many, many articles on how to knot these bracelets but none have the instructions for the one cord technique. I dug out my leather braiding book to see if, after all these years, the how to knowledge may have superimposed itself upon my feeble brain when I wasn't looking...
Oh all right, but can you do it? Hope dies hard.
It came down to simple knotting, after all.
1) Cut a two foot piece of cord.
2) Fold it in half and make a slip knot of the two ends. Now measure it for
your wrist and move the knot up or down.
3) Push the center, folded, end through the eyebolt and make another slip
knot to attach it.
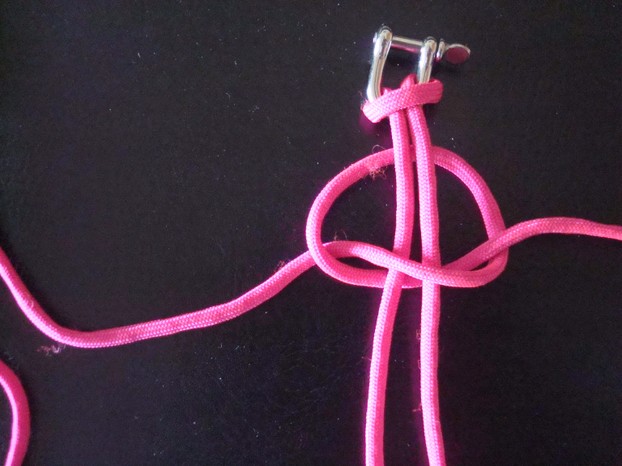
4) Take the remaining eight foot of cord and find the middle.
5) Place the center behind the slipknot of the eyebolt and make a square
knot.
6) A Square Knot is made by curving the right hand cord over the two stationary cords in the middle then taking the left hand cord, passing it over the right hand cord then under the two stationary cords and up through the hole created by the right hand cord.
What do you mean that makes no sense at all?
I know. Thats exactly what I thought when I was reading everyone elses articles! HAHA :)
Sorry, I thought it was funny.
Made me remember what it was like to learn knotting all those years ago. I just stopped reading the instructions in the first place and just looked at the pictures! Hey! Having a masters degree does not mean you can cross the street by yourself OR follow written instructions OK? Get over it. I did.
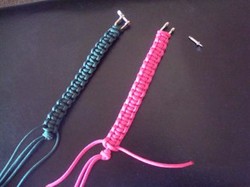
So I unraveled the pink bracelet and took pictures for all my mastered prepared peeps :) so to speak. Yes, that means that it wasn't until after I made the bracelets that it ocurred to me to write about it. I can learn, I just learn slowly...happy now?
Clear as mud, right?
It just takes getting your feet wet again is all. Or rather, your index figer callused again. But hey! At least it isn't hemp, right? And knotting, macrame, sailors pastime or whatever you call it is a wonderful pastime.
I just want to add a couple of things.
1) Remember the stationary cord in the middle. Of course you guys know you can make a square knot with only the one two foot cord folded over or with any number of cords, it all depends on how wide you want the bracelet to be...not a bad idea actually.
I may have to experiment with that idea. 'Sides, I didn't get to mess around in the Army Navy Store long enough today! There are untold treasures awaiting me, I am sure of it! And the jarhead probably needs one too. DIL may like one too, never know!
I like the "one thin red line" design thats on one of the websites. That might look good with four stationary cords. Or what about a flag type bracelet? Red, white and blue... that may be too wide? No it would be great, red and white as the two foot stationary cords and blue on the edges! Make a larger ball knot with the two foot cords tied together and get a wider eyebolt or another metal clasp of some kind at least an inch wide instead of half an inch like the ones for the kids! Cool idea!
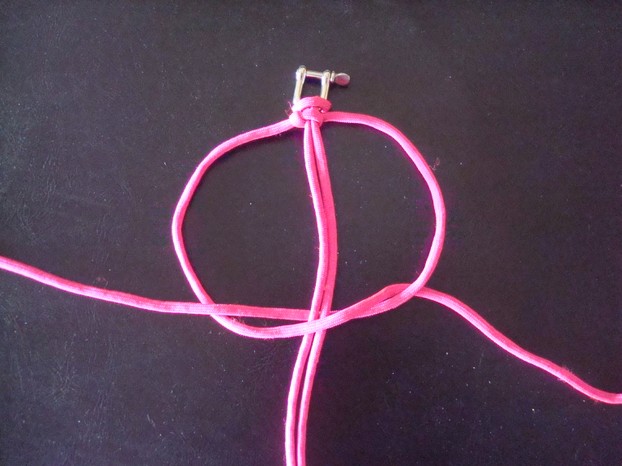
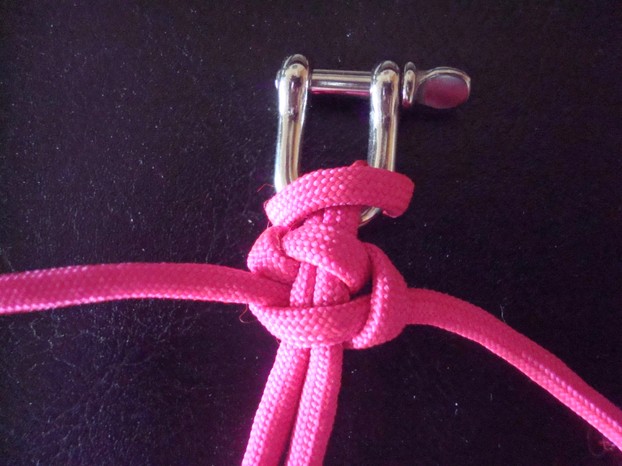
2) To complete the square knot and to keep up with which side you need to curl over the stationary cords remember this: look for the vertical end to the knot. It will look like an 'I' and the rest of the knot will look like a horizontal oval attached to the 'I.'
It isn't as obtuse as it sounds. Look at the cord in the last picture. See how the right side is straight up and down like the letter 'I?" Now look at the other side. It is curved like an oval with the closed end attached to the 'I."
To keep the bracelet from twisting, you have to alternate which cord gets curled over the stationary cords and which cord goes over, under and tucked!
Don't panic! Stay with me!
It is easy to know which one to curl!
Just curl the cord on the same side as the 'I' and your bracelet will lay flat, sharp and perfect!
Have you ever done macrame?
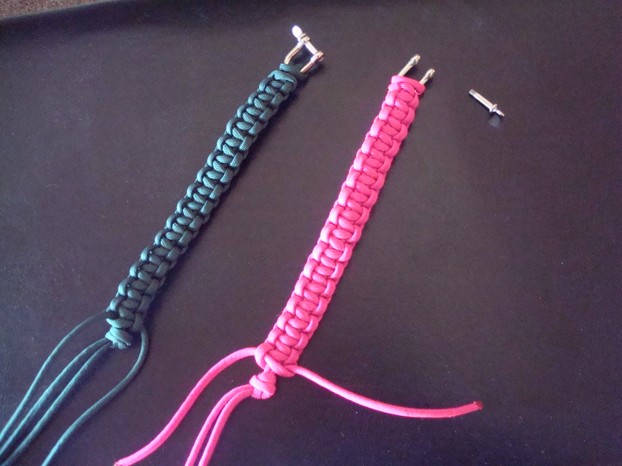 finished products! notice the open ey... bbethard |
 eyebolt, closed |
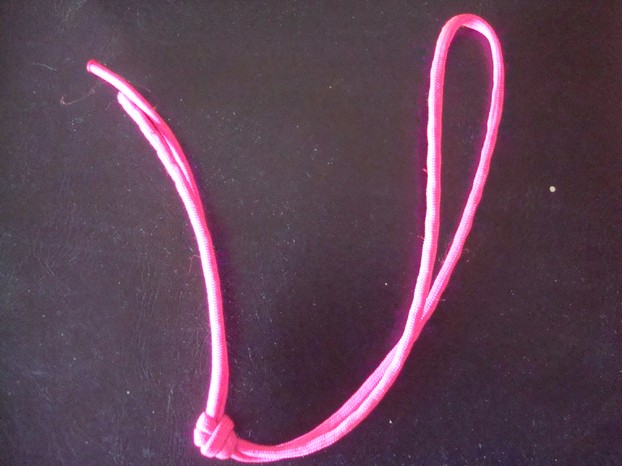 this is the first step, cutting, fold... |
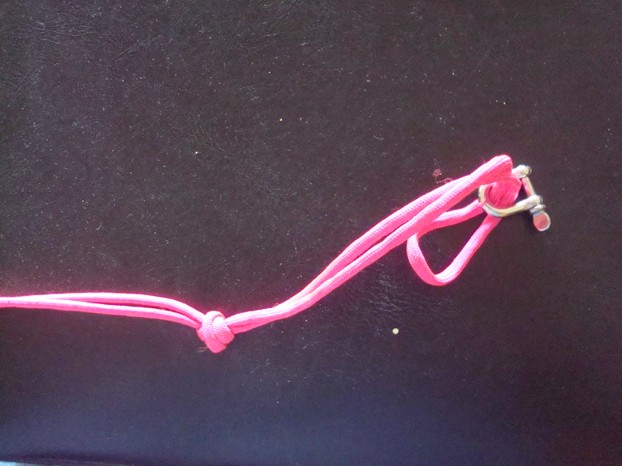 starting the slip knot to anchor the ... bbethard |
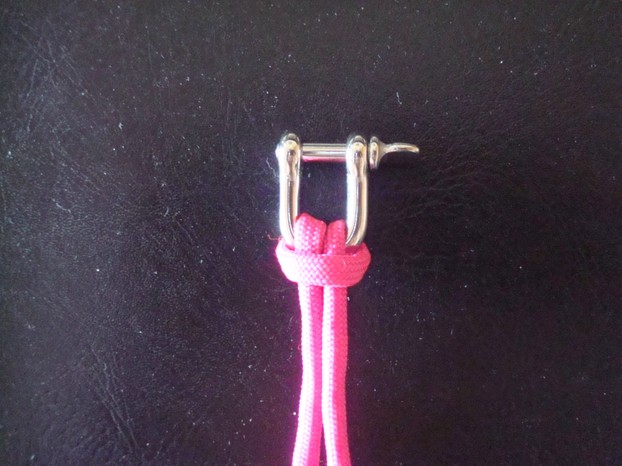 tighten the slip knot |
 lay the right hand cord over the two ... |
 Bring the left hand cord over the rig... |
 Now repeat but this time curl the lef... |
 This is how the finished square knot ... |
What are the perks of making a survival bracelet for your grandkids?
1) Your grandkids will have a lovely time unraveling it!
2) If you live a thousand miles away, you won't have to re-work the bracelet a million times!
3) Not to mention hearing your son (or daughter, depending) yell loudly when they step on the loose screw out of the eyebolt in the middle of the night!
4) But really, the kids will love it and paracord doesn't fade or shrink when water hits it so they can wear it out!
5) Best of all, you work those poor old arthritic fingers which is totally important to try and keep them as supple as possible.
6) Lastly, you get a visit to your Army Navy Store! Be sure and check out all the neat pins and tie tacks and everything! They even have coins! I carry the one our son gave me from Parrish Island at all times in the hopes someone will challenge me! :) But most of all, just to feel close to our son.
You might also like
The Arduino Open Source PlatformUnique Fish Tanks and Unique Fish Tank AccessoriesUnique Fish Tanks and Accessories help show off your fish raising hobby in th...

 The Hormone Cortisol and Its' Link To Weight Losson 09/02/2012
 A Peek at Who Is bbethardon 09/11/2011
 Are You Looking Forward to The Hunger Games?on 09/08/2011

Comments
thank you dak! taking the pics was fun too!
An informative article. I like the illustration.
My daughter in law said the granddaughter loved it! :)
Reminds me of my secondary school days ah me and my friends use to be so addicted to these stuff...Its time to try them again I guess..Thank you for creating this page.
I love it still! I used to do it years ago, but I reckon that I might do it again :)
Thanks @Barbarab to sharing this!
wo knows maybe the two of you will make something together! too much fun!
Had totally forgotten how fun we had making these when I was a kid! Will show this page to my daughter when she comes home, she will love it!
thank you Big_Joe!
it took me a few 'not' knots :) before it came back to me but the bracelets were a big hit !!
This is such a good reminder. I had completely forgotten how to make these knots