The standard makeup you buy from the Halloween store can also be found on Amazon. While you may think this makeup is not the best it is really good quality stuff. You can create amazing results if you know what you're doing. I'm sharing pictures of zombie bites, scratches, bullet wounds and more, even a pencil through an arm all done with the over the counter Halloween makeup. We share with you our tips and secrets to getting the best from this product. All of the pictures you are about to see were taken while we created these sick zombie effects live today using the makeup shown on this page. Relax and have fun creating your very own real life zombie features making the best looking zombie this Halloween.

How to Create Fake Zombie Wounds, Scars and Look
by katiem2
Look like a real zombie straight off the walking dead set with these tips created by using the standard Halloween makeup, this stuff is better than you know.
 pencil |


How to Use Scar Putty
The scar putty is the key to creating the most amazing and realistic looking zombie effects.
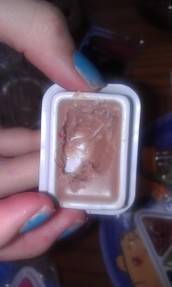 The Scar Putty
The basic Halloween makeup kits create insanely good zombie effects.
Once you know the basics of creating these effects you will never think twice about using these makeup kits again.
You can create an amazing zombie look with it. using the tips and tricks to creating zombie makeup here.
How to Create Zombie Effects and Details
How to Make Yourself into a Zombie
How We Did It
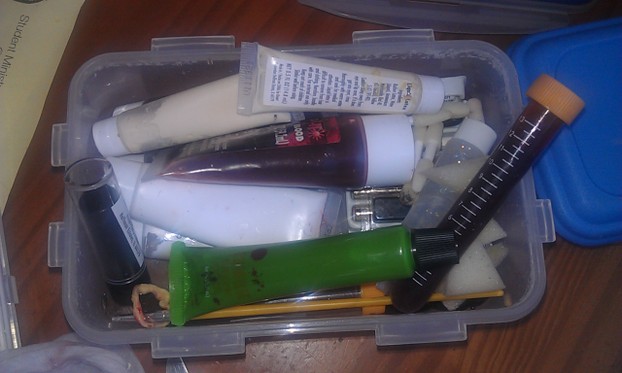
All of the pictures you see here today were made using the container of scar putty you see to the left. We also used the liquid latex included in the kit, more on that later.
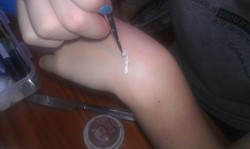
What you do is dab the scar putty on the area of the body you want to create wound, scar, bite or other zombie looking feature. You dab some of the putty onto one of the sponges provided with the kit. You then dab it on the skin creating the shape of the wound you want to create. Do so by building up the perimeter area outlining the area you want to create. Once you complete the perimeter blend it into the surrounding skin by tapering it down thinning it out to create a smooth transition. Lastly accentuate the area with black, green and red. The black should be used just as you would outline a drawing. The green is used to create the infection look. It looks a bit bright but will mellow out adding tints of yellow once you add the red. The red should be used last in the center of the wound and the edges as if bleeding. Use the various flesh colors to enhance the look. Plus create bruises and the like. Look at the images below using them as a guide.
This technique quickly reveals the skin like consistency it creates. You will quickly be dabbing and moving the putty into the exact desired shape in no time. Look at how little I used to do all this.
Steps to Creating Zombie Wounds
The first thing to use for this wound is the whitest white tube in this container.
Here you see the white and green tubes. The white is liquid latex and the green and red are paint based materials we use to create a gross open scar perfect for Zombies. First use the white liquid latex to form the wound. See below for beginning visual.
The Zombie Tool Kit
 |
Step by Step Zombie Look Tutorial
Follow along as we quickly create an horrific zombie wound.
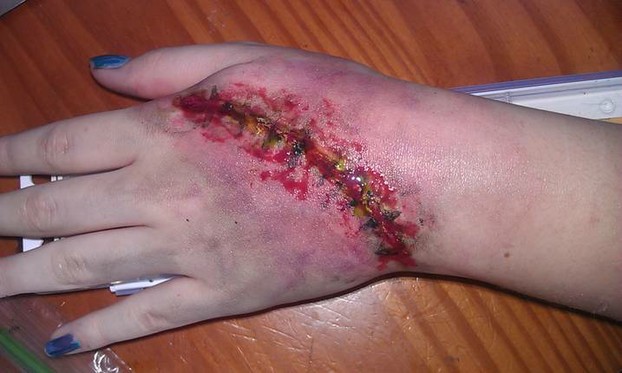
First outline the size and area you want to create as seen here. Continue with this procedure making the wound area as big or small as you like with the white liquid latex. The latex, just like the scar putty, creates a textured 3-D effect that is totally real looking. Continue dabbing it on till you get the size and consistency you desire. We're going to stretch this out along the entire hand. Then fill it in with the green, black and red paint to give the infected wound appearance.
 |
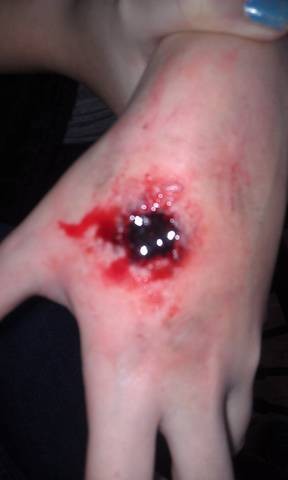
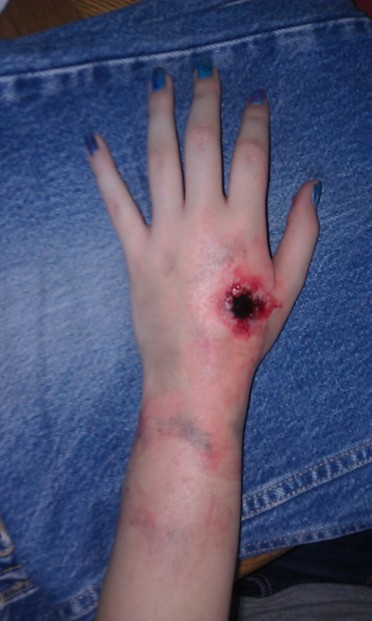
How to Make Infected Zombie Wounds
To accentuate the look add a bit of black to give the broken stitch appearance.
Add the green for the infected look. Finally dot along with the blood for the bleeding effect. The most important thing is to have fun adding your own creative genius. The biggest reason people don't succeed when it comes to using Halloween makeup is the foundation. A good foundation is created using the liquid latex which is tacky creating the frame work for the sick details. This picture shows the infected zombie scratch we created today. Plus check out the bullet wound we created.
 wound |
 |
The Zombie Makeup Techniques
The above described makeup techniques were used to create all of these Zombie scars, wounds, bite marks, bullet wounds here today with the kit we showed.
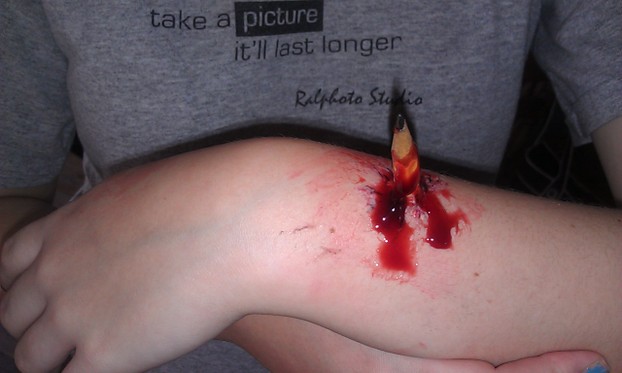
The key is a little bit goes a long way. Start using very small amount dabbing each step around on the skins surface in moderation. The less you use the better the look. We still have makeup left after having created all these ghastly looks. This awful pencil threw the hand was simply adhered to the arms surface with the putty. We then added a bit of black paint lines for the cracking skin look and a bit of blood for the horrific details. Doesn't it look painful?
Zombie Scratches
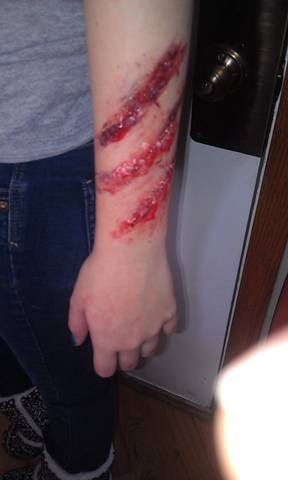 scratches |

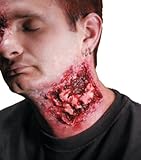
Bite Wound
 |
Bloody Bite Wound
 |
The Zombie Creations We Made Today
These are all fun and easy to do at home projects. We used the Halloween makeup you can find at the Halloween stores.
 zombie |
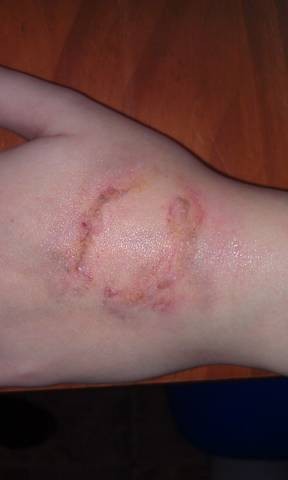
How to Remove Zombie Special Effects
Removing the special effects you see here today is easy.
While these fun Halloween looks stand up to a long night of fun and scares it is easily removed.
Simply start by peeling off those nasty scars and sores as you would pick off a real sore. Caution - it is never a good idea to pick on scabs or sores. Remember what your mother and the doctor says.
Once you've removed those terrible sores you wash with soap and warm water and before you know you you've washed that zombie right out of your hair.
Happy Halloween All, Katie and Sarah :)
Blue nail polish to the right really adds to the zombie look .

Zombie Makeup Must Haves
The makeup you need to turn yourself into a realistic walking dead zombie
 |  |  |
 |  |  |
How to Keep Zombie Makeup Fresh and Reuse
Store Zombie Makeup in Air Tight Container
The basic makeup outlined in this blog can be reused as long as you store it in an air tight container in order to keep it from drying out.
Use one like the one here found on Amazon, it is a quality container and the price is right!

Updated: 10/06/2019, katiem2
You might also like
How to Shop Online for HalloweenOnline Shopping Guide to Great Deals. Find all your Halloween needs online an...
Buy the Best Halloween Trick or Treat Candy and GoodiesDon't disappoint get the best deals on Halloween candy and treats. Surprise y...
Disclosure: This page generates income for authors based on affiliate relationships with our partners, including Amazon, Google and others.

 Guide to Sourdough Bread Using Cups, Ounces and Spoon Measurementson 09/27/2025
 Parents Discover 3 Stress-Free Ways to Readingon 09/25/2025
 How to Get More Reviews for Your Book: Why Authors Love Pubbyon 09/07/2025
 3 Best Blue Lotus Oils And Benefits That Wow Youon 06/03/2024
Chat about Halloween makeup tips and how to create the most horrific zombies
It is all thanks to my very talented daughter, I thought I should make a post about her talent for zombie makeup on the cheap.
This looks so real May have to use this as a guideline on for Halloween scares.
Dedriu, I actually added the nail polish beside the text module below the picture. Thanks for both tips, I also added a disclaimer for the kids advising them NOT to pick on their real life scratches, cuts or scabs.
Dedriu, I bought it at Sally's Beauty Supply, it is OPI brand. I'll leave the link above at the bottom of the article. I had on two coats, more than one changes the color, so its a sort of two in one polish. Oh and the advice to peel the scabs off, that is all part of the fun.
katiem2, What is the name of the blue-looking fingernail polish in five of your scary pictures? In another direction, I couldn't stop laughing at your saying "While these fun Halloween looks stand up to a long night of fun and scares it is easily removed. Simply start by peeling off those nasty scars and sores as you would pick off a real sore" since that is so counter to what medical personnel and parents tell patients and children: Don't pick!
WritersArtist, Thank you it is suppose to look very horrific and real as if a zombie invasion has occurred.... lol
This looks so real and terrifying - perfect for Halloween.
.Tutaj na stronie jest wiele ładnych zdjęć i można wybierać też za pomocą search.Przypomina to trochę Springpad,w którym układamy obrazki w jakiś estetyczny schemat a potem dodajemy krótką notatkę.
debij, Zombies have been on a lot of peoples minds these days, the birth of a whole new makeup concept for halloween is the result of such thoughts. Enjoy :)
Thanks Mike, Always glad to have fellow parents here to learn new tricks for Halloween night sure to be packed with lots of trick or treats and awesome scares.