How To Create And Install GIMP Brushes For Beginners

by Paul

There's many reasons for creating your own brushes. It can seem a daunting task, but it's actually quite the opposite!

There'll come a time in your GIMP career where the brushes that it provides for you simply won't cut it and you'll have to create your own. Fortunately, this is much easier than you might think.

Most other sources try and overcomplicate the process of making a brush, but they really needn't. It's even simpler if all you wish to do is use a brush that someone else has already created!

Like most things with GIMP, it's enjoyable to create and play around with the results - the brushes won't go away so you might find a use for them in the future.

If you're unsure about any of the basics of GIMP, you can find out about them here.

Creating A Brush

If you've found yourself on this article, you're likely to already have an idea as to what you want the brush to be. However, if you've not, simple designs often work best ensuring they're of a relatively small size.

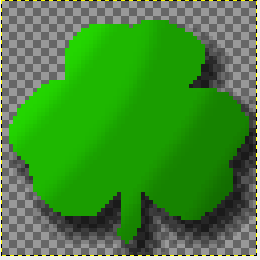
I'll be using the following shamrock design I've created which would be perfect for St Patrick's day or any other Irish picture's needs! It's perhaps slightly more detailed than you'd want a brush to be, but GIMP comes with a bell pepper brush which besides being curious as to why they've included it (I've still no idea why!), is far more detailed than mine.

Shamrock

Once you've got your design, adding it to your current brushes is easy. Simply go to File->Export and locate the GIMP files. By default, this can be found by clicking on your user on the left hand panel of the export window and then the .gimp2.8 folder in the main panel if you're using the latest version.

If you're not using the latest version, you'll just have a different number after .gimp. The process should be exactly the same.

After you're in the .gimp2.8 folder, find the brushes folder and here's where you'll be saving the brush file.

However, we need to make sure that we're saving it as a brush file. To do this, click the plus button beneath "Select File Type" and select "GIMP brush" from the list. Finally, click export.

export

Accessing Brushes In GIMP

Now we have our brush in the correct folder, we need to update GIMP to reflect this. Open up the brushes dialogue by pressing Shift+Ctrl+B.

Press the refresh button in the bottom right corner of the dialogue. This synchronises all of the brush files in the brush folder with the current instance of GIMP that's running.
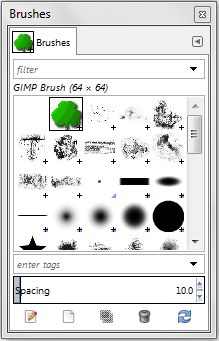
Once you've pressed that, you should notice your new brush amongst the rest.

Brushes dialogue

Select your brush, then the brush tool and you're done!

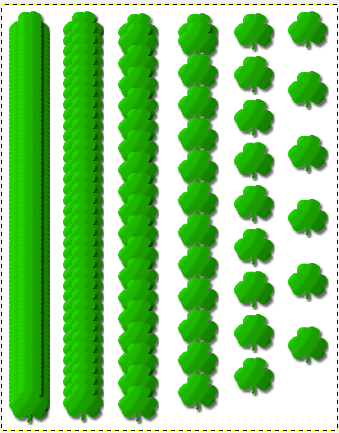
Take note of the "Spacing" value. This value is the value in pixels between each placement of the brush. The higher this value, the more space in between each placement.

spacing

The image above shows a 10, 25, 50, 75, 100, and 150px gap respectively. You can see how it evenly separates the shamrocks which can be very useful when utilising the brushes. 

Adding Premade Brushes

Adding a premade brush couldn't be simpler - unzip the file and add the .gbr files to the same folder as before and follow the previous steps for synchronising the brushes.

The brush I've used is available here.

If you'd like a guide on anything, please ask below!

Updated: 02/10/2013, Paul
 
Thank you! Would you like to post a comment now?
8

Comments

Only logged-in users are allowed to comment. Login
Paul on 02/11/2013

Doubly confirmed, Hollie! Thanks :D

HollieT on 02/11/2013

Paul, having read the article again whilst vodka free, I can honestly say that it is. :)

Paul on 02/10/2013

Link's up!

Paul on 02/10/2013

Just asked on the forums if I'm allowed to add it to the article and if so, what they'd prefer me to do. If I'm not, I'll PM it to you, Joan. :)

Paul on 02/10/2013

Jo - If you want the .gbr file, I can make it available!

JoHarrington on 02/10/2013

You've got me thinking about doing a Celtic GIMP brush now. Much creative inspiration here!

Paul on 02/10/2013

Thanks Joan! It does seem strange as it's essentially all I've ever known, but I'm glad I can convey my knowledge efficiently. :)

Paul on 02/10/2013

Thanks Hollie! :) I suppose I can now definitely classify my writing as "easy to understand" if you could comprehend it while somewhat intoxicated!

HollieT on 02/09/2013

Paul, I actually understand this, despite having several vodkas! The brushes now make sense, and an area which I had previously not wanted to delve in. For you, this kind of tutorial may not be a big deal, but for others like me, who were not brought up around computers, your straight forward language and no nonsense approach makes it accessible.

Never underestimate your skills, the rest of us have not naturally acquired them!:)


You might also like

How To Use Basic Functions In GIMP For Beginners

GIMP is a free image manipulation program which can be intimidating at first,...

How To Cut Out Parts Of A Picture In GIMP For Beginners

Along with making something transparent, cutting an element out of an image a...


Disclosure: This page generates income for authors based on affiliate relationships with our partners, including Amazon, Google and others.
Loading ...
Error!