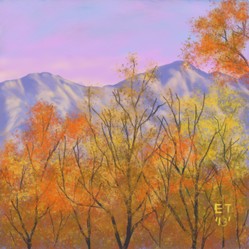
One of the most colorful seasons is fall. Small wonder then that it is a popular subject for painters all over the world. In this lesson, I will show you how to capture the beautiful colors of fall trees. I used the SketchBook Pro android app. There is a SketchBook Mobile app that is designed for mobile phones, but it doesn't have as many features as the tablet app, SketchBook Pro. I used my Samsung Galaxy Note 10.1 tablet with the S Pen to create this painting. For this lesson, I went with a simple composition of trees highlighted against background mountains.

How to Paint a Fall Scene Using Sketchbook Pro for Android Tablets
This article will focus on how to paint a simple fall scene using the android tablet app, SketchBook Pro. I will also emphasize traditional painting techniques.
SketchBook Pro for Android Tablets
 SketchBook Pro for Android Tablets Ellie Taylor Artist |
SketchBook Pro for Android Tablets
This is the interface of the SketchBook Pro android app. It has custom palettes on each side, one for your most used brushes and the other for your current project's colors. There are sizes to choose from up to 2560 x 2560 pixels. This program has 165 brushes to choose from: some brushes mimic natural media such as pencils, markers, airbrush, paintbrush etc., while others are stamps of flowers, grass, silhouettes and more. You can also customize the brushes by changing opacity, size, jitter, spacing, and more. You can also change your line from free hand to straight, square, or circular and there are two guides (line and circular). This app also supports layers. The amount of layers is based on the size of the painting: the bigger the painting the less layers you can have because of the amount of memory it uses. There are many more features that are explained in the help menu.
Samsung Galaxy Note 10.1
 | Samsung Galaxy Note 10.1 (32GB, Deep Grey) The S Pen makes this the best tablet for painting and drawing in my opinion. Only $349.95 |
Samsung Galaxy Note 8
 | Samsung Galaxy Note 8.0 (16GB, White) If you want a smaller tablet, but still have the S Pen support this tablet is 8 inches instead of 10.1 inches. |
SketchBook Pro for Android Tablets
 | Autodesk SketchBook The app has limited free features and you can buy all the rest of the features with an in app purchase. Only $0.00 |
Fall Lesson: Step 1
 Painting a Fall Season Sky Ellie Taylor Artist |
 Using an X-shaped Stroke Ellie Taylor Artist |
 Adding Purple Ellie Taylor Artist |
Painting a Fall Season Sky
I wanted to paint a sky which would complement the fall trees. The trees are shades of orangish red and gold and the complements to these colors are shades of purple and blue. Color theory is a very good subject for artists to learn. Color complements are pairs of colors that produce a neutral color when combined. The basics are red-green, blue-orange, and yellow-purple. This principle is usually displayed on a color wheel. The color picker in SketchBook Pro has a good example of a color wheel.
I started out with a cerulean blue for the first layer of the sky. I picked a brush that mimics traditional brushstrokes. Then I painted the sky using an x-shaped stroke. This stroke helps make a smooth looking sky and it also works well in traditional painting. Then for the second color in the sky, I added a purple paint layer with reduced opacity. Since the tablet version of SketchBook Pro doesn't have paint blending like the PC version SketchBook Pro 6, you can adjust the opacity of paint layers for blending. You can also adjust the brush size and opacity using the resize puck. There is a smudge tool that blends a little, but it does not give a natural paint look. However, this layering technique is similar to the traditional painting technique of glazing. Glazing is commonly used with watercolor, acrylic, and oils. For traditional media you apply several thinned down layers of paint.
Fall Lesson: Step 2
 Airbrushing the Sky Ellie Taylor Artist |
 Adding More Color to the Sky Ellie Taylor Artist |
 Adding More Color to the Sky Ellie Taylor Artist |
 Blending the Sky Ellie Taylor Artist |
Blending the Sky
In this step , I used the airbrush with a reduced opacity to add several paint layers to the sky. First I added a lighter purple to the sky, then I added some more light blue. To make more light on the horizon I added a light orange and purple and blended it with the airbrush on low opacity.
Fall Lesson: Step 3
 Painting the Mountains Ellie Taylor Artist |
 Layers Ellie Taylor Artist |
Painting the Mountains
For the mountains, I added a new digital layer. I chose the same paintbrush as I used for the sky and picked a grayish-blue color to underpaint the mountains.
Fall Lesson: Step 4
 Adding Highlights Ellie Taylor Artist |
 Smudge Tool Ellie Taylor Artist |
 Textured Brush Ellie Taylor Artist |
 Advanced Brush Settings Ellie Taylor Artist |
 Blended Highlights Ellie Taylor Artist |
Adding Highlights
In these steps, I added the highlights to the mountain. First, I picked a light orange for the highlights and used the same brush as I used on the mountains. Then I picked the smudge brush and softened the edges of the highlights. I decided that the highlights needed more texture, so I chose a textured brush and used the advanced settings to customize it. This brush helped further blend the highlights into the mountain.
Fall Lesson: Step 5
 Adding Trees Ellie Taylor Artist |
 Brush for Branches Ellie Taylor Artist |
 Draw in the Branches Ellie Taylor Artist |
Adding Trees
For the photo reference of fall trees, I went to pixabay.com and downloaded this photo. Pixabay.com has lots of royalty free photos that you can use for references. One of the very nice features of my Samsung Galaxy Note 10.1 tablet is windows. There are quite a few apps that you can open as a window or a dual view. The gallery is one of the apps that does this and it works great when you need a photo reference.
Then I picked a brush with a rough texture to give the impression of bark on the trees. I used this brush to draw thin trunks and branches on a new layer.
Fall Lesson: Step 6
 Adding First Layer of Leaves Ellie Taylor Artist |
 Extending the Background. Ellie Taylor Artist |
Adding First Layer of Leaves
In this step, I added the first layer of leaves, making them a dark rusty color for the underpainting. It was at this point that I realized I needed to extend the background mountain all the way down to the canvas edge. Since I had made a separate layer for the trees, it was easy to turn off the tree layer (tap the eye icon on the layers panel) and paint in more of the mountain. Then I turned the layer back on by tapping on the eye icon again.
So what do you do when this is an actual canvas and you need to extend the mountain? Well you just have to paint over the trees and repaint them. There are some advantages to digital painting.
Fall Lesson: Step 7
 Adding More Leaves Ellie Taylor Artist |
 Leaf Brush Ellie Taylor Artist |
Adding More Leaves
Here I used the airbrush to underpaint the first layer of leaves and used dark oranges, yellows, and reds. Then I picked a brush that looked like scumbled leaves and adjusted it to my liking. When I paint leaves in the traditional way, I use a scumbling technique to get the leafy look. Basically scumbling means making random, rough brushstrokes. This technique works great for leafy trees of all kinds.
Final Steps
 Adding Another Layer of Leaves Ellie Taylor Artist |
 Redraw Branches Ellie Taylor Artist |
 Final Highlights Ellie Taylor Artist |
Final Highlights
The last steps were basically just adding highlights to the leaves and creating the tree forms. I picked lighter shades of yellow and orange and painted them in bunches to give tree branch shapes. Study your tree forms to see how to make natural looking trees. To add more details, I drew some of the branches back in before adding the final highlights. When painting trees you want some of the branches showing to add realism. I then picked very light shades of yellow and orange to add the final highlights and give the leaves a three dimensional form. I covered up some of the branches, but left enough detail to give the impression of a real tree form. I signed the painting and exported it as a jpeg file.
Books on Painting Trees
 | Paint Along with Jerry Yarnell Volume Four - Painting Techniques This book has several lessons on painting trees in all different seasons including fall. |
 | Jerry Yarnell's Landscape Painting Secrets This book has some really good pointers about painting trees. Even though this is a book about acrylic painting, the fine art techniques still apply to digital painting. |
Examples of Fall Landscape Painters
 | The Hudson River School: Nature and the AmericanVision Now these guys knew how to paint beautiful fall scenes! |
E-book
 | Hudson River School: 150+ Paintings - Asher Durand, Frederic Church, George Inness, Thomas Cole, ... These little e-books are very nice to showcase large collections of art at an affordable price. You can get the kindle app for free. Only $4.99 |
 | Kindle for AndroidOnly $0.0 |
Conclusion
Since SketchBook Pro has picture sizes up to 2560 by 2560 pixels, you can have a fairly big image to print out. Fine Art America has print sizes that start at 600 x 600 pixels and up. For this painting size, Fine Art America will print up to 24 x 24 inch canvas prints.
My Fine Art America Gallery
 Riotous Color |
Updated: 02/06/2015, EllieTaylorArtist
You might also like
How To Paint a Night Scene Using the Infinite Painter Android AppThis is a lesson on painting a night scene using the Android app, Infinite Pa...
OpenAI and WatermarksPlay a little, work a little, be inspired a little, and all the while use the...
Disclosure: This page generates income for authors based on affiliate relationships with our partners, including Amazon, Google and others.

 Painting a Cat in Infinite Painteron 03/23/2016
 Painting Light and Shadows with Serious Painton 10/14/2014
 How to Paint a Waterfall Using the Android App LayerPaint HDon 01/08/2014
 How to Paint a Snow Scene Using the Android Painting App, ArtFlowon 09/30/2013


Comments
Thanks so much! Yes, I have plans to do more Sketchbook tutorials. Especially since they have updated and revamped their app. I need to show the new blending features of this app.
Very useful and I hope you do some more sketchbook demo's.
Thanks, I'm glad this lesson helps.
Thanks so much!
Very nice and useful guide, Ellie.