Paintings are made up of light and shadows. Without light and shadows you cannot achieve the illusion of depth on your two dimensional painting surface. If shadows are not correctly placed, an object in a painting may appear to float. A good understanding of shadow placement will help correct this problem. In this lesson I will show you how to paint shadows and highlights in a still life painting. I used the android app Serious Paint on my Galaxy Note 8 tablet. You can find this app at the Google Play Store. They also have a very nice website. http://www.seriouspaint.com/

Painting Light and Shadows with Serious Paint
This article teaches the basic principles of adding light and shadows in your paintings. To demonstrate this I am using the android app Serious Paint.
Example of Shading
 Sphere Ellie Taylor |
Example of Shading
A Sphere
This sphere gives you a simple idea of how shading works on round objects. Since my still life setup is made up of round objects, this sphere will help demonstrate how light affects them. In this example our light source is from the left. It creates a cast shadow behind the sphere. The cast shadow is the darkest shadow and needs to be touching the bottom of the sphere. If the cast shadow is not touching the bottom of the sphere, it will appear to be floating. The light also creates a shadow on the sphere, usually called the body shadow. The body shadow is lighter than the cast shadow. Along the edge of the sphere there is a thin rim of light called the reflective edge. This edge is created by light reflecting off the surface of the table. The midtone is the point where the shadow gives way to a lighter tone. This is where we add the true color of the object. The highlight is where the light source shines brightest and creates the lightest color point on the sphere.
Serious Paint
User Interface
 Serious Paint UI Ellie Taylor Screenshot |
Serious Paint
The User Interface.
For this lesson I used the android app Serious Paint created by the developers, Creative Science, on my Samsung Galaxy Note 8 tablet. I like the look of traditional oil paint that this app can create. Serious Paint has an accordian style menu that pops up when you tap the middle button on the bottom of your screen. The first row contains a few brushes and the eraser tool. The second row contains the settings, edit brush functions, help, clear, file, and save buttons. The last row has the effects, layers, view, and undo and redo buttons. The button on the bottom left of the screen brings up the color picker or you can drag out the contol to adjust the shade of your current color. On the bottom right of your screen there is a button to bring up your brushes menu or you can use the drag out control to change size of your current brush.
Brushes
 Serious Paint Brushes Ellie Taylor Screenshot |
Shaders and Blenders
 Shaders and Blenders Ellie Taylor Screenshot |
Brushes Used in this Lesson.
For this lesson I mainly used the Rough Brush, Flat Oil, Soft Shader, Simple Blender, and Detail Brush. These brushes give the picture an oil painting look.
Samsung Galaxy Note 8 Tablet
 | Samsung Galaxy Note 8.0 16GB White (Certified Refurbished) I really like this tablet because it is so easy to take with me for quick sketches or paintings when I am traveling. The 8 inch size makes it very convenient. However, this is a fully featured powerful tablet and I can also produce finished works. Only $20.00 |
 | Samsung Galaxy Note 8.0 16GB Brown (Certified Refurbished) This tablet comes in two colors, white or brown. Only $35.00 |
Photo Reference
 Still Life Reference Ellie Taylor |
Still Life Photo Reference
Here is the photo reference of my still life setup. It consists of a polka dotted sugar bowl and salt and pepper shakers. When setting up a still life you can use anything you have around the house. It doesn't have to be fancy. I actually just used a sheet for the background.
Step 1
Beginning Sketch
 Beginning Sketch Ellie Taylor |
Beginning Sketch
In the first step, I used the Detail Brush to make a beginning sketch. I used simple circular shapes to make the sugar bowl and shakers. Since the background is not that important yet, I have just made indications for some of the large wrinkles. On my Galaxy Note 8, I have an app called Floating Apps which opens a window for an image viewer on my tablet. I used this to look at my photo reference.
Step 2
Underpainting the Still Life
 Underpainting the Still Life Ellie Taylor |
Underpainting the Still Life.
In this step I underpainted the objects using an off-white brown tinted color. For the traditional artists using acrylic or oil paint, that would be White tinted with Burnt Sienna. I used the Flat Oil Brush option in the Serious Paint app. I also created a new layer for this step in order to preserve my original sketch. This is a good idea because you may need to refer back to your sketch if you get things out of proportion and need to correct your shapes.
Step 3
Massing in the Fabric
 Massing in the Fabric Ellie Taylor |
Massing in the Fabric
Still using the Flat Oil Brush, I massed in the fabric around the objects. I used white tinted with blue for the light areas of the fabric and a grey color for the shadows in the folds. I smoothed the paint on the sugar bowl and shakers using the Simple Blender Brush. In this step, I have not blended the background fabric yet and you can see that the Serious Paint App does a good job of mimicking traditional oil paint.
Step 4
Blending the Paint
 Blending the Paint Ellie Taylor |
Blending the Paint.
Here I used the Simple Blender Brush to smooth out the paint on the fabric. It is during this step that you can decide how smooth you want your brushstrokes to appear. If you want a thick oil paint look you can leave the strokes fairly rough or if you want a more acrylic paint look you can smooth them out more. Since I paint with acrylics a lot, I opted for a smoother look.
Step 5
Adding the Body Shadow
 Adding the Body Shadow Ellie Taylor |
Adding the Body Shadow.
Our light source is from the front and the right and the body shadows on the still life are on the left. On a new layer, I applied a light blue grey color to the shadowed side of the sugar bowl and shakers with the Flat Oil Brush. At this point I kept the cast shadows behind the sugar bowl and shakers as a soft blur.
Step 6
Blending the Shadows
 Blending the Shadows Ellie Taylor |
Blending the Shadows.
This is the step that starts to give our still life objects a three dimensional form. I blended the body shadows into the still life surface with the Simple Blender Brush. I added soft indications of the sugar bowl lid and edges of the shaker tops and put a shadow on the handles.
Step 7
Adding Details
 Adding Details Ellie Taylor |
Adding Details
Here is where we start to add the details. Using the Detail Brush, I added the shadows to the tops of the shakers and sugar bowl. I also painted the holes in the tops of the shakers. For the color, I chose a dark brown or Burnt Umber color to bring out the edges on the tops.
Step 8
Adding Highlights to the Fabric.
 Adding Highlights to the Fabric Ellie Taylor |
Adding Highlights to the Fabric
Next I went back to adding more highlights on the fabric with a light blue color. I used the Flat Oil Brush and then blended it in with the Simple Blender.
When I am working on a painting, I like to keep all elements of the picture at the same developmental stage. I will move around to many different areas in the painting trying to bring each section up to the same developmental stage. I do this because I want to look at the painting as a whole and judge the progress from each stage. Sometimes you can make mistakes and not notice them if you finish out one part of your painting before the other parts. The colors, perspective, and forms will look a lot different when finished and they need to be compared in the same stages.
For example, when painting a portrait, if you just finish out one feature such as the eyes or the nose, they can be too big or too small, but you won't notice that when you are painting because the other features are not finished and you can't compare them. This also applies to still life paintings. You may have one element too big or too small compared to the others.
Step 9
Highlighting the Sugar Bowl
 Highlighting the Sugar Bowl Ellie Taylor |
Highlighting the Sugar Bowl
At this point, I started to add the highlights. Using the Flat Oil Brush, I painted the lid of the sugar bowl using white with a touch of yellow to give it a cream color.
Step 10
More Highlighting
 More Highlighting Ellie Taylor |
More Highlighting
To add the brightest highlights on the fabric, I used the Flat Oil Brush to bring out the folds. I used an almost pure white. When adding pure white make sure you use it on the final layer of the painting because it will show up very well then and give a three dimensional look to your painting. You don't want to use pure white before the final highlights are added because it can make your painting look washed out or too chalky looking.
Step 11
Smoothing the Wrinkles
 Smoothing the Wrinkles Ellie Taylor |
Smoothing the Wrinkles
Here I used the Simple Blender on the sheet to smooth the wrinkle highlights and blended them into the shadow edges. This gave a finished look to the sheet.
Step 12
Adding the Polka Dots
 Adding the Polka Dots Ellie Taylor |
Adding the Polka Dots
Now for the final steps. Using the Flat Oil Brush, I added the polka dots on the sugar bowl and shakers on a separate layer. For those using traditional paint, I used a Spring Green color, Cadmium Red Light, Cadmium Yellow, and Ultramarine Blue. I made sure that the polka dots followed the contours of the sugar bowl and shakers. Some of the polka dots have an oval shape because they are in a side view perspective.
Step 13
Working on the Shadows
 Darkening the Cast Shadow Ellie Taylor |
 Shading the Polkadots Ellie Taylor |
Working on the Shadows
In this step, I darkened the cast shadow using a grey color. I used the Flat Oil Brush to paint in the shadows and then blended them with the Simple Blender. I accidentally made a stray mark on my picture, but I hit the undo button and deleted it. (This happens to me a lot.) However, when this happens on a traditional canvas, I have to paint over it.
With the shadow color, I shaded over the polka dots with the Soft Shader to make them feel like part of the shakers and get rid of the pasted on look. Then I used the Simple Blender to soften the shadows on the polka dots.
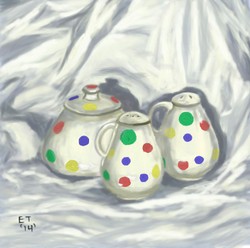
Step 14
Final Highlights and Details
 Final Highlights and Details Ellie Taylor |
Final Highlights and Details
I added the brightest highlights on the sugar bowl and shakers to give them a three dimensional look. I darkened the shadows under the sugar bowl and shakers and fine tuned the edges of the lids.
Final Thoughts
Painting white objects against a white background is not easy. You have to use shades of off-white colors. In this lesson, I used white tinted with yellow, brown, and blue. I hope I helped you learn how to paint white objects with this lesson as well as how to paint shadows and highlights.
Digital painting is just another medium like acrylic or oil paint. The basic principles of art such as composition, color, and form still apply even in digital paintings. With the advent of natural media mimicking digital apps, even painting techniques can be close to the same.
Further Reference
 | Your Painting Questions Answered from A to Z Helen Van Wyk was an excellent still life painter. I have all her books and they helped me a lot. This is a book dealing with oil painting techniques, but you can apply them to your digital paintings. Only $32.99 |
Another Reference Book
 | Classic Still Life Painting: A Contemporary Master Shows How to Achieve Old Master Effects Using ... This book gives some pointers on how to set up still life arrangements. It is a book about oil painting and gives excellent insight into the traditional painting process which can be adapted into digital techniques. |
Updated: 02/02/2015, EllieTaylorArtist
You might also like
Ferdinand Bauer: "the Leonardo of natural history illustration"Ferdinand Bauer created exquisitely realistic paintings and sketches of the n...
Still Life Oil Paintings by Nicole PellegriniA traditional subject for oil paintings and watercolors, the still life is a ...
Disclosure: This page generates income for authors based on affiliate relationships with our partners, including Amazon, Google and others.

 Painting a Cat in Infinite Painteron 03/23/2016
 How to Paint a Waterfall Using the Android App LayerPaint HDon 01/08/2014
 How to Paint a Snow Scene Using the Android Painting App, ArtFlowon 09/30/2013
 How to Paint a Fall Scene Using Sketchbook Pro for Android Tabletson 09/04/2013

Comments