As soon as the weather starts to get cooler, it is time to consider winterizing your windows. It is relatively easy to apply plastic to your windows. Furthermore, the window kits available at any discount store or hardware store is low-priced. Not only will your home stay warmer this winter, you can save money on your heating bill at the same time. The plastic film included in window kits is fairly clear and you can still look out your windows. So basically, you really have no excuse this winter. It is time to winterize your windows with indoor shrink plastic film!

How to "Winterize" Your Windows
Winterizing your windows when the weather starts to get cool can save you money and keep you warm. Using plastic on your windows can help more than you might imagine.
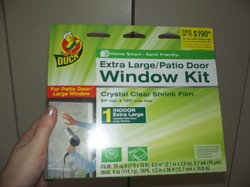
Purchase Your Window Kit
When you are ready to "winterize" your windows this year, a good brand to purchase is Duck. The window kits are not very pricy and the plastic is high quality. You can find this brand at Walmart, Target, and other discount and hardware stores. You also have a number of options, such as the extra large / patio window kit, or a box that covers plenty of windows. If you want to use plastic to cover all your windows in your home, you will need more than one box.
Make sure to measure your windows before going to the store to determine how many boxes you will need for this process. Also, you might think your windows are way smaller than they really are in your home. It helps to measure before buying the wrong product.
Prepare Your Windows
Once you've purchases the window kits, it is a good idea to apply the plastic before the weather gets too cool. The instructions recommend applying the plastic film when the temperature is 50 degrees or higher. This means, depending on your location, you will probably want to start this process in the fall.
The first task to do is pull back all the curtains, raise the blinds or shades, and then clear out a nice wide area for completing this task. The last thing you need are blinds falling down in your face or objects sitting too close to the window. Falling and tripping is not on the agenda!
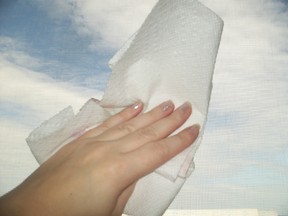 I also like to clean my windows well with Windex before going any further. Since this is the last opportunity I will have to clean the windows before applying the shrinking plastic film, I like to make sure they are really clean. The plastic film is quite clear, so you will be able to look out your windows all winter. It is a good idea to make them as clean as possible so you don't obsess over little smudges you can't clean once the plastic film is up.
The next thing you will want to do to prepare your windows is to clean the molding with rubbing alcohol. In the past, each box came with alcohol swabs for this task. This year, I had to provide my own. I am not sure if this was an error on the manufacturer's part, or if the swabs simply are no longer included with the kit. Either way, it is a good idea to make sure you have extra rubbing alcohol on hand.
Finally, I also like to use plastic packing tape to tape the edge of my window that I know is most drafty. Of course, I am not supposed to do this and I know it. However, my windows are not well insulated, and I know from past experience the plastic film will not hold up as long if I don't do this process. Just remember... I am not telling you to do this. I am just saying it is something I do as a renter since the landlord refuses to insulate the windows well. I've accepted I won't get all of my deposit back since it does tend to leave some sticky residue behind when I remove it in the spring.
Applying the Plastic Film
Once you've prepared your windows for the winterizing process, this is when the real "fun" begins. Warning: you may feel the need to use profanity! Make sure small children are not in the home and let's put up some plastic!
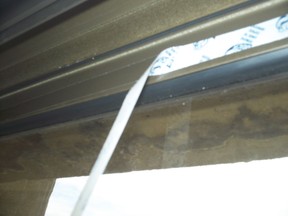 The window kit is going to have plenty of double-sided mounting tape. I recommend taping the entire edge of the top of the window molding. Once that is complete, unfold your plastic film. I personally do not cut the plastic before using it. I just unfold it, get up on a step ladder, and start sticking it to the double-sided tape.
Once that step is complete, you can use the double-sided mounting tape along the sides of the windows. You can then stick the plastic film to the sides. Last, apply the tape along the bottom of the window, and then apply the plastic.
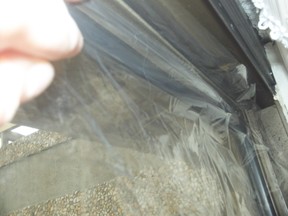
Applying the plastic to the top of the window is always the most difficult part of the process. Once you've completed that step, applying it to the rest of the window should be easy. You can always "unstick" the plastic if it starts looking a little uneven and reapply it if you catch it early in the process. Nobody is perfect! If there are a few wrinkles or it is a little lopsided, don't worry. Curtains and blinds cover up imperfections really well.
Once you've completely applied all of the plastic film, then you can cut away the edges to make it a better fit. It is recommended you leave about an inch of extra film on each side.
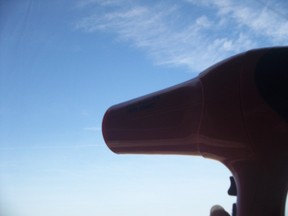 If you'd like the plastic to adhere to the window a little better, you can use a hair dryer to warm the film. According to the instructions that come with the kit and my mother, this process should be simple. According to me, it never works that well.
If you don't see any results when using your hair dryer, don't feel bad; I never do either. My mother says it works wonders. Her hair dryer and/or windows must be way better than mine.
Taking Pride In Your Work
 Nothing feels better than completing your own Do It Yourself project. As far as DIY projects go, this is one of the easiest you can do. Once you've finished, you can enjoy warmth this winter. Considering the cost of heating bills, this is a practical, simple way to save money. The winter kit box even says you can save up to $190 in heating costs this winter. I am not sure where they are getting their numbers, but I can say my heating bill did go down dramatically the first winter I used this kit. I've used it each winter since then.
In the spring, it is relatively easy to remove the plastic and tape from your windows. I would suggest waiting it out a little bit once the weather gets warm. I've noticed there is always a little bit of warm weather that comes along and gives me false hope each spring. Don't fall for it! Wait until the weather has been warm for over a week before taking down your plastic.
When autumn arrives, it is easy enough to start the process all over again with a new Duck Window Kit. In time, you will find you become a bit of an expert and you can do each window in 30 minutes or less. Hey, you might even find it becomes so easy you start charging other people to do it! You can save money in your home and make money in other homes. What a great way to spend a weekend!
The Completed Project
 Winterized window |
Check Out More Of My Articles:
Updated: 11/27/2012, Jeannieinabottle
You might also like
Use Essential Oils to keep spiders awayUsing essential oils is a great natural and inexpensive method to keep spider...
How to build the perfect garage workbenchLighted workbench in the garage makes the perfect spot for craft projects, bu...
Disclosure: This page generates income for authors based on affiliate relationships with our partners, including Amazon, Google and others.

 5 Reasons You Should Visit the National Aquarium in Washington, DCon 05/21/2013
 Confessions of a Customer Service Representativeon 05/05/2013
 Not So Great Gift Ideas for Valentine's Dayon 01/27/2013
 Last Minute Christmas Gift Ideason 12/15/2012
Comments
Thank you both for your comments. Adding plastic to my windows has really helped save money during the winter. :-)
We are in an rv, in a cold climate this winter. Definitely needed this article! Thanks!
I've never done this myself, but I think it's a great idea for leaky windows and can save the homeowner in heating costs for very little money. I also lived in a rental with drafty windows and should have used this!