Cats are a big part of our society and people love to draw and paint them. In this painting lesson, I will be using the Android app, Infinite Painter, to show how to paint a portrait of my cat, Puffball. Infinite Painter is a digital painting app that mimics natural media and works great for painting fur. I also want to give some tips to show people how to keep animal facial features straight. I used my Samsung Galaxy Note Pro 12.2 tablet for this painting. Cats are a lot of fun to paint, so let's get started!

Painting a Cat in Infinite Painter
In this lesson, I will show how to paint a cat using the Android app, Infinite Painter. I will show how to paint fur and how to keep animal facial features straight.
Infinite Painter Website
Here is the official website for Infinite Painter. Check it out. It's one of my favorite painting apps and I like it so much that I became a beta tester. You can also find it in the Google Play Store.
http://seanbrakefield.com/
Infinite Painter UI
Choosing Paper Size
 Infinite Painter UI Ellie Taylor Screenshot |
 Paper Sizes Ellie Taylor Screenshot |
Choosing Your Paper Size in Infinite Painter
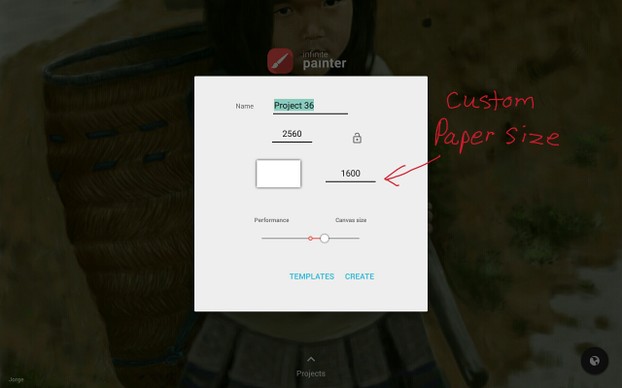
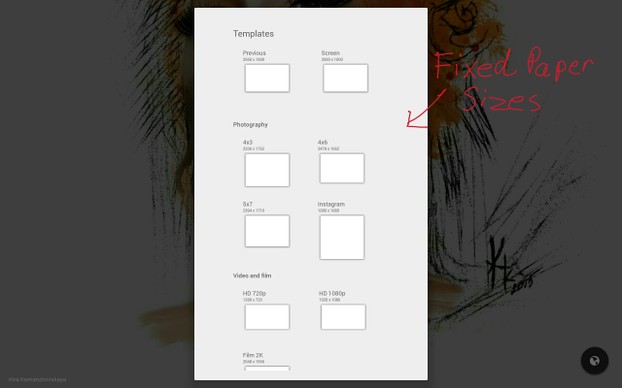
When you first open the Infinite Painter app, the project manager appears. Here you can open a previous project, import an image or a pattern, or start a new painting. There are two ways to pick your file size: you can put in your own numbers or use a template. There are templates such as letter size, 5X7, A4, and several more. The custom size goes up to 3200 X 3200 pixels or variations such as 4000 X 2500 pixels. For this painting the size I picked was 2028 X 2028 pixels.
Pop-out Menus
 Pop-out Brush Menu Ellie Taylor Screenshot |
 Pop-out Tool Menu Ellie Taylor Screenshot |
Pop-out Menus
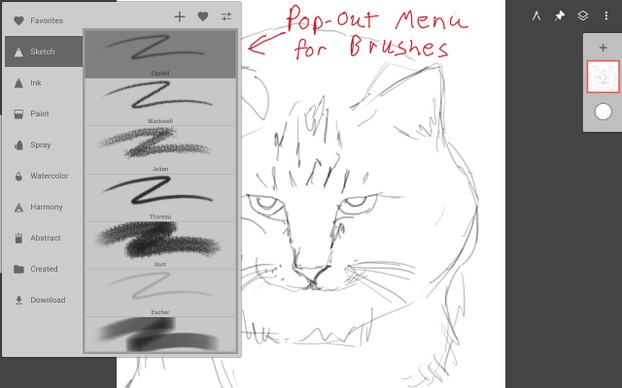
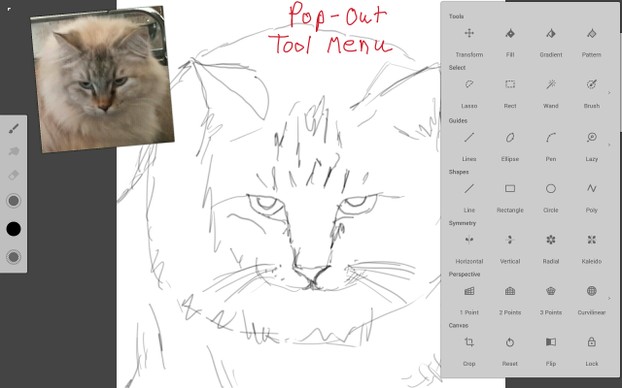
Infinite Painter has lots of features including pencils, pens, watercolors, acrylic/oil paint, airbrushes, harmony brushes, and abstract brushes. For this painting, I used the acrylic/oil brushes. The tools are found in the pop-out menu in the right-hand corner.The tool menu contains symmetry tools, perspective guides, shapes, patterns, select tools, and a lot more.
Beginning Sketch with the Infinite Painter UI.
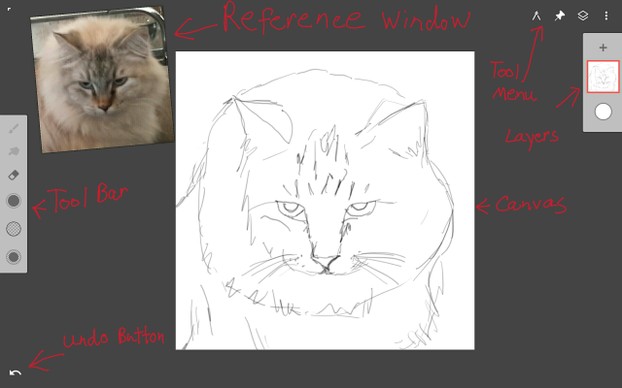 Beginning Sketch with the Infinite Painter UI Ellie Taylor Screenshot |
Beginning Sketch in the Infinite Painter UI
One of my favorite features of Infinite Painter is the reference window. You can resize it and move it around. Here I have imported the reference photo of my cat.
The tool bar can be moved around on the UI and consists of the brushes, blend mode, eraser, size, color picker, and opacity.
There are also layers with lots of features and blend modes and you can pick your paper texture. For this painting I picked one of the watercolor paper textures.
I used a pencil tool to sketch in the cat. I wanted a portrait style composition for this painting.
Paint Brushes
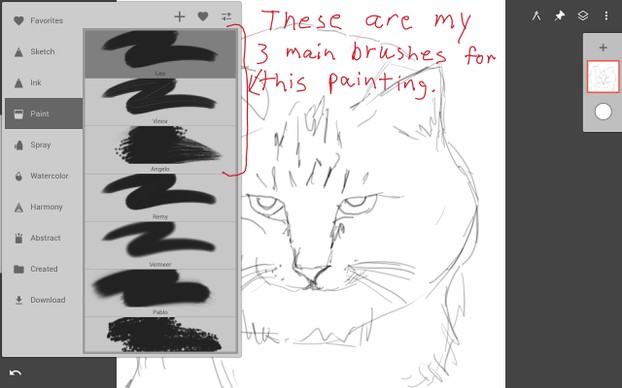 My 3 Main Brushes Ellie Taylor Screenshot |
Paint Brushes
For this painting, I used the Leo, Vince, and Angelo brushes. I think these brushes really give a naturalistic medium look.
Samsung Galaxy Note Pro 12.2 tablet
My favorite tablet!
Paint in the Background
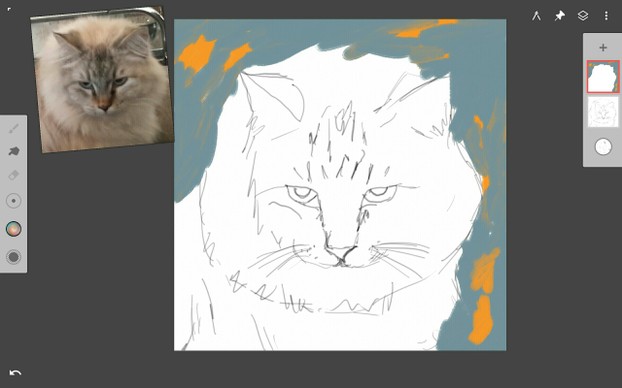 Paint in the Background Ellie Taylor Screenshot |
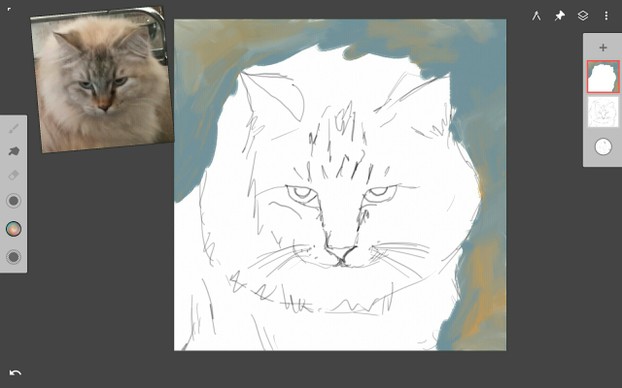 Blend the Background Ellie Taylor Screenshot |
Paint in the Background
First I created a new layer to paint on because I wanted to preserve my original sketch. (Trust me, this is very import because you can really get your proportions wrong if you cover up your original sketch!) Then on that separate layer, I painted in the background using light blue and orange colors. I wanted a rough painterly look so I painted the background with rough strokes. Then I used the blend tool set on the Leo brush and blended the orange and blue. I made sure that I didn't blend all the orange away and kept the strokes rough.
Using the Guide to Check Facial Features
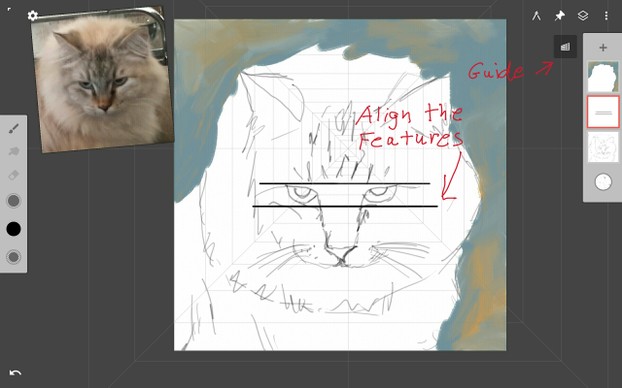 Using the Guide to Check Facial Features Ellie Taylor Screenshot |
Using the Guide to Check Facial Features
One of the problems that many artists have is keeping facial features straight. I use a guide to check the alignment of the eyes. Infinite Painter has some very good perspective guides that can be used to check the eyes. First I created a separate layer, then I chose the one point perspective guide and positioned it around the eyes. I drew two straight lines above and below the eyes. This helped show if the eyes were even. I thought they needed some adjustment so I tweeked the eyes a little bit to align them. It is best to do this with your beginning sketch before you get too far along in your painting because it will be a lot harder to correct later on. I kept this guide on a separate layer and just hid it while finishing the picture.
Start Painting the Fur
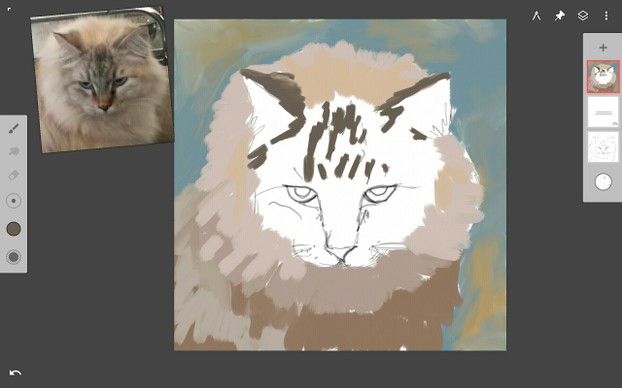 Painting the First Layer of Fur Ellie Taylor Screenshot |
Painting the Fur.
In this step I painted the first layer of fur in the chest area. I used the Leo brush to give a paintbrush-like look at the end of each stroke. This makes a fur texture. I used very light brown colors and brown tinted off-white. I also started to add the markings on her head with a greyish brown and some Yellow Ochre.
Adding Fur to the Head
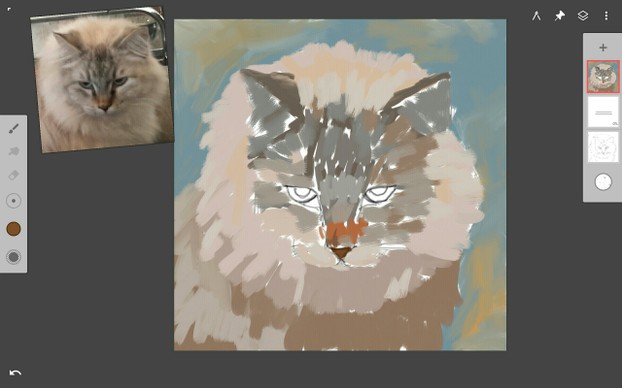 Adding Fur to the Head Ellie Taylor Screenshot |
Adding Fur to the Head
Next I painted the fur on her head and face. I added patches of different colors for her markings. She has some orange on her nose and grey on top of her head and under her eyes. I kept the strokes rough and jagged to show the fur texture. I painted the nose in a sort of upside down triangle shape with an orange rust color.
Refining the Facial Features
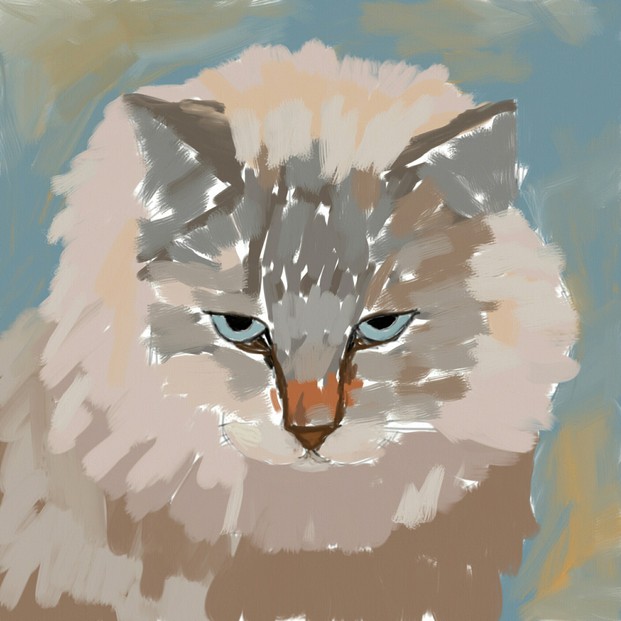 Refining the Facial Features Ellie Taylor Screenshot |
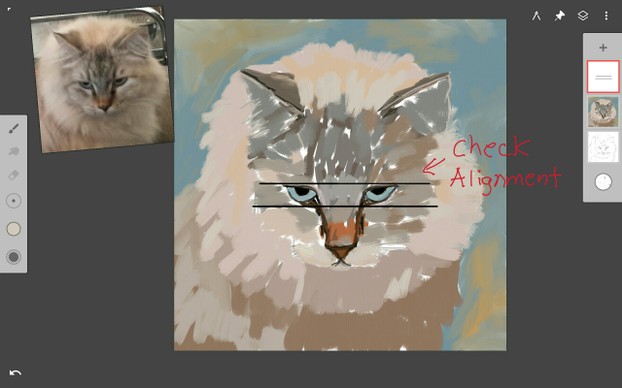 Checking Feature Alignment Ellie Taylor Screenshot |
Refining the Facial Features
Here I painted dark grey around the nose and eyes to shape the facial features. I used painterly strokes because I don't want a hard looking line. A hard line would destroy the look of fur texture. I painted in a light blue color for the eyes and used black for the pupils.
Since I had all the underpainting (the first layer) done, I decided to check the alignment of the eyes again. I turned on the guide layer to check the alignment. I did this halfway through because sometimes after I start adding paint the shapes can get altered from their original size.
Adding the Markings
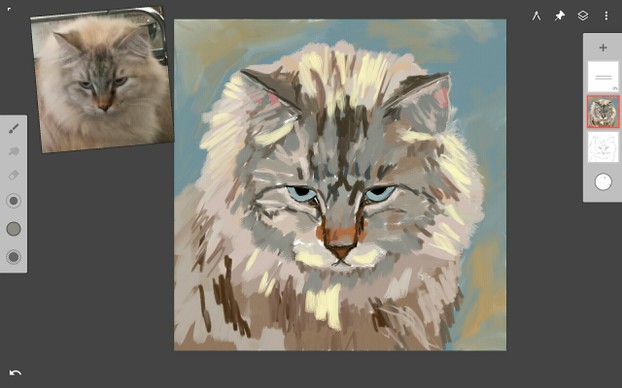 Adding the Markings Ellie Taylor Screenshot |
Adding the Markings
At this stage I started to add more colors for the markings on her head. I used light yellows and oranges for the lightest fur and brown, light grey, and dark grey for the dark markings. For the skin in the ears, I painted in touches of light pink. I refined more features such as the ears and the mouth.
Blending the Fur
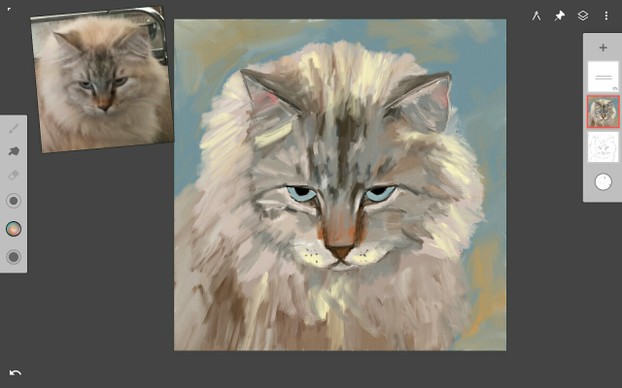 Blending the Fur Ellie Taylor Screenshot |
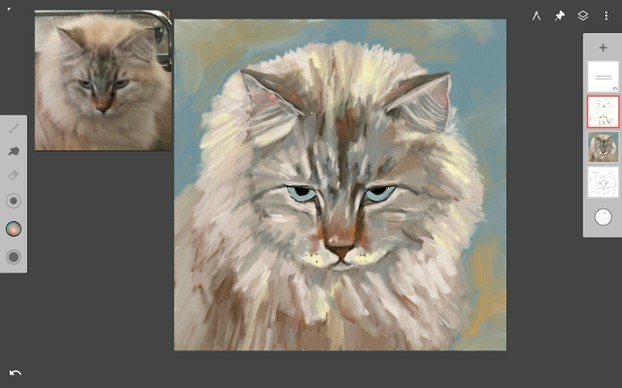 More Blending of the Fur and Adding Highlights Ellie Taylor Screenshot |
Blending the Fur
The next step was to blend in the fur. I did this by choosing the blend mode in Infinite Painter. The blend mode was set on the Angelo brush. This gives the blending strokes a paintbrush look and makes a fur-like texture. I also added pure white highlights for the lightest fur and blended the edges of the white into the fur. I added small black dots to the muzzle for the beginning details of the whiskers. I also added some rusty orange on the head and ears and blended it as well.
Adding Whiskers
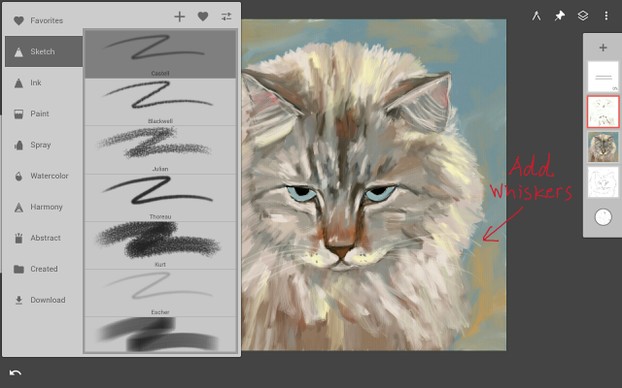 Adding the Whiskers Ellie Taylor Screenshot |
Adding Whiskers
To add the whiskers, I used the Castell pencil. I used pure white on a separate layer. For most of the painting I painted on the same layer for the main cat portrait, but you can really mess up on the whiskers so I added a separate layer for them. I added the whiskers on her muzzle and the short ones above her eyes. I also used this pencil to add some little short hairs in her ears.
Final Features
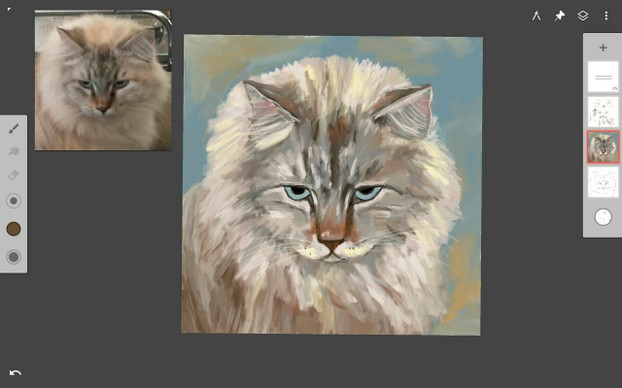 Final Features Ellie Taylor Screenshot |
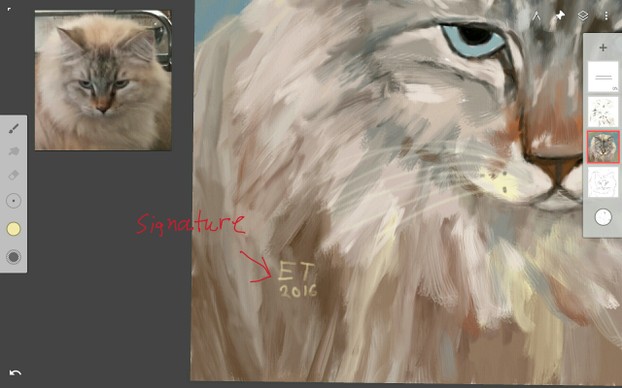 Final Signature Ellie Taylor Screenshot |
Final Features
For the final touches, I blended the fur even more. I also pulled out the edges of the fur with the blender and made sure it feathered out (After all there is a reason why she is named Puffball). I tend to work on just a few layers because it is more like working with natural media. I used one layer to preserve my sketch, a layer for the background, a layer for the main body of the cat, a layer for the whiskers, and the guide layer.
A Good Book on Painting Cats
 | Cats & Kittens in Acrylics (Ready to Paint) This is not a book on digital painting, but it gives you good pointers on how to paint cats. You can adapt the techniques to Infinite Painter because it mimics traditional media very well. Only $32.29 |
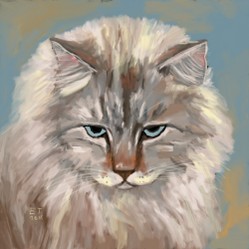
Puffball
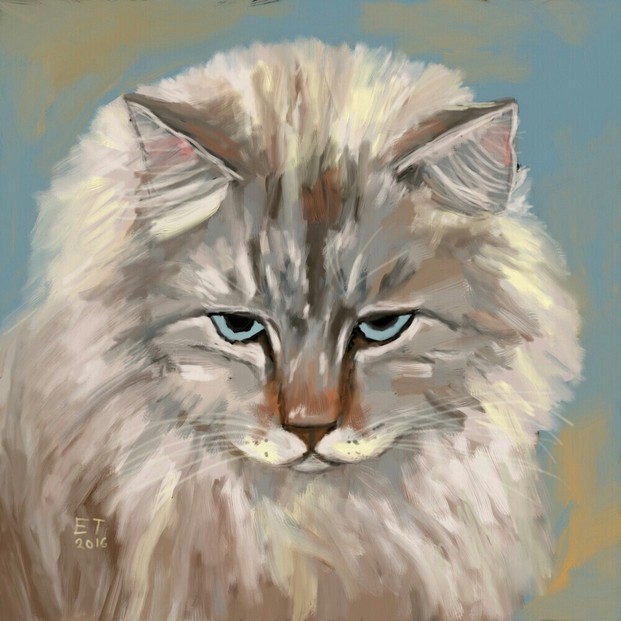 "Puffball" |
Final Thoughts
I hope this lesson helped show you how to paint cats and how to use Infinite Painter. As I said in the intro I am a beta tester and so my version of Infinite Painter might have small differences from the Google Play version, but it will be fairly close.
How to Draw Cats
 | How to Draw Cats in Simple Steps This is a good drawing book that shows how to draw cats. |
Another Book on How to Draw Cats
 | The Artist's Guide to Drawing Animals: How to Draw Cats, Dogs, and Other Favorite Pets This is a nice book on how to draw pets including cats |
You might also like
The Many Tones and Undertones of Color PinkPink color is especially popular among girls but this is true for less than h...
A Colorful Journey: Comparing and Contrasting Mexican Folk Art...Beyond the confines of museums and galleries lies a vibrant world that often ...


 Painting Light and Shadows with Serious Painton 10/14/2014
 How to Paint a Waterfall Using the Android App LayerPaint HDon 01/08/2014
 How to Paint a Snow Scene Using the Android Painting App, ArtFlowon 09/30/2013
 How to Paint a Fall Scene Using Sketchbook Pro for Android Tabletson 09/04/2013

Comments
Thanks so much! I painted this on a 12.2 inch Samsung Galaxy Note Pro 12.2 tablet.
Wow - yours came out beautiful. I do not have an Android device unfortunately. Did you do this on a phone or a tablet? I'm sure this is helpful for anyone with an Android device.
I am so glad you liked it! Yes, I used the S Pen stylus on my Samsung Galaxy Note Pro 12.2 tablet.
Okay, I see from the comments that you used a stylus, right? I was wondering about that. This is a great tutorial page. I'd love to try this. Beautiful cat and your artwork is spot on! I'm saving this page for future reference.
Thanks! I really like the Note Pro for its big screen and the S Pen stylus! I hope Samsung will release a new version of it!
Thank you for this tutorial. I'm going to bookmark it. I want a note pro, and I'll come back here to buy it.
Thanks! Infinite Painter is a lot of fun and it does a great job of mimicking traditional media!
This looks like i can really make painting simpler than just picking up brushes. I like the facial alignment feature.