This is a beginners guide to shooting and directing a live event. The event could be a concert, sermon, speech, etc. But there are some basic rules to live event shooting. I have the experience of shooting with one camera and multiple cameras. I hope this article will help you with your endeavor of shooting a live event.

Shooting a Live Event
by skFliehman
I have been shooting live events ever since I was a teenager. I am now 32 as of the writing of this. This article is all about how to properly shoot and direct a live event.
Production Camera 1
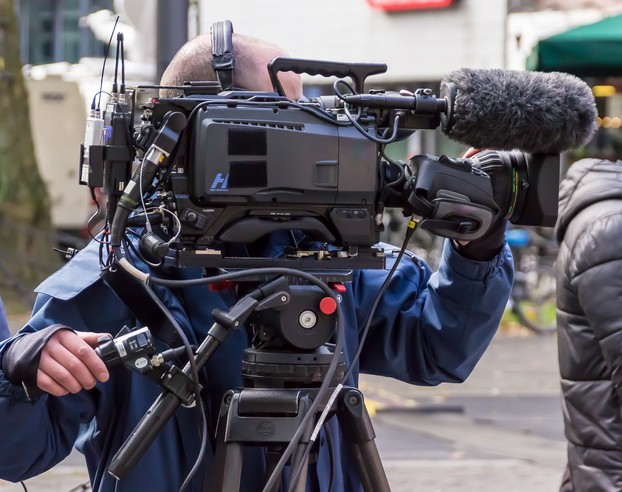 Production Camera |
My History of Shooting
Terminology Built In
As mentioned I began shooting live events when I was in my late teenage years. I started at church taping services. The church had a consumer grade camcorder and a little tripod so I used that to tape services. I varied between 2 shots when I recorded. I used a wide shot of the whole stage and then would periodically zoom into a head and shoulders shot of my pastor. When shooting live events to zoom in on something is to push in on it. When you only have one camera you learn to do this as smoothly and accurately as possible. When you want to zoom out or widen up your shot it's known as pull. You have to pull out to a wider shot. On a tighter shot you have to track with your subject. Following your subject from side to side with the camera is known as panning. To Pan is to follow the subject from left to right or vise versa. It is invaluable to have a smooth fluid tripod to shoot with. This can't be stressed enough. There have been to many times that my tripod was jerky and shaking, inevitably causing a jerky, shaking picture. That is no bueno! You may also need to learn to Tilt the camera. That is to move the camera in fluid up or down motion. You may need to direct the eyes of the audience to another subject or object of interest. Most likely you'll use a combination of panning, pushing, and tilting to get the right shot most of the time that your shooting. A seasoned camera person can do all these and make it as smooth as butter. Seasoning comes with practice and muscle memory of the tools.
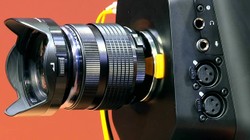
 Semi Professional Camcorder |
Directing the Shot
Filming a Music Festival
For a good bit of my 20's I worked a music festival. The festival was two times a year. Our church provided the cameras and equipment to broadcast the image of the musicians on projector screens and to provide a DVD to the manager. We used 5 cameras for the shoot. One in the back was a wide shot. One on the left and one on the right for medium shots and two up front for close up shots. I started out just shooting. I shot at each side position and then eventually the stage front and occasionally on stage. On stage shooting is a lot of fun, to get those killer shots. The more experienced I got the higher I climbed in the ranks to mixer and then to director. I also tacked on camera coach to that list every time we added a new recruit.
Many of the younger guys or gals wanted to shoot the main thing happening on stage all the time. We had to train them to think like a team and to see the big picture. The director does not need 5 shots of the same thing! I had to coach them to listen to the directors commands and to be willing to shoot "something boring". Their camera angle may not be the best angle to shoot that particular event happening. That might be a solo song,instrument, dance or whatever. It's important to stick to your assigned role when shooting. This is not your vision the show is the director and producers vision. As a director you need to communicate effectively and friendly, how and what to shoot to each videographer. I say friendly because in the heat of the moment you can come across cross or un caring. Before the show, ecpesially if its a volunteer staff, be sure to be clear that noting is personal. Make sure that you have all the shots covered for an effective and quality mix. What are the shots you should be looking for?
The New wave in Production!
The basic Shot List
- Wide: This is your establishing shot. You use this at the start of your program to let your audience know where their at. Shoot the building, the auditorium, stage or group to establish the shot.
- Head to Toe: This is a great intermediate shot. It intros and establishes the speaker or musician and is a great full body shot.
- Hip Shot: This shot is an adequate tight shot that still leaves a little breathing room for the audience. I use this shot often when I record Sunday sermons.
- Head and Shoulders: This is a great shot to use when you want to drive home a point or when a musician or singer has a limelight moment.
- Close Up: This shot is usually used in film but you can use it once in a while on live even shooting. I use it when I'm zeroing in on a instrument being played. If someone is really hitting those cords this is a great shot for something like that.
- Truck: The shot is live and it is when the whole camera pod is dollied across the floor .The camera physically moves in on a subject instead of pushing in.
- Boom: This is a crane like tool. The camera sets on the end of the boom and the operator uses it to capture those grandiose swooping shots that move in on the subject.
 Production Camera 2 |
What is Your Favorite type of Event to Shoot?
Rules to Shooting the Event
- Acknowledge the Director. This may seem elemental and obvious, but it's worth repeating. Put your head set on and make sure your head set works. In the case that you can't speak to the control room or box, you may have to pan or tilt the camera to demonstrate that you are on camera and can hear instructions clearly. Now you can receive instructions for what to shoot and when to shoot.
- Focus Assist. The "focus assist" is an essential tool. The focus assist tool will be in a different spot depending on the camera. Some may have it on the side of the camera body. Other cameras will require that you go into a menu setting. But no matter what, know how to find it and turn it on.
- Focus the Subject. To do this you need to push in and frame on the eyes of the subject.
- To push in on the subject take a look at the right handle bar. On the hand bar will be a switch that you press with your thumb. The lens will zoom in or out depending on how you press the switch. There will also be another level there that will determine the speed at which you will be able to zoom in or out. The dial will be set between 1-5 and each number will be a different speed. This is your good friend because the zoom switch can be very sensitive. It will help you get a better more accurate shot.
- Usually on the left handle bar will be a dial, ring or something to turn to focus. You will know that the subject is in focus because the "focus assist" will highlight them in blue or red line. Once they are focused everything in between the lens and the subject will be crystal clear. You will need to refocus before each new shot.
Now you can clear your head take a deep breath and have fun shooting! Be sure to stretch your neck, back and fingers before, during and after the shooting event. It can be strenuous shooting for several hours. Over all I hope that this will be a article that will help prepare you for the big event. Happy shooting everyone!
Affordable Production Camera
Updated: 03/17/2016, skFliehman
You might also like
Suzanne Valadon - "The Blue Chamber"Suzanne Valadon was a Fench circus performer, artist's model, waitress and si...
Understanding The Persistence of Memory by Salvador DaliDali's work was prophetic. Scientists still struggle to explain the concept...
Disclosure: This page generates income for authors based on affiliate relationships with our partners, including Amazon, Google and others.
 How to Set Up Four Point Lightingon 04/22/2016
 3 Ways to Change Your Life by Servingon 04/03/2015
 Family Mission Tripson 04/01/2015
 Serve with a Rescue Missionon 04/01/2015
Comments