
Adding The Wizzley Widget To A Wordpress Blog
by marciag
The Wizzley widget uses an iframe and Wordpress doesn't allow iframes on the blogs due to security reasons. There are, however, ways around that, and this post will show you how.
About The Wizzley Widget
And Why Wordpress Doesn't Like It
 The Wizzley widget is a neat way to display various Wizzley posts (with your affiliate link of course) and showcase them somewhere on your blog. You can display either some of your own posts, or some popular posts from the front page, or from any category of your choosing.
People click through to read the article they are interest in, and if they sign up, you get I think 10% of their income due to the cookie that is placed on their computer with your affiliate link. Here is a link to Wizzley's help page related to the widget and other affiliate links.
The problem with this widget and Wordpress is that Wordpress doesn't allow iframes due to security reasons, and Wizzley's widget uses iframes as its code.
So if you happen to have a Wordpress blog, any time you paste the widget code in the blog, upon posting, it gets instantly removed.
Btw,if you have a Blogger blog (Blogspot.com), it works just fine.
I was looking online for solutions to my problem because I do have a blog on Wordpress that I use to talk about Squidoo (and more recently Wizzley as well), and from the few solutions i found, I'm presenting here the one I used on my own blog, the one that worked the fastest and easiest for me.
So here is step by step my guide for adding the Wizzley widget to a Wordpress blog, with (hopefully) clear pictures and instructions that are easy to follow along.
Please note - I'm using Firefox with this tutorial, but you can use Internet Explorer (and I think Chrome as well), so your menu options in step 5 might vary slightly.
There are 14 steps in this tutorial, and while it seems a lot, it's because I took images of every single step to have a detailed guide. It will take you no longer than 10 minutes tops to do it for your blog from start to finish. It took me much longer than that to create this tutorial :-)
Step 1 - Recruit New Authors
 recruit new authors |
For step 1, simply go to the main Wizzley site and scroll to the very bottom. Click on Recruit new authors (it's between Wizzley on Facebook and Flag content).
Btw if you don't see on your screen Flag content as red like on my screen is because I use a browser plugin that shows me automatically no-follow links, and Flag content is a no-follow link).
Step 2 - Widget Builder
 widget builder |
As soon as you clicked through Recruit new authors, you will come across the next screen, and right on the top section you will find the Widget Builder link. Click it to go to the next step.
Step 3 - Building Your Widget
 building your widget |
Now you're on the Widget builder screen. You can select some articles written by you, or the most popular articles on the site or the most popular articles within a specific category.
You have some other options that you can play with such as the color of the link, how many articles you want displayed, whether you want the image of the article, the date and how much text to show through.
When you're happy with your options, simply click on the big Create Widget button.
Step 4 - Taking Your Widget Code
 widget created |
Once you clicked on Create Widget, you will have in a new box on the right a preview of how your widget looks like (so you can change sonething if you're not happy with its appearance) and you can copy the html code for later use.
While we won't be using this code in our Wordpress blog (remember Wordpress doesn't like iframe codes), you can use it into a Blogger blog or your own static website.
Step 5 - Opening The Frame In New Window
 right click on frame |
Next simply right-click anywhere inside the box with the 3 articles shown here. You should get a menu like on the screen above. (Remember I'm using Firefox, you might have a slightly different menu in Chrome or Internet Explorer)
On the This Frame menu, select either Open Frame in New Tab or Open Frame in New Window to get to a new Firefox screen.
Step 6 - Copying Out The URL
 copy wizzley code |
Once you selected either Open this frame in new tab or new window, your Firefox will open a new screen with only the links to the articles.
What you need here is the actual URL (it's highlighted in blue code in my Address bar). It starts with http://wizzley.com/service/
Select it and copy it to your clipboard (right-click / copy should do).
Then simply paste it in Notepad so you don't lose this link. Alternativel you can leave this window open in your Firefox so you can copy the link when you will need a bit later on.
Step 7 - Head Over to Wordpress To Add New Plugin
 add wordpress plugin |
Now head over to your Wordpress dashboard. Login to Wordpress as usual and on the left sidebar scroll down until you find Plugins. Click on Add New.
Step 8 - Search For Plugin
 search for plugin |
In the Search box enter iframe embedder as this is the plugin we are looking for. Then click the Search Plugins button.
Step 9 - Install Iframe Embedder Plugin
 install iframe embedder plugin |
The Iframe Embedder plugin will the at the top of the list. Click on Install now. You will get a popup screen asking youf if you really want to install it. Click on Yes. The installation of the plugin will start.
Step 10 - Activate Plugin
 activate plugin |
Now that the plugin has been successfully installed, you need to activate it so that it is available in your blog. Click the Activate Plugin link.
Depending on when you will read this post, you might get a more updated version of the plugin with a different number than 1.2. That's ok, it should still work just fine.
Step 11 - Go To Iframe Embedder
 Iframe Embedder |
Once you've activated the Iframe Embedder plugin, a new menu will appear in your Dashboard, toward the bottom of your screen (on the left). It's one of the menus in the Settings.
For me it shows as the last, because this blog is relatively new and I haven't really added many plugins to this one yet. But you might already have some plugins installed, in which case it might be in any position within the Settings menu.
Click on it to access the settings for the Iframe Embedder.
Step 12 - The Iframe Embedder Options
 The Iframe Embedder Options |
In the Iframe embedder options screen you can change a couple of options, or if you know CSS and want to customize how the widget looks on your blog, knock yourself out. But personally all I did was tick the Show border right at the top, becaue I prefered the look of it with the border rather than without.
You can also display the widget with scrolling window, or non scrolling.
Once you're happy with your settings, click on Save Changes box at the bottom to save your new settings for ths plugin.
The last thing you need to do here is copy the code from the Info section (below the CSS box) so that you can paste it in your new Wordpress post.
To make it easier on you, here is the code that I copied already:
[iframe http://address.com 400px 100px]
Step 13 - Writing Your Post And Adding The New Widget To it
 adding new blog post with wizzley widget |
Now you're about to write your new post about Wizzley and embed your affiliate links in it.
In a new Wordpress post, paste the code I gave you just before from the Iframe Embedder options screen (here it is again):
[iframe http://address.com 400px 100px]
Next, either find the URL that you copied out when you did Step 6 (Widget in new tab or window) or if you still have that browser window open, then copy out the entire URL now.
You should see your own Wizzley affiliate code right at the end. Mine is 1084 as you can see in the image above as well.
Once you have this URL copied to your clipboard, it is time to paste it in our post.
All you need to do is replace this bit from the iframe code above:
http://address.com
with your URL link, so in my case I will have this code instead:
[iframe http://wizzley.com/service/widgets/get/?source=best&count=5&description=70&link_color=3080c8&img=true&pr=1084 400px 100px]
(the bold text is the URL that replaces the previous text).
Don't delete anything else yet.
For this test, publish your post (or at least preview it from the Preview button) to see how the widget displays on your blog.
If all went well, you should have a nice widget displaying your site. The only problem is....it's only showing one article instead of 3 or 4 or how many you chose to show. How do we fix this?
Step 14 - Resizing the Wizzley Widget
 resizing the wizzley widget |
This is the simplest step of all,l I promise you that.
See in the screenshot above the 100 towards the end of your code? The 400 is the width of your widget, and the 100 is your height. I like to increase the height of 100 to 300 so I have more items show in my widget.
You can also play with these two numbers (400 and 100) to your liking, but make sure you don't touch anything else, to not break the code.
Once you're happy with your options, again either Publish or Preview your post. You should have a nice widget right in your post.
Now you can add the rest of your post that promotes Wizzley.
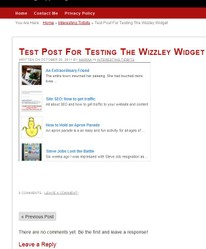
Below is an image of how the Wizzley widget shows up on my blog.
Wizzley Widget On My Blog
 Wizzley widget on blog |
Final Comments On The Iframe Plugin
If you don't like this particular plugin, or it's not working for you as intended, there are several other Wordpress plugins that do a similar job. In Step 8 simply search for 'iframe plugin' and you will see several plugins there. Install the one that you like and then follow the rest of this tutorial to get it working in your post.
The only difference could be in the little code that you get with your chosen plugin, as it might be different than [iframe http://address.com 400px 100px]
You will always find the relevant code to insert in the options of your chosen iframe plugin.
Have fun with this and let me know in the Comments section below how it went on your blog.
You can use this tutorial to add any iframe code to your Wordpress blog, not only the one for Wizzley (e.g. Youtube videos that still use iframe, etc).
Disclaimer: I am not an owner or affiliate with any of these Wordpress plugins. It is simply one that I found in the Wordpress plugin repository and I liked it. If you have any actual plugin problems, please contact the developer of the plugin as I have no extensive knowledge of Wordpress plugins beyond simply using them.
If you liked this tutorial and you're not a Wizzley member yet, if you want to sign up for Wizzley through my link, here is my Wizzley registration link.
You might also like
Start a Blog. Here's WhyBy Mira at Wizzley. I've become a fan of blogging on Wordpress.com. Here's ab...
Setting Up WordpressThe settings of Wordpress are important as they carry over many nuances, not ...

 Percy Jackson Books In Orderon 10/15/2014
 Meditation For Pregnancyon 09/25/2013
 New Age Meditationon 09/23/2013
 How To Use Essential Oils With Reikion 09/22/2013


Let Me Know How You Found This Tutorial And If The Plugin Worked For You
Thank you, I'm going to give this a try. I'm struggling a bit with some wordpress stuff at the moment.
Thanks Maricag, this is such a clear and helpful tutorial. I'm sure I'll be returning here again!
This tutorial is mainly for adding the wizzley widget within the post. Actually to add it on the sidebar is much easier. Try it, just copy the actual widget code, go to the Widgets in your Wordpress Dashboard, add a new text widget and paste it in there. You might need to fix the actual size as the widget might be wider, but otherwise it should work. Let me know if it doesn't and i'll make a tutorial on it as well.
I love this! Thank you so much... I'm not at all good with this kind of thing and your tutorial is excellent. I DO need all these step by step pictures. I've tried to add a wizzley to my sidebar at WP (I think) and it didn't work - should it work there?, so I guess I can try this in a post.