All too often today, children have to join some special organization before they area allowed to things like carving, painting, etc. Using this simple method, a parent and child can work together and have an opportunity to achieve something really special. But, don't wait till Christmas... this is a great summer project as well!

Christmas Gift Idea: Make your own Fishing Lure
by swampnut
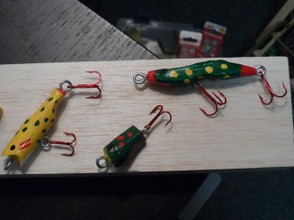
Is it too early to think of Christmas? This is an easy way to help a child to make his own fishing lure. It provides a parent and child a unique opportunity to learn new skills.
How soon is too soon to prepare for Christmas?
Making your own fishing lure is simple.
A great parent-child memory making opportunity!
This is a fairly simple idea to follow through with. The tools needed are:
1. Good pocket knife like a Barlow type. Not one of those razor sharp fancy knives!
2. A square or two of sand paper, medium and fine grade
3. A short saw to cut through a broom handle or dowel with
4. A small paint brush to use with acrylic craft paint
5. Patience and a couple of hours
6. A red treble hook and two screw in eyelets.
7. Some Mod Podge sealer from the crafts section at Wal Mart
8. Some super glue
9. some acrylic craft paint...little containers, they usually cost about $2 for a set of six colors. Water cleanup type stuff.
10. A place to hang up your lure to allow it to dry
Making it:
A. Use the saw to cut off about a 2 inch or so section of wood.
B. You can cut into one end of your wood piece to make a concave face. Sand this smooth after you get it curved as much as you want it. The rougher the sand paper, the more it'll cut into the wood... which is helpful as you curve and shape it.
C. On the tail end, start on the top side and slowly whittle down into the wood. Start your cuts about half way down the length of the wood, and carve away from your body. Slowly remove the wood down almost to half the thickness of the piece all the way to the tail end. A sharp Barlow pocket knife will remove the wood quickly.
D. Once the top is roughed out, work on the underneath part of the tail. Only carve away about half the distance which you carved away on the top.
E. Once the majority of the wood is carved away on the face and the top and bottom of the tail, use your sandpaper to smooth and give final shaping to the lure.
F. You can use the tip of the knife to slowly and carefully cut two little round indentations for the eyes. You can also use the tip of the blade to mark 2-3 little lines for simulated gills behind the eyes for decorative purposes.
G. In the center of the "face" screw in one of your eyelets about half way. You can use this to hold onto when you paint it. You can hang it by this eyelet to allow it to dry, so give some thought as to what you will hang/hook it on to allow for this.
H. Now paint it as you want to and let it dry. Then dip it in the Mod Podge and coat it well with this sealer. Then let it hang and dry for about 24 hours.
Finishing:
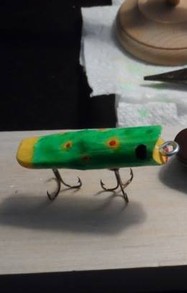
I. Once it is well dried, open one of the eyelets and hang the red treble hook on it, then close the eyelet. Now screw it straight into the end of the tail. I usually put a drop or two of super glue on this and then screw it in. Do this fairly quickly and try to a void getting that glue on your hands. It WILL glue your fingers together!
J. Now remove the eyelet which is in the face and put a drop of glue on it and reinstall it but this time screw it in all the way.
If all goes well, your lure is ready to test in water in about 30 minutes. Hint: if it fails to float straight or retrieves in a way you don't like, remove the hooks and use it on a key chain! :)
I have made many of these and given them away for gifts...fished with some as well!
Other resources for doing more advanced work.
You might also like
Jessie Willcox Smith: Her Life Through Art and PaintingsJessie Willcox Smith was one of the most successful illustrators of all times...
Growing Up In a Different AgeNow, I'm a grandfather, but I still recall growing up as a child and the qual...



 Okefenokee Swamp Park, Waycross, Georgiaon 05/30/2017
 Trail of Tears State Parkon 06/16/2016
 Wesley Woodland Walk, St. Simon's Islandon 06/13/2016
 The Heroeson 12/27/2015

Comments