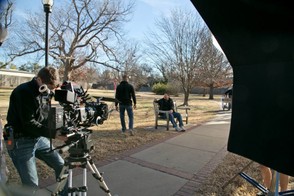
Some of you may already be thinking that this is a stupid idea. Why not just go to your favorite online video store an buy a perfectly good video for your background or illustration. That is an excellent question. Break it down with me. How much money do you spend on buying cool videos for your church, business or organization? Specifically this article is tailored to churches. Churches buy a lot of media for presentation, sermon illustration, and motion backgrounds. What happens if you start making your own? It may seem harder at first and more expensive but in the end it will pay off. This is an article on how to do better videography. I've chosen video backgrounds because they are an easy first project to do and a good place to start learning. If you can make a video background then you can learn to shoot any kind of video. Let's begin.

How and Why to Create Your Own Motion Backgrounds and other Video Presentations
by skFliehman
It's expensive to purchase already made material online for video backgrounds or other video illustrations and presentations. Why not do your own? Read on to see how and why.
Why Shoot?
How will making your own content pay off? First, it keeps you from spending money. Put some money up front on some camera gear and then after a while you'll be able to save money on already made video. Those videos cost $15.00 and upwards. I guarantee you will start saving once you have produced your own content. Second, producing your own content protects you from copy write laws because you already own the content. You can use your own videos anytime and anywhere. Thirdly, you can start selling your content online to other churches that aren't making their own content. Why not start making $15.00 -$20.00 a video? Then that money can go back into the art department or to any cause the church deems necessary. Your church is generating cash flow and cash flow opens up more choices. More choices means your church can do more things for the Kingdom of God. Finally, its fun and your creative team will have a blast making them, thusly creating team camaraderie. Anyway you slice it this is a good endeavor to start on! Now that we have gotten that out of the way we will begin to look at how to make your own motion backgrounds and so much more!
What to Buy and How to Use It
The brass tax is that you can use a smart phone shooting 1080p if you want. Thats the easiest way to shoot video in this day of modern and quick results. There are some nice options out there for lens's, tripods, and other great mini material for your smart phone or tablet. But i'm going to help you make some selections that will be both quality and affordable.
Starting off with I advise that you purchase a Cannon DSLR. Cannon has a better video codec. Nikon is a better camera for stills. But both will work. Sony has some nice choices too. Might I advice for laymen reason to get a camera with a "D" in the title. That's going to ensure you that it is a professional grade camera. Get a camera that comes in a kit. You will get more options that way and will get a lens in the bundle. The kit lens will be a 18mm-55mm. The kit may even come with a 55mm-250mm. If possible get both lens's. When it comes time to buy some better lens's get a 18mm-200mm that way you don't have to keep changing lens's and your shooting becomes more versatile. The next product to buy is going to be a tripod. Don't skimp on the tripod! You need something with a fluid head. Don't buy the tripod from just any electronics department store go online or to a specialized video retailer and buy one. There is nothing worse than having a jerky sporadic tripod head. It WILL ruin your video.
In the future you will need to get some good mic's for your camera to record audio with. Buy a lavaliere mic and a shotgun mic that can mount to the DSLR. You'll be happy you did. You can buy a good Zoom recorder for $100 and a lav' mic for $25 and that can be the beginnings of your audio department for video recording.
For all purchasing needs, Amazon and B&H are the best places to buy cameras and gear. Adorama is a great place to buy quality refurbished equipment.
Shooting Tips
Since we are shooting video backgrounds you will most likely be shooting outside. There will be no need for lighting at this point. If you want to buy a reflector you can but I find it not necessary. You can get some nice but cheap lighting kits later. Some of the equipment that you want or desire to use can be bought cheap or you can even make your own.
A Slider. Acquire 6 sturdy wooden boxes. Two same length metal pipes/poles. 1 skateboard. Make sure the wheels of the skateboard can run smoothly down the two metal pipes. They can not be bigger or smaller. Acquire 2 metal plates. Screw together the metal plates to both ends of the poles. A plate on one end of the same length poles and a plate on the other end. Now you can set the track on top of the stacked up boxes. Stack three boxes (or as many as required) at each end of the track. You should have something that looks kind of like a bridge now. At this point place the skateboard on the track and set the camera on the skateboard. Point the camera at the subject and slowly pan the camera down the track. This is a great way to get a nice,long, smooth pan that your tripod alone can not achieve.
A jib. I don't know how to build this so your going to have to just bite the bullet and buy one if you want to use it for your shoot. The other choice is to watch the video below to learn how to build one. Please see the videos for more understanding and visual learning.
Great Videos for building and Using Some Great Video Gear
Basics on Shooting
Once you have your new DSLR how do you get the most out of it? This is a quick lesson in videography. Turn your camera from automatic to 'M' for manual. You need to learn the three basics of getting a awesome balanced image. The first element is the ISO. This lets in the most amount of light to the sensor. The sensor is what takes the place of film in the digital realm. When shooting outside you will need to set the ISO to 100 or if the day is overcast then set it to 200 or 300. Don't set the ISO over 3200 otherwise the picture will look grainy in the dark areas. Grainy means the image looks like sand has been poured on it. The following element is the shutter. The shutter is what allows light to go back to the aperture. For shooting video you need to set your shutter speed to 1/50 of a second. Finally there is the f-stop. The f-stop is a measurement for how wide a hole that light can get into for the aperture. For example f-2 is a large hole and a lot of light will go in. For a really bright day you may need to have the aperture set to f-8 or f-10, smaller holes. Try if you can to have a low f-stop. A low f-stop will give you nice bokeh. Bokeh is the blurring out of the background while the foreground is in focus. Its a nice film style technique.
What to Shoot Once You have the Equipment?
Location is key. For specific locations be sure to ask permission to film there. To make video backgrounds you need a variety of shots at your location. Wide shots are good setting shots to ground the video. This might be a city scape. Medium wide shots will show the subject but still on a wide scale such as a street in the city. Head to toe is explanatory. Close up is a head and shoulders shot. Extreme close up is usually focused on the eyes. Learn to pull focus. You know what that is, every movie uses it. It's when the subject is in focus and the background is not. Then the focus ring is turned and the subject switches from the fore ground to your new subject in the background.
Subjects to Shoot. Use one person from your congregation and follow them around a location. For variety have a small group be in some of your shots. The group can be smiling, happy, content, serene, and worshipful. Have them stand, sit, kneel in prayer. Have them raise their hands, lift their eyes up to the heavens. Have them stand in the sun with the sun shining on their face. Vary the shots between the lists above. Also vary between just one person and a small group.
Nature shots are great. Get some big, bold and beautiful nature shots. Use a wide lens or the widest setting on your lens. Bright blue skies with puffy clouds,sun beams, lakes, ponds streams or oceans and mountains (if you can) are all wonderful shots. Focus on tight scenes of nature such as a flower, bug, grass grain, etc. Go into the country and get fields of corn, wheat or barley. Bring your person or group out with you to these locations. Have them stand in a field of grass and worship the Lord. Don't forget about getting city shots and suburb shots. Is there an interesting street you can shoot on to show cars, buildings, stop lights, crowds walking etc. Some streets are unique. They have cobblestone or murals, or other old interesting features. In the suburbs you can get friendly community shots. Get permission to go into a grocery store or some other department store. Go to parks with some families and kids. Get nice shots of kids on playgrounds.
The possibilities are endless. You just need to be open minded and creative. Ask God what to shoot. This is going to be a video during worship after all. What kind of video will honor him and inspire people to come into worship? Thats the kind of motion background you need to make.
For more information on this subject please see my home site of:
http://understandingchurchmedia.com
What is Your Favorite Camera to Shoot With
You might also like
Suzanne Valadon - "The Blue Chamber"Suzanne Valadon was a Fench circus performer, artist's model, waitress and si...
Understanding The Persistence of Memory by Salvador DaliDali's work was prophetic. Scientists still struggle to explain the concept...

 How to Set Up Four Point Lightingon 04/22/2016
 Shooting a Live Eventon 03/16/2016
 3 Ways to Change Your Life by Servingon 04/03/2015
 Family Mission Tripson 04/01/2015

Comments