You do not need to be a nail professional to create this adorable Strawberry Nail Design on your nails. Keep the money in your pocket and do it yourself.

How to create a Strawberry Nail Design
Create this Strawberry Nail Design on your nails in 4 Easy steps following my step by step tutorial.

Creating this Strawberry Nail Design like mine in the photo above is incredibly EASY to do.
It is a perfect nail design choice for Spring and Summer and is a definite attention grabber.
You can create the same design in just 4 EASY steps and I am going to share those with you right here.


What you will need to create your Strawberry Nail Designs
To create your Strawberry Nail design you will need the following:
- Red Nail Polish - I chose a Red Nail Polish for my Strawberry, but you can use Pink, Hot Pink, Wine Red etc... What ever color you have on hand that may be closest to a Strawberry will work just fine. Have fun with it.
- Light Green Nail Polish - I used a Light Green Nail Polish for my leaves, but again use any shade of Green Nail Polish you have on hand. I like the contrast of the lighter green against the red - it really stands out.
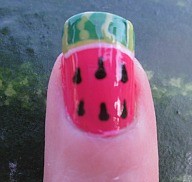
- Yellow Nail Polish - I used the Yellow Nail Polish for my Strawberry Seeds, But I have seen them done in white & black. The Yellow is more realistic and I think when you use black they end up looking more like watermelons to me.
- Nail Dotting Tools - This is what I used to create my Strawberry Leaves, as well as the Strawberry Seeds. You can use a thin nail painting brush, but I find I have more control when using the nail dotting tools - just a matter of preference.
- Clear Top Coat - This will give your nail design a nice shine and also help protect your design and help it last longer.
- Nail Polish Remover and Q-Tips for edge clean up

4 EASY steps to create a Strawberry Nail Design
Step 1: Polish your Nails with your Red Nail Polish - usually 2 coats is best. Let dry.
Step 2: Put some of your Light Green Nail Polish on a disposable plate (just a tiny bit) and dip your Nail Dotting Tool into it and follow around the bottom of your nail. Then pull up to create the peaks (leaves).
Step 3: Using your Yellow Nail Polish and one of the small Nail Dotting Tools create your Strawberry Seeds by dipping into the yellow polish (or put some on a disposable plate as stated above) and dotting on nails. You also want to dot and pull to create a tear drop vs. a round dot.
Step 4: Once your nails are dry add a Clear Top Coat. This will not only give you shine, but it also helps smooth out your nail design, as well as protect it.
Come on now - How EASY is that? Anyone can do it.
Want your Strawberry Nails to sparkle? Add some Glitter Polish. A cute idea would be to just do the Strawberry or just do the Leaves. I am actually gonna add some sparkle to my leaves.
Also I prefer to have my Strawberry Nail Design with the leaves at the bottom of my nails. I do this so when someone is looking at them my Strawberries face them. I have seen them done the other way, but personally I do not like that at all.
So what do you think? Do you see Strawberries on your nails in the near future?
Clean up those edges !!!
Once you are done with your nail design and they are all dry make sure to take the time and clean up around the edges. There is nothing worse than having a cool design and polish all over the sides of your fingers. Clean up is just as important as the design itself.
Personally I love the Q-Tips with the pointed ends - they help clan up those edges without removing half the polish. They are called Nail Tees, but you may also find them under other names.
I also love the Nail Polish Remover Pump Dispensers - this is a convenient way to dispense your nail polish remover and having less waste. Just pump the top and it dispenses a tiny bit out you can use to dip your Q-Tip into.


Take a look at my other Nail Art Pages for even more FUN !!


Updated: 04/10/2012, ThePartyAnimal
You might also like
How to create a Watermelon Nail DesignCreate this SWEET Watermelon Nail Design by following my easy step by step tu...
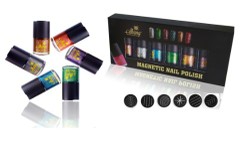
Magnetic Nail Polish - The New Rage in Nail PolishThe hot new trend in nail polish is magnetic nail polish with actual metal fl...
Disclosure: This page generates income for authors based on affiliate relationships with our partners, including Amazon, Google and others.


 How to create a Mike and Sully Nail Designon 06/20/2013
 How to create a Cupcake Nail Designon 04/26/2012
 How to create a Ladybug Nail Designon 03/27/2012
Strawberry Nail Talk right here !!
I love your step by step pictures of how you do your designs. This one looks great for this time of year (early summer -- the strawberries are just coming out in my garden).
I didn't realize you put up some more designs. I love them!
Love the strawberry nail design, very cool
Great for summer. Love it!
These are so cool! Love them!