If you are tired of paying those high prices to have a fun nail design done on your nails - STOP. You can create one yourself and I promise it is not hard to do.

How to create a Watermelon Nail Design
Create this SWEET Watermelon Nail Design by following my easy step by step tutorial.

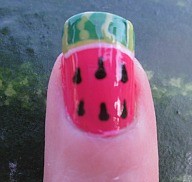
Creating a Watermelon Nail Design like I did in the photo above is easy to do. Having this design on your nails will definitely get you some SWEET comments.
This is a great Summer Nail Design choice.
You can create the same design in just 7 EASY steps and I am going to share those with you right here.
What you will need to create your Watermelon Nail Designs
To create your Watermelon Nail design you will need the following:
- Hot Pink Nail Polish - You can really use any shade of Pink or even Red to create the base of your Watermelon Design. I really liked the Hot Pink because against the green the colors pop.
- White Nail Polish - I used the white to give my watermelon rind a little highlight and it also breaks up the green from the pink.
- Light Green Nail Polish - I used a light green nail polish for part of the watermelon rind as well as creating some veins on my rind.
- Dark Green Nail Polish - The dark green nail polish is also used for the watermelon rind. When choosing your green polishes go with brighter greens and make sure they are not close in color shade - you want them to be a few shades apart from each other to get the effect.
- Black Nail Polish - This is what you will use to create your Watermelon seeds.
- Nail Dotting Tools - These come in very handy when you are creating your Watermelon Seeds on your nails. If you do not have one can you can always use a toothpick to make them.
- Clear Top Coat - This will protect your nail design and also provide you with a nice shine.
- Nail Polish Remover and Q-Tips for edge clean up
Some other items you can use: instead of the Black Nail Polish is to use a Black Nail Art Pen to create the watermelon seeds. Another item you can use to create the watermelon rind are French Manicure Guide Stickers - place these at the tips of your nails and they will get you a perfect line for your watermelon rind with no mess ups. I did mine freehand, but I have a pretty steady hand - for now - lol.


7 EASY steps to create a Watermelon Nail Design
Step 1: Polish your Nails with your Hot Pink Nail Polish - usually 2 coats is best. Let dry.
Step 2: Using the White Nail Polish polish a line across the tip of your nail like shown in the photo. Let dry.
Step 3: Using the Light Green Nail Polish do the same as above, but leave a small line of white uncovered to act as your highlight. Let Dry.
Step 4: Using the Dark Green Nail Polish again do the same as above, but now you are going to leave some of the light green polish uncovered. Let Dry.
Step 5: Using your Nail Dotter and Black Nail Polish add on your Watermelon Spots. All you do is make a dot and lightly pull forward to create your seed. When I use the Nail Dotter I will put a small amount of the nail polish on a disposable plate or paper and then dip the dotter into that. You can also use a Black Nail Art Pen for this.
Step 6: Using your Nail Dotter again, but this time with the Light Green Polish create some lines on the dark green polish as shown in the photo. Do not make them straight - have them squiggle a bit to look like veins in a watermelon rind. Let Dry.
Step 7: After your nails are dry go ahead and add on a Clear Top Coat to protect them and give them shine. This will also smooth out all the layers you applied on your nails.
**For extra fun add some Sparkle with some Glitter Nail Polish - you can even choose just to make the Watermelon Rind sparkle !! **
That is it !! Is that EASY or what?
So what do you think? Do you see Watermelons on your nails in the near future?
Clean up those edges !!!
Once your nails have dried be sure to clean up around the edges. There is nothing worse than cool looking nails and polish all over your fingers. I always get polish all over my fingers when I do a design - I know It cleans up in the end - so no worries.
To help with clean up I love using these Nail Tees Q-Tips - they are similar to Q-Tips, but hand pointed ends. This makes it so much easier to get close to the sides of your nails without removing half your design. I cannot tell you how many times I have done that using a regular Q-Tip.
Another handy item - Nail Polish Remover Pump Dispensers with a push on the pump they will dispense the remover in small amounts and in the end save you from wasting a bunch.


Take a look at my other Nail Art Pages for even more FUN !!


Updated: 06/20/2013, ThePartyAnimal
You might also like
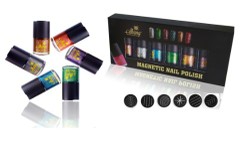
Magnetic Nail Polish - The New Rage in Nail PolishThe hot new trend in nail polish is magnetic nail polish with actual metal fl...
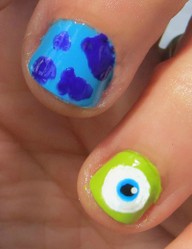
How to create a Mike and Sully Nail DesignCreate this FUN Simple Mike and Sully Nail Design by following my easy step b...
Disclosure: This page generates income for authors based on affiliate relationships with our partners, including Amazon, Google and others.

 How to create a Mike and Sully Nail Designon 06/20/2013
 How to create a Cupcake Nail Designon 04/26/2012
 How to create a Ladybug Nail Designon 03/27/2012
Watermelon Nail Talk right here !!
This is SO cute! And you make it looks so easy! Thanks for sharing!
This nail design is cute and fresh like a watermelon. Just perfect for hot summer days on the beach. With a slice of cold watermelon, of course:)
This is a very interesting design...I never would have thought of that. My daughter would love them! Thumbs up! I will be sharing this one on Facebook.
This design is adorable and your photographs are fantastic! Thanks for your article and lovely pictures.
Your nails are so cute! I think I might have to give this a try. Thanks for the tips!
I love it and my watermelon loving daughters who also love nail art will be loving this. Hmmm you have a lot of tutorials on nail designs. I'm thrilled to have found these. I love painting my toe nails in creative designs. Great nail art, so cool I now have my go to summer nail designs.
This is so cute! But as one who grew up playing piano I cannot stand having nails that extend beyond my fingers. So I guess I'll just have to marvel at other women's nails.
I love this! It would look great on the toenails also.
I love the design, perfect for the summer.