How to Make Beeswax Candles for Fun and Gifting

by belinda342

Beeswax candle making can be a fun craft for the whole family. And the resulting candles make great gifts too!

There are two main ways to make a beeswax candle. You can simply roll a beeswax sheet up around a wick, or you can melt a chunk of refined beeswax and pour it into a container. Of course there are a few steps to follow for each alternative. But don’t worry, we’ll walk you through both ways.

We’ll even show you where you can get all the supplies you need for your new found hobby. There are a lot of products out there that really do make this a great crafting option. Whether you are looking to make just a few candles for yourself, or make a bunch for a special occasion (wedding candles, anyone?), you’ll find everything you need right here.

Including, of course, instructions.

Image Credit: 100% Beeswax 2-hour Candles Hand Made - 7 3/4" Tall (Pack of 12)

Why Beeswax?

There are many reasons to choose beeswax as the base for your candle making. The first being the fact that—well, it’s made by bees! I mean, how cool is that? If you are making tapers, and using sheets of wax, then you just can’t beat the elegant look of all those precise little hexagonal rows.

Then there is the fact that it is absolutely the most elegant type of wax to be found. Natural and pure. This makes this type of candle very popular with churches.

And, oh, when they burn! No other candle can top that awesome golden glow that you get with beeswax. Plus, you get an added bonus of a very gentle and wafting scent of honey.

Last but not least, this type of wax burns very slowly, so your candles will last much longer!

How to Make Rolled Beeswax Candles

This is by far the simplest way to make a candle from beeswax. There is no melting of wax, so even young children can safely join in the fun.

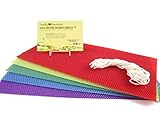
And you’ll only need three items to make your candle: 1. A sheet of beeswax, 2. A primed wick a little longer than the candle you are making, and 3. A sharp knife.

Your first step is to lay out the sheet of wax onto a surface that you can cut on. (A cutting board works great!)

Once you have your sheet all flattened out, measure your wick and cut it to the size you will need. You will want to leave an inch or so on either end.

Lay out your trimmed wick on the edge of the sheet and turn up about 1/8 of an inch of wax to cover the wick. (If you have trouble turning it up, try folding it over the edge of the cutting board.) Press both layers of wax together to create a sealed channel for your wick.

Now for the fun part! You simply roll up your candle.  Go slow and gentle, and don’t press too hard or you’ll lose some of that great honeycomb accent look. As you roll, make sure that your edges stay even. If you are finding the sheet too stiff to roll easily, simply warm it with a blow dryer. Just remember, a little warmth goes a long way in making the wax more pliable.

Once your candle is all rolled up, gently press the last edge into the candle proper.

Now take a look at the candle you’ve just made. Which end looks the nicest? Make that end the top and trim the wick to about ½ inch. Trim the wick on the other end completely flat with the bottom of the candle.

That’s it. Your candle is ready to light and enjoy!

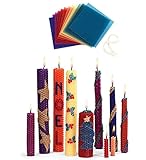
Want to make the process even more fun? Check out the great Beeswax Candle Making kits on Amazon!

Want to See a Candle Rolled?

Here is a short YouTube Video

How to Make Poured Beeswax Candles

The Preliminaries

If you have ever made a poured candle before, then really there isn’t much difference in making one from beeswax. That being said, there are a couple of things to bear in mind before we give you the step-by-step instructions.

First, this type of wax, in its pure form burns very hot. So hot, in fact, that it can crack a glass container. If you happen to be planning to pour your melted wax into glass jars, that isn’t a good thing!

But luckily there is a way to tame a bit of that heat—and even stretch out that wax a little too. Simply mix about 2/3 of a cup of Coconut or Palm Oil to every pound of beeswax that you use.

Secondly, because this wax burns so slow, you might need a bit thicker wick. And the bigger the container that you are pouring the wax into, to thicker the wick needs to be. For a 4 inch jar, you will probably want a size 8 wick. A votive sized candle would use about a size 3 wick.


Poured Candles: Step By Step

Now the instructions.  Gather together your block of wax, wick and container.  You will also need a double boiler (or a large pot and a smaller pot within), a cooking thermometer, and a couple of pencils.

1)      Get your containers ready. Measure and cut your wick about 2 inches longer than your container. Tie the end of the wick around the center of a pencil and place the pencil across the top of the jar with the wick hanging into the center of the container.

2)      Melt the wax in a double boiler over low heat. Once the wax is totally melted, add the oil and gently mix it together. Heat the combined wax and oil to around 160F.

3)      Pour a small amount of wax in the bottom of the container, enough to coat the bottom. Make sure to get your wick coated with wax as well. Now with the end of the other pencil, push the dangling end of the wick into the wax in the bottom of the jar. Hold the wick tight and straight for a moment while the wax dries. It shouldn’t take long at all.

4)      Now simply pour the rest of your wax into the container. Allow your candle to set for at least 24 hours, then trim your wick to around a quarter inch. Wait another 24 hours or longer before burning.

Of course, just like with rolled candle options, you can purchase a complete kit with everything you need to start making great poured beeswax candles!

In Closing

These are so much fun to create, and they make great gifts too. To make them extra special, simply tie a colorful ribbon around the candle and add a fun and meaningful charm! Want an even nicer gift? Tie up a bundle of these handmade candles!

Now that you know how to make beeswax candles, what are you waiting for? Get some supplies from Amazon and start crafting!

Updated: 05/09/2013, belinda342
 
Thank you! Would you like to post a comment now?
7

Do You Make Candles?

Only logged-in users are allowed to comment. Login
fanfreluche on 06/16/2013

Nope but I'd like too. Looks rather fun and I am sure my son would like to help me. I need to put this on the "to try" list. The Rolled Beeswax Candles are neat

belinda342 on 05/24/2013

My daughter in law was actually the Indiana HoneyBee Queen a few years back. I'm thinking one of these kits would make a great Christmas present. She's nuts about anything honey or bee related!

sheilamarie on 05/24/2013

Beeswax smells so nice! They would be great to make.

belinda342 on 05/22/2013

It's a great non-messy craft for kids, and I really do love the resulting candles too.

katiem2 on 05/21/2013

I enjoy candles and can imagine this being a great activity to share with my kids.

belinda342 on 05/11/2013

It's a great way to let kids craft something to give as gifts--that people will actually want to receive! And a great way to spend quality time with the family.

pkmcr on 05/11/2013

We used to make candles and it is something we really need to get back into.

belinda342 on 05/10/2013

I love that sweet honey smell, too. It's not the over powering scent of most "scented" candles.

PeggyHazelwood on 05/10/2013

We made the rolled beeswax candles once as a kid. Love the smell!

belinda342 on 05/10/2013

It's been too long for me too. I really love the rolled candles. No chance of getting burnt and no mess either!


You might also like

16 Candle-making Supplies and Equipments to Make Candles

Candle-making is a fun craft to do. Do you want to make candles? Get to know ...

5 Reasons to Buy an Electric Tart Warmer

Electric tart warmers are an excellent alternative to using candles. Not onl...


Disclosure: This page generates income for authors based on affiliate relationships with our partners, including Amazon, Google and others.
Loading ...
Error!