I’ve been doing some research on container gardening since I’ve moved back to Texas. The approach to gardening down here is somewhat different than in the Northeast. Heat and water are the main issues
I don’t have a yard to put a garden in, but I do have a little space for some containers. A little fresh lettuce or herbs are always welcome. I did grow a couple of tomato plants in pots last summer and they did produce tomatoes - all of four. Now I’ve got garlic started outside and some lettuce in a pot inside.
In my research on Texas gardening. I discovered some nifty ideas. One was vertical gardening. Another idea was self-watering containers. That might really be a misnomer. You still have to put water in the plant, but it goes into a reservoir in the bottom of the pot. The plant can wick up as much water as it needs so you don’t over water. You don’t have to water as often either.

Make a Free Self Watering Flower Pot
by Ragtimelil
How to make a free and easy container that holds water for your plants.
More on Gardening
Free Seed Starter pots from a Cardboard Tube
Easy and green
Experiments with Mini vertical container gardening
My mini garden
First, Get a Bottle
Most of the instructions I read said to use a two-liter soda bottle. I don’t drink sodas but I do drink juice. So I used a quart juice bottle.The beauty of this design is that you can reuse and recycle whatever you have laying around or can scrounge. The juice bottle looks like it’s working just fine although the soil compartment is rather shallow because of the shape of the bottle. A two-liter soda bottle might actually have more soil space.
To make a self watering pot, I remove the label and then drill holes in the cap and around the neck of the bottle. This is for the wicking action between the water and the soil.
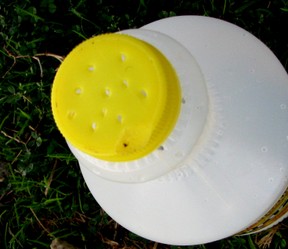
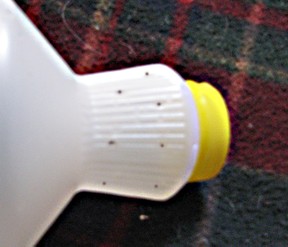
Cut to Fit
Then I cut off the top of the bottle, about where the top of the label was. This bottle has some curves that make it more difficult to fit into the bottom of the bottle. I just cut some slots around the edge so it will slide in easier. I also made one larger hole for a tube or straw to fit through. This will be your refill tube.
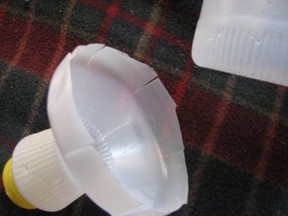
Watering Tube
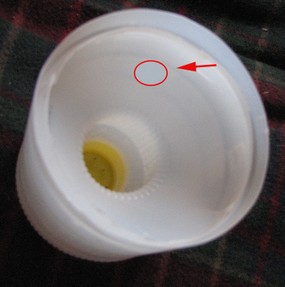
The refill tube can be as simple as a straw from a restaurant or take out. I didn’t have any straws on hand so I used a piece of left over plastic tube that I had lying around. The hole had to be a bit bigger to accommodate the thicker tube.It's a good idea to cut a notch in your tube or cut the bottom at an angle so that it can't create a vacuum against the bottom of the water reservoir.
The top of the tube will stick up next to your plant and you can use a funnel (even a homemade plastic one) to pour water into the reservoir
Plant Your Plant
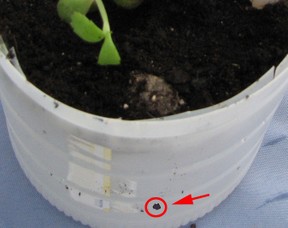
Now add a little soil. Be sure you get soil down in the neck of the inverted bottle top. Top up and add your plant. It’s a good idea to punch another hole on the outside bottle about an inch or so up from the bottom to serve as an overflow. That way water will not accumulate and reach the level of the plant roots.
Off and Growing
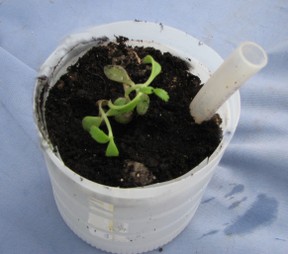
Now your plants are ready to go. I recommend that you still pour water on top of the soil until the roots get established. After that, just funnel water into the reservoir. The soil will wick up the water and your plant will drink what it needs. Your plant should be happy and healthy.
The next time I go grocery shopping,. I'll get something in a two-liter bottle and make another one in that. I'll be running a comparison test. I'll report back once it's done.
You might also like
Growing Plants in Straw BalesThose who want to garden in small and constrained spaces with hard surfaces c...
Experiments with Mini Vertical Container GardeningI have moved into a space that doesn't allow for a garden. I was determined t...


 How I Found My Free Family History Programon 09/05/2013
 Finding a Graveon 09/01/2013
 Do Border Collies Make Good Pets?on 08/11/2013
 Hubert Patey - an Indentured Servanton 08/02/2013

Comments and Tips
Yes, I've been overenthusiastic once or twice myself. I have an article in the works about using plastic bottles (waiting for some plants to grow....)
Thanks. This mini gardener loves it too. Next, a bottle tower...;-))
Nice idea, this gardener likes it. Always up for anything to reduce reuse recycle :)K