Tips When Modifying Or Customizing A Google Blogger Blog Template

by CeresSchwarz

Looking to modify and / or customize your Google Blogger Blog template but not exactly an expert at this? Here are some tips to keep in mind to help you be successful with this.

Have you experienced finding a nice acceptable theme that you want for your Google Blogger blog? However, before you can fully make use of this theme, you still want to make a number of changes to it, in order to fully make it perfectly suitable for your blog. For the experts on blog customization and modification, this is no problem to them at all and they might even opt to just make their own theme from scratch.

But those who are new to blogging and those who aren't adept at tinkering with HTML and CSS and all the other things required to edit a blog template would surely have a hard time ahead of them as they face this seemingly daunting and complicated task. As such, it would surely be very helpful and useful for one to take note of these tips to keep in mind when one is attempting and trying to modify a Blogger template.

Tips when modifying and / or customizing a Google Blogger Blog Template / Theme

Google Blogger Templates

Have you found the perfect blog theme for you?

You can easily find a wide variety of Google Blogger themes just by doing a simple search.

The great thing about this is that you have so many choices to choose from.

Some would surely be able to find the right theme for them, the one that they consider perfect for their blog and which would require no more further changes.

However, it's inevitable that there would be those who are unable to find the perfect blog template for them. Some might be able to find something that they merely consider acceptable.

But they would still want to make changes to said theme so that it would really fit their preferences and blogging needs.  

If you have the means to do so, you can always just get someone to modify your blog theme for you so you won't have to do it yourself.

This would certainly be a much more preferable option especially for those that have no idea where to even start editing their template. But if you don't have the means to do so or if you can't find anyone to do it for you, then you would either have to customize your blog template by yourself or just make use of the free theme that you found as it is.

Blog Customization

Do you really want to modify your Blogger template?

Beginners and those who aren't experts at blog customization should really think things through first before deciding to tinker with their Blogger theme.

You should be sure that you really want to edit your template. Why?

It's because this will require a lot of work and research, depending on how much you know and how much you want to change as well as what kind of changes you wish to make on your blog theme.

Are you sure you want to customize your blog template?

Ad

Blog customization can also take a lot of time. If you decide to give up halfway through, you would just end up wasting a lot of your time when you could have made use of that time doing more productive things such as publishing more content for your blog.

But if you are really determined to modify your blog template, then here are a few tips to keep in mind to help you be more successful at this endeavor. These are just some of the things that I've noticed, observed and learned in my quest to modify and customize my own Blogger template.

Save & Backup Your Template

Always save and never forget to backup your blog theme or you might end up regretting things

This just might be one of the more important tips when you want to customize your blog. It is very, very important to backup your theme before you start making any changes to it. Save a copy of it in your PC and in an external hard drive or USB.

Google Blogger makes it very easy to backup your blog template and save a copy of it. This is very helpful because, if you end up making a mistake in the process of editing your theme, you can easily roll back those unwanted changes by uploading your previously-saved template.

Furthermore, it's good to make the habit of backing up your template every time you succeed in making changes to it. For example, if you successfully managed to change the font color of your post title header, you should backup your template before attempting to make any more changes to it.

In this way, if the next changes you make causes something to go wrong or causes an error, you can just roll back to your previous theme. Since you've already saved the successful changes you made to it, you don't need to try and figure out how you managed to make those changes all over again. This just helps save you the trouble of having more work to do.

Hide HTML Codes

Instead of deleting codes from your blog template, just hide them

There may be HTML codes in your Blogger template that you don't need or want anymore. These unwanted codes are usually deleted. 

For example, your blog theme has another menu, which includes drop-down lists but you don't want these in your blog.

Rather than deleting the codes for the drop-down list menu, you can just opt to hide these instead.

Do this for the other HTML codes that you don't want in your blog.

In this way, if you ever have the need to make use of these particular codes or if you ever decide that you do want these codes after all, you don't have to worry about looking for these codes all over again.

HTML Code Mug

You'll see HTML codes similar to this in your Google Blogger blog. Instead of deleting an unwanted code, hide it. To hide said code, all you need to do is make use of <!-- and -->
Ad

Since they're still on your blog and are merely hidden, all you would need to do is just remove the hide code. After that, you're now free to make use of these codes again and you would have saved yourself the trouble of having to locate these codes or work out how to add these codes to your blog.

Hiding codes mean they would not be visible on your blog so you don't have to worry about them being seen. On Blogger, you can easily hide codes by adding this <!-- to the beginning of the code you want to hide and this --> at the end of your hidden codes. This will turn those lines of code into a brown color. If you want to make the hidden codes visible again, just remove both <!-- and -->.

Google Blogger Template Designer

Make use of this tool to help you in modifying your blog theme

Don't forget about the Google Blogger Template Designer because this is really one useful and helpful tool.

This really aids you in making things easier for you in trying to customize your blog theme. 

With this feature of Blogger, you can easily change the fonts in your blog and even its layout and backgrounds all without you having to tinker with the HTML codes.

You just need to choose the colors and font types that you like.

However, note that this designer is unfortunately not applicable for all templates.

Be sure to check if your theme is compatible with the Template Designer.

Choose Your Background

If the Google Blogger Template Designer is actually applicable or if it works with your chosen blog theme or template, then be sure to take advantage of this because it allows you to easily do a variety of things including changing backgrounds and layouts
Ad

In some cases, some parts of it may be compatible while other parts of it may not be applicable. If your chosen blog theme is indeed compatible with the designer, then take advantage of such an opportunity and don't waste it. Make use of the designer to help you.

Label HTML Codes

Easily identify what each code does by labeling them

Some codes may look very complicated to you that it can seem like it was written in another language.

Add labels to your visible and hidden codes to help you easily identify exactly what each set of codes do

A lot of codes certainly aren't exactly easy to understand, interpret and decipher. You might be looking at a code and have absolutely no idea what it does until you start tinkering with it and making changes to it.

Once you know what a code does or for which particular part of your blog said code pertains to, you could add labels to them in order to help you identify these codes. Even hidden codes could use a label or two so you know why you decided to hide those codes as well as what each code does when you come across them again.

For example, you decided that you don't want a drop down menu list on your blog so you hid the code for this. If you didn't add a label identifying what this particular code does, you might find yourself confused when you see this code in your blog. You would wonder why you hid this code and what this code is for.

You can also make use of labeling to identify codes that aren't hidden.

This helps to make things easier for you in case you need to make changes to your blog again.

For example, you want to change the color of your post title. You find the code that does this and successfully change said code.

Should you feel the need to change your post title color again, you would need to find this code again. 

If you labeled this code, you won't have to waste your time going through your template's HTML just trying to find this particular code.

To label your code, you can use the same code you use for hiding codes: <!-- and -->.

Search / Find What You Seek

If you labeled your codes, then you can easily search for them and find them whenever you need them
Ad

This will ensure that the text you entered will be hidden and not visible on your blog but you can still see it on your template's HTML. For example, you can put something like "<!-- this code changes the font color of the footer columns -->".

The Preview Button

Preview first before saving any changes you made to your blog

When you edit your template on Blogger, you can see a preview button alongside the save button and the other buttons. Be sure to make use of the preview button first before saving any changes that you made to your theme.

By previewing your theme first, you can see if the changes that you made to the HTML did what you wanted it to do. If you see that things went wrong or that you made a mistake, you won't have to worry about this ruining your template because you haven't saved those changes at all.

However, do note that when you use the preview button, you can only see the home page of your blog. You can't see any of the other pages that you have such as your posts or your contact us page and the like. As such, if you made changes to all those other pages, you would have to save your template in order to see those changes.

In this case, you can change a few things at a time so you can easily pinpoint the problem should any mistake occur and, as aforementioned above, it's always a good idea to backup your template before making any changes to it.

View Source Code

Check out the codes of your blog

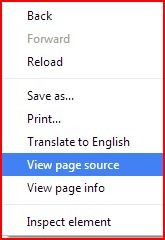
Right-click on a web page and one of the options you'll see is "view page source".

If you select this, a page will open, which shows the source code of the page in question.

This is yet another way of viewing the HTML and CSS codes of a page. However, this also shows the particular codes of that page including the text content, which you normally won't see in the HTML of your blog theme.

For example, if you view the page source of, say, the about page of your blog, you can also see the text that appears in said about page.

View Page Source

Just right-click on your blog page and select the "view page source" option
Right-click to see view page source

The source code can be very helpful for a number of reasons. One, it includes the text so if you're looking for something specific, you can find out where it is by using the source code. For example, you're looking for the class that pertains to the post header in order to find out where it's being called and what you can use to change the colors of said header. Looking at the source code and using the find feature of your browser will help you locate what you're seeking.

The Page Source

This is part of what you'll see if you check out the source code of your blog page
Part of the Page Source of a Google Blogger Blog Template

You can also view the source code of other pages to get an idea on how to do things or to better understand how things work on a particular site and how you can try to do the same for your own blog. For example, you like the floating social media icons and you want one of your own so you try to find out how this can be done.

Unique IDs

IDs in your blog's HTML template must always be unique

In Blogger, you cannot have two IDs in your HTML theme code.

If the ID's in your blog theme are not unique or if they have the exact same name, then you will get an error and you won't be able to save any changes that you make to your template. To fix this, you need to make the ID's different from each other.

If you make changes to your blog and you happen to have two IDs with the same name, you won't even be able to preview your theme because you will get an error. It's easy enough to fix this error because all you have to do is make the IDs different from each other.

Even just adding a number at the end of the ID name will already make it different enough that you won't get the error anymore. This is great because it means you don't have to make such significant changes to the IDs. These IDs can be a good way to help you identify what the code it pertains to does.

For example, you happen to have two widgets with the ID ContactForm1. The ID ContactForm1 would most likely refer to the contact us form gadget of Blogger. If you add a number, say 1, at the end of one of these IDs so that it becomes ContactForm11, this will be considered different enough from ContactForm1 so you won't be getting the error anymore and you can now view your template.

Tags Source Code Page

Searching for the theme's tags, we find that the class post-labels is the one that pertains to these tags
Google Blogger Blog - Part of the theme's source code pertaining to the class used for the tags of the template

Code in <Style>

Use this to help you with things like font sizes, types, colors, etc

Use the code <style> and </style> to tinker with such things as fonts and the like on your blog template.

With this, you can set the font color (among other things) that you want for your post title while setting a different color for your post content. You can decide on whether you want text to be bold, italicized or underlined.

Some <Style> Codes

In this image, .post-labels pertains to the tags of the blog so make use of this to change the appearance of said tags
Google Blogger Blog - Part of the HTML codes that appear in the <style> </style> section of the template

You can even set the color of the links in your blog as well as what happens when you hover your mouse on said link and what color you want the link to turn to once it's been visited.

To do these sorts of things, one of the things that you need is the class of the part of your blog which you want to change.

For example, you want to make changes to the tags in your blog. In order to do this, you will have to find the class that pertains to the tags codes in your blog.

You can make use of the source code of your template to find the instances when the tags appear in your blog.

Once you find the class that you need, you just add it to the <style> part of your theme's HTML alongside the other appropriate codes that you need, which depends on what you want to do.

To illustrate, look at the image shown above. In this instance, the class for the tags of the blog is post-labels. To set the color of the tags, a color code is added.

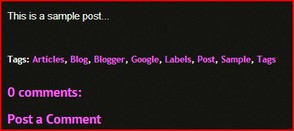
Tags Link Color

By adding your chosen color code to post-labels in <style>, you can change the color of your tags
Google Blogger Blog - Part of a post showing the tags and their link color

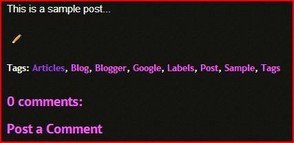
Tags Hover Color

If you hover your mouse on a tag, it will change color depending on what color you inputted in the <style> code
Google Blogger Blog - Part of a post showing the tags and their link and hover colors

The a:link code is added to post-labels alongside the chosen color code in order to set the color of the tags links. The a:hover code sets the color of the tags when you hover your mouse on it.

Trial & Error

Do not give up

You would surely find yourself making use of the concept of trial and error with regards to customizing your blog especially if you have no idea what you're doing.

Sometimes, it's inevitable that whatever code you're trying just wouldn't or doesn't seem to want to work with your theme.

You would try to look for other codes or try to figure out what you're doing wrong.

At these times, it can seem tempting to give up especially if you seem to keep facing error after error.

Good Advice

Ad

But don't give up. You just have to keep trying and trying until you succeed. The important thing is not to give up even if you get errors and make mistakes. Believe in yourself and believe that you can do it.

It might take time but, surely, you'll be able to finish customizing and modifying your blog until you're finally ready to start adding content to it and making it visible to search engines and to potential readers.

Conclusion

These are just some of the tips to keep in mind and take into consideration when you're planning to modify and customize your Google Blogger blog template. 

This is especially for those that are just beginners or are new to this and aren't exactly sure what they're doing.

While editing a blog theme might be difficult and complicated for some people, it's important to remember never to give up.

If you're really determined and if this is really what you want, just keep trying and you'll surely succeed in being able to modify your blog to your liking.

Have you successfully modified / customized your Google Blogger Blog Template?

  Display results
Thank you for voting.

Image Sources:

  • The 'tips when modifying or customizing a Google Blogger blog template' image above was modified by Ceres Schwarz, CC:BY-SA
  • The original, unedited image is by Cpro, CC:BY-SA, via Wikimedia Commons
  • The rest of the images in this article are print screen by Ceres of the free Google Blogger blog of Ceres

More articles about the Google Blogger blogging platform

The free Google Blogger blog is a great blogging platform but it's not without its imperfections and flaws. What are some of the things that one might dislike about said platform?
Many would suggest that beginners to blogging should try making use of Google Blogger as their blog platform because of how easy & simple it is to use. But is this really the case?
The methods you found explaining how to add Chitika ads to your Google Blogger blog not working for you? Yeah, that happened to me too. Maybe this one can help. It did work for me.
Updated: 06/30/2016, CeresSchwarz
 
Thank you! Would you like to post a comment now?
1

Comments

Only logged-in users are allowed to comment. Login

You might also like

What To Consider When Starting A New Web Site & / Or Blog

If you're brand new to beginning a web site or blog, things can get overwhelm...

Why Weebly (The Free Version) May Not Be The Best Web Site Bui...

If you're planning or thinking about using Weebly to create your free web sit...


Disclosure: This page generates income for authors based on affiliate relationships with our partners, including Amazon, Google and others.
Loading ...
Error!